Installing OpenShift Origin in a Home Lab
We are going to demonstrate how quickly get us up and running with a “lightweight” OpenShift Origin environment in a virtual home lab.
Origin is the upstream community project that powers OpenShift. Built around a core of Docker container packaging and Kubernetes container cluster management. OpenShift Origin is a distribution of Kubernetes optimized for continuous application development and multi-tenant deployment. (source: www.openshift.org)
Let’s have a look at our virtual infrastructure of this project:
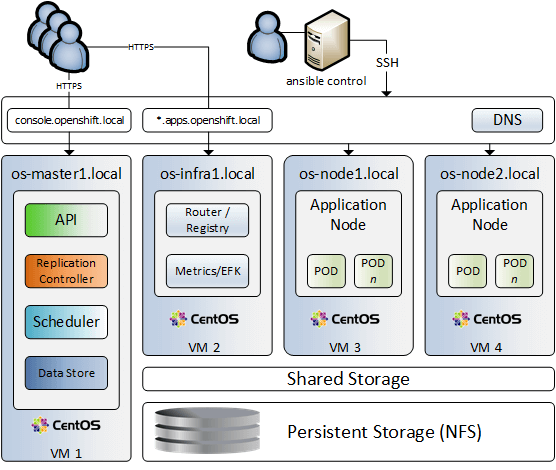
OpenShift Origin Topology
Virtual infra: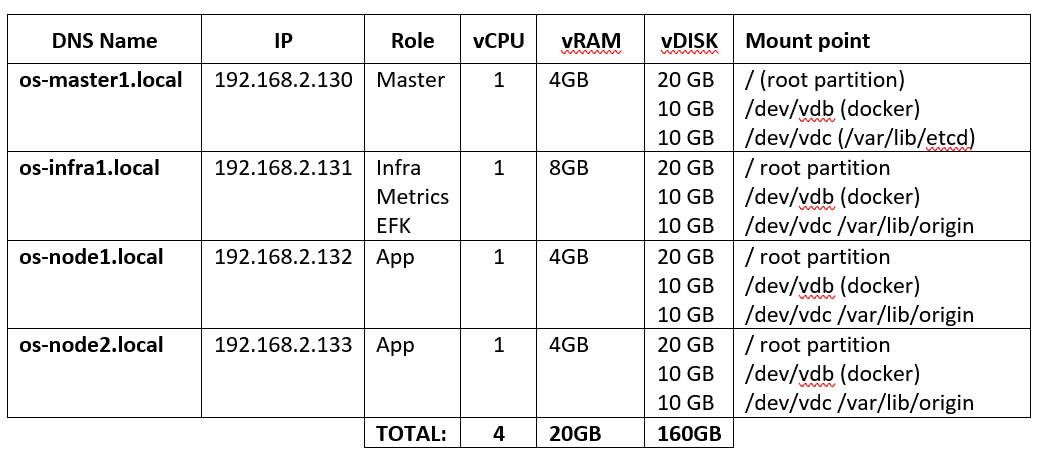 Our virtual infrastructure has 4 virtual machines. Point out that each machine has 3 virtual disks attached. In addition, we are running DNS server, NFS storage and Ansible control server. Our DNS server is configured to resolve to all hostnames and IPs including console.openshift.local domain and wildcard for *.apps.openshift.local. We will be running installation scripts from ansible host, using openshift ansible playbooks. It can be a laptop or any other workstation that has access to all virtual servers. Point out that os-infra1 node has 8GB of RAM, this is because we intend to run logging, metrics and EFK on that node.
Step 1. Create the CentOS 7 base image.
Download CentOS minimal ISO image here, create a new VM and install OS in a virtual machine. Make sure you have a new user created with admin rights, hostname set as os-master1 and fixed IP address. Once the installation is complete, login (SSH) into the new VM, install updates and common to all nodes packages. This way we ensure that all nodes have the same setup after cloning.
sudo yum -y update;

yum install -y wget git perl net-tools docker-1.13.1 bind-utils iptables-services bridge-utils openssl-devel bash-completion kexec-tools sos psacct python-cryptography python2-pip python-devel python-passlib java-1.8.0-openjdk-headless "@Development Tools"
Edit network interface configuration file /etc/sysconfig/network-scripts/ifcfg-eth0 and remove the lines having HWADDR and UUID, also make sure that ONBOOT=”yes”
# sudo vi /etc/sysconfig/network-scripts/ifcfg-eth0

TYPE="Ethernet"
PROXY_METHOD="none"
BROWSER_ONLY="no"
BOOTPROTO="none"
DEFROUTE="yes"
IPV4_FAILURE_FATAL="no"
IPV6INIT="no"
IPV6_AUTOCONF="yes"
IPV6_DEFROUTE="yes"
IPV6_FAILURE_FATAL="no"
IPV6_ADDR_GEN_MODE="stable-privacy"
NAME="eth0"
DEVICE="eth0"
ONBOOT="yes"
IPADDR="192.168.2.130"
PREFIX="24"
GATEWAY="192.168.2.1"
DNS1="192.168.2.20"
DOMAIN="local"
On ansible control server generate ssh key pair and copy a public key over to os-master1
$ ssh-keygen -t RSA

$ ssh-copy-id root@os-master1
...
root@os-master1's password:

Number of key(s) added: 1

Now try logging into the machine, with: "ssh 'root@os-master1'"
and check to make sure that only the key(s) you wanted were added.

$ ssh root@os-master1
Last login: Fri Jun 11 11:33:21 2022 from 192.168.2.121
[root@os-master1 ~]# logout
Connection to os-master1 closed.
Step 2: Docker Storage Setup (os-master1).
We provisioned all of our virtual machines with docker volumes attached as /dev/vdb. We’ll now install and configure docker to use that volume for all local docker storage.
On os-master1 server:
$ sudo cat <<EOF > /etc/sysconfig/docker-storage-setup
DEVS=/dev/vdb
VG=docker-vg
EOF

$ sudo docker-storage-setup

## Check results
$ lsblk

$ sudo shutdown -h now
We are ready to clone our master VM to 3 new vms (os-infra1 & os-node1/2)
Once new VMs have been created start one at a time and configure it according to your virtual infra design (our example is in a table above).
1. Update IP address accordingly (/etc/sysconfig/network-scripts/ifcfg-eth0)
2. Change hostname:
$ sudo /etc/sysconfig/network-scripts/ifcfg-eth0

$ sudo hostnamectl set-hostname os-infra1

$ sudo reboot
Repeat above two steps on os-node1, os-node2 and finally power on os-master1.
DNS: All of the hosts in the cluster need to be resolvable via DNS.
On ansible control server test DNS for all 4 vms:
nslookup os-master1
Server: 192.168.2.22
Address: 192.168.2.22#53

Name: os-master1.local
Address: 192.168.2.130
Step 3: Download the OpenShift ansible playbooks.
On ansible control server make sure that the following packages are installed:
“python-passlib” & “apache2-utils”
Clone openshift-ansible:
$ git clone https://github.com/openshift/openshift-ansible.git
$ cd openshift-ansible
$ git checkout release-3.9
Next we need to create an inventory file where we define target hosts and OpenShift installation strategy. We call this file openshift_inventory and it looks like this:
openshift_inventory:
[OSEv3:children]
masters
etcd
nodes

[OSEv3:vars]
## Ansible user who can login to all nodes through SSH (e.g. ssh root@os-master1)
ansible_user=root

## Deployment type: "openshift-enterprise" or "origin"
openshift_deployment_type=origin
deployment_type=origin

## Specifies the major version
openshift_release=v3.9
openshift_pkg_version=-3.9.0
openshift_image_tag=v3.9.0
openshift_service_catalog_image_version=v3.9.0
template_service_broker_image_version=v3.9.0
openshift_metrics_image_version="v3.9"
openshift_logging_image_version="v3.9"
openshift_logging_elasticsearch_proxy_image_version="v1.0.0"
osm_use_cockpit=true
openshift_metrics_install_metrics=True
openshift_logging_install_logging=True


## Service address space,  /16 = 65,534 IPs
openshift_portal_net=172.30.0.0/16

## Pod address space
osm_cluster_network_cidr=10.128.0.0/14

## Subnet Length of each node, 9 = 510 IPs
osm_host_subnet_length=9

## Master API  port
openshift_master_api_port=443

## Master console port  (e.g. https://console.openshift.local:443)
openshift_master_console_port=443

## Clustering method
openshift_master_cluster_method=native

## Hostname used by nodes and other cluster internals
openshift_master_cluster_hostname=console-int.openshift.local

## Hostname used by platform users
openshift_master_cluster_public_hostname=console.openshift.local

## Application wildcard subdomain
openshift_master_default_subdomain=apps.openshift.local

## identity provider
openshift_master_identity_providers=[{'name': 'htpasswd_auth', 'login': 'true', 'challenge': 'true', 'kind': 'HTPasswdPasswordIdentityProvider', 'filename': '/etc/origin/master/htpasswd'}]

## Users being created in the cluster
openshift_master_htpasswd_users={'admin': '$apr1$Y7xqqalc$Mhtfi2EH5cwY6bLaFJWfm0', 'user1': '$apr1$HYdB7Vye$J9GFboUG/TIG3IYl0c4LV0'}

## Persistent storage, NFS
openshift_hosted_registry_storage_kind=nfs
openshift_hosted_registry_storage_access_modes=['ReadWriteMany']
openshift_hosted_registry_storage_host=zion.local
openshift_hosted_registry_storage_nfs_directory=/volume1/SHARED
openshift_hosted_registry_storage_volume_name=registry
openshift_hosted_registry_storage_volume_size=50Gi


## Other vars
containerized=True
os_sdn_network_plugin_name='redhat/openshift-ovs-multitenant'
openshift_disable_check=disk_availability,docker_storage,memory_availability,docker_image_availability

#NFS check bug
openshift_enable_unsupported_configurations=True
#Another Bug 1569476
skip_sanity_checks=true

openshift_node_kubelet_args="{'eviction-hard': ['memory.available<100Mi'], 'minimum-container-ttl-duration': ['10s'], 'maximum-dead-containers-per-container': ['2'], 'maximum-dead-containers': ['5'], 'pods-per-core': ['10'], 'max-pods': ['25'], 'image-gc-high-threshold': ['80'], 'image-gc-low-threshold': ['60']}"

[OSEv3:vars]

[masters]
os-master1.local

[etcd]
os-master1.local

[nodes]
os-master1.local openshift_node_labels="{'region': 'master'}"
os-infra1.local openshift_node_labels="{'region': 'infra'}"
os-node1.local openshift_node_labels="{'region': 'primary'}"
os-node2.local openshift_node_labels="{'region': 'primary'}"
Authentication setup for OpenShift Origin users:
$ htpasswd -nb admin secret-password
admin:$apr1$6CZ4noKr$IksMFMgsW5e5FL0ioBhkk/

$ htpasswd -nb user1 secret-password
user1:$apr1$AvisAPTG$xrVnJ/J0a83hAYlZcxHVf1
Add those values into your inventory file; openshift_master_htpasswd_users.
On ansible control host test connectivity to all target hosts
$ ansible -i openshift_inventory OSEv3 -m ping
os-node1.local | SUCCESS => {
"changed": false,
"ping": "pong"
}
os-infra1.local | SUCCESS => {
"changed": false,
"ping": "pong"
}
os-node2.local | SUCCESS => {
"changed": false,
"ping": "pong"
}
os-master1.local | SUCCESS => {
"changed": false,
"ping": "pong"
}
Step 4: Configuring etcd and origin storage on virtual servers.
Similar to Docker storage we created our virtual machines with an extra virtual disk /dev/vdc to be used for /var/lib/etcd (on master) and /var/lib/origin (on infra and nodes).
Let’s use ansible to set up volumes:
ansible -i openshift_inventory etcd -a 'yum -y install lvm2'
ansible -i openshift_inventory etcd -a 'pvcreate /dev/vdc'
ansible -i openshift_inventory etcd -a 'vgcreate etcd-vg /dev/vdc'
ansible -i openshift_inventory etcd -a 'lvcreate -n etcd-lv -l 100%VG etcd-vg'
ansible -i openshift_inventory etcd -a 'mkfs.xfs /dev/mapper/etcd--vg-etcd--lv'
ansible -i openshift_inventory etcd -m shell -a 'mkdir /var/lib/etcd'
ansible -i openshift_inventory etcd -m lineinfile -a 'path=/etc/fstab regexp=etcd line="/dev/mapper/etcd--vg-etcd--lv /var/lib/etcd xfs defaults 0 0"'
ansible -i openshift_inventory etcd -m shell -a 'mount -a'
ansible -i openshift_inventory nodes:\!etcd -a 'yum -y install lvm2'

## Check results:
ansible -i openshift_inventory etcd -m shell -a 'lsblk'

ansible -i openshift_inventory nodes:\!etcd -a 'pvcreate /dev/vdc'
ansible -i openshift_inventory nodes:\!etcd -a 'vgcreate origin-vg /dev/vdc'
ansible -i openshift_inventory nodes:\!etcd -a 'lvcreate -n origin-lv -l 100%VG origin-vg'
ansible -i openshift_inventory nodes:\!etcd -a 'mkfs.xfs /dev/mapper/origin--vg-origin--lv'
ansible -i openshift_inventory nodes:\!etcd -m shell -a 'mkdir /var/lib/origin'
ansible -i openshift_inventory nodes:\!etcd -m lineinfile -a 'path=/etc/fstab regexp=origin line="/dev/mapper/origin--vg-origin--lv /var/lib/origin xfs defaults 0 0"'
ansible -i openshift_inventory nodes:\!etcd -m shell -a 'mount -a'

## Check results:
ansible -i openshift_inventory nodes:\!etcd -m shell -a 'lsblk'
Step 5: We are ready to rock’n’roll, install OpenShift Origin.
As a pre-check we run prerequisites.yml playbook:
ansible-playbook -i openshift_inventory playbooks/prerequisites.yml


PLAY RECAP ******************************************************
localhost : ok=11 changed=0 unreachable=0 failed=0
os-infra1.local : ok=54 changed=11 unreachable=0 failed=0
os-master1.local : ok=64 changed=12 unreachable=0 failed=0
os-node1.local : ok=54 changed=11 unreachable=0 failed=0
os-node2.local : ok=54 changed=11 unreachable=0 failed=0
Install OpenShift by running deploy_cluster.yml playbook
ansible-playbook -i openshift_inventory playbooks/deploy_cluster.yml

PLAY RECAP ********************************************************
localhost : ok=13 changed=0 unreachable=0 failed=0
os-infra1.local : ok=119 changed=14 unreachable=0 failed=0
os-master1.local : ok=938 changed=238 unreachable=0 failed=0
os-node1.local : ok=119 changed=14 unreachable=0 failed=0
os-node2.local : ok=119 changed=14 unreachable=0 failed=0

INSTALLER STATUS *******************************
Initialization : Complete (0:00:20)
Health Check : Complete (0:00:00)
etcd Install : Complete (0:00:29)
Master Install : Complete (0:02:47)
Master Additional Install : Complete (0:00:22)
Node Install : Complete (0:01:32)
Hosted Install : Complete (0:00:42)
Web Console Install : Complete (0:00:37)
Metrics Install : Complete (0:01:19)
Logging Install : Complete (0:02:26)
Service Catalog Install : Complete (0:04:20)
================================================
Step 6: Post deployment environment validation.
On os-master1 server, as root:
[user@os-master1 ~]$ sudo su -

[root@os-master1 ~]# oc login -u system:admin -n default

Logged into "https://console.openshift.local:443" as "system:admin" using existing credentials.

You have access to the following projects and can switch between them with 'oc project <projectname>':

* default
kube-public
kube-service-catalog
kube-system
logging
management-infra
openshift
openshift-ansible-service-broker
openshift-infra
openshift-node
openshift-template-service-broker
openshift-web-console

Using project "default".
Display all nodes:
[root@os-master1 ~]# oc get no
NAME STATUS ROLES AGE VERSION
os-infra1.local Ready <none> 3h v1.9.1+a0ce1bc657
os-master1.local Ready master 3h v1.9.1+a0ce1bc657
os-node1.local Ready compute 3h v1.9.1+a0ce1bc657
os-node2.local Ready compute 3h v1.9.1+a0ce1bc657
Display all services (note the docker registry network)
[root@os-master1 ~]# oc get svc
NAME TYPE CLUSTER-IP EXTERNAL-IP PORT(S) AGE
docker-registry ClusterIP 172.30.106.196 <none> 5000/TCP 4d
kubernetes ClusterIP 172.30.0.1 <none> 443/TCP,53/UDP,53/TCP 4d
registry-console ClusterIP 172.30.200.85 <none> 9000/TCP 4d
router ClusterIP 172.30.243.35 <none> 80/TCP,443/TCP,1936/TCP 4d
Step 7: Allow insecure access to the docker registry (do it on all nodes).
Edit the /etc/sysconfig/docker file and the parameter INSECURE_REGISTRY:
vi /etc/sysconfig/docker

INSECURE_REGISTRY='--insecure-registry 172.30.0.0/16'

#Restart Docker
systemctl enable docker
systemctl restart docker
By default, “system” user and regular users don’t have cluster-admin access via the web console. The system:admin user cannot log in to web console as it is intended to only be used in the CLI.
To have cluster-admin access via the web console, we must grant a new or existing user cluster-admin rights:
# oc login -u system:admin -n default

## For a user
# oc adm policy add-cluster-role-to-user cluster-admin user1

## For a group
# oc adm policy add-cluster-role-to-group cluster-admin somegroup
Now we are ready to login to our brand new OpenShift Origin instance:

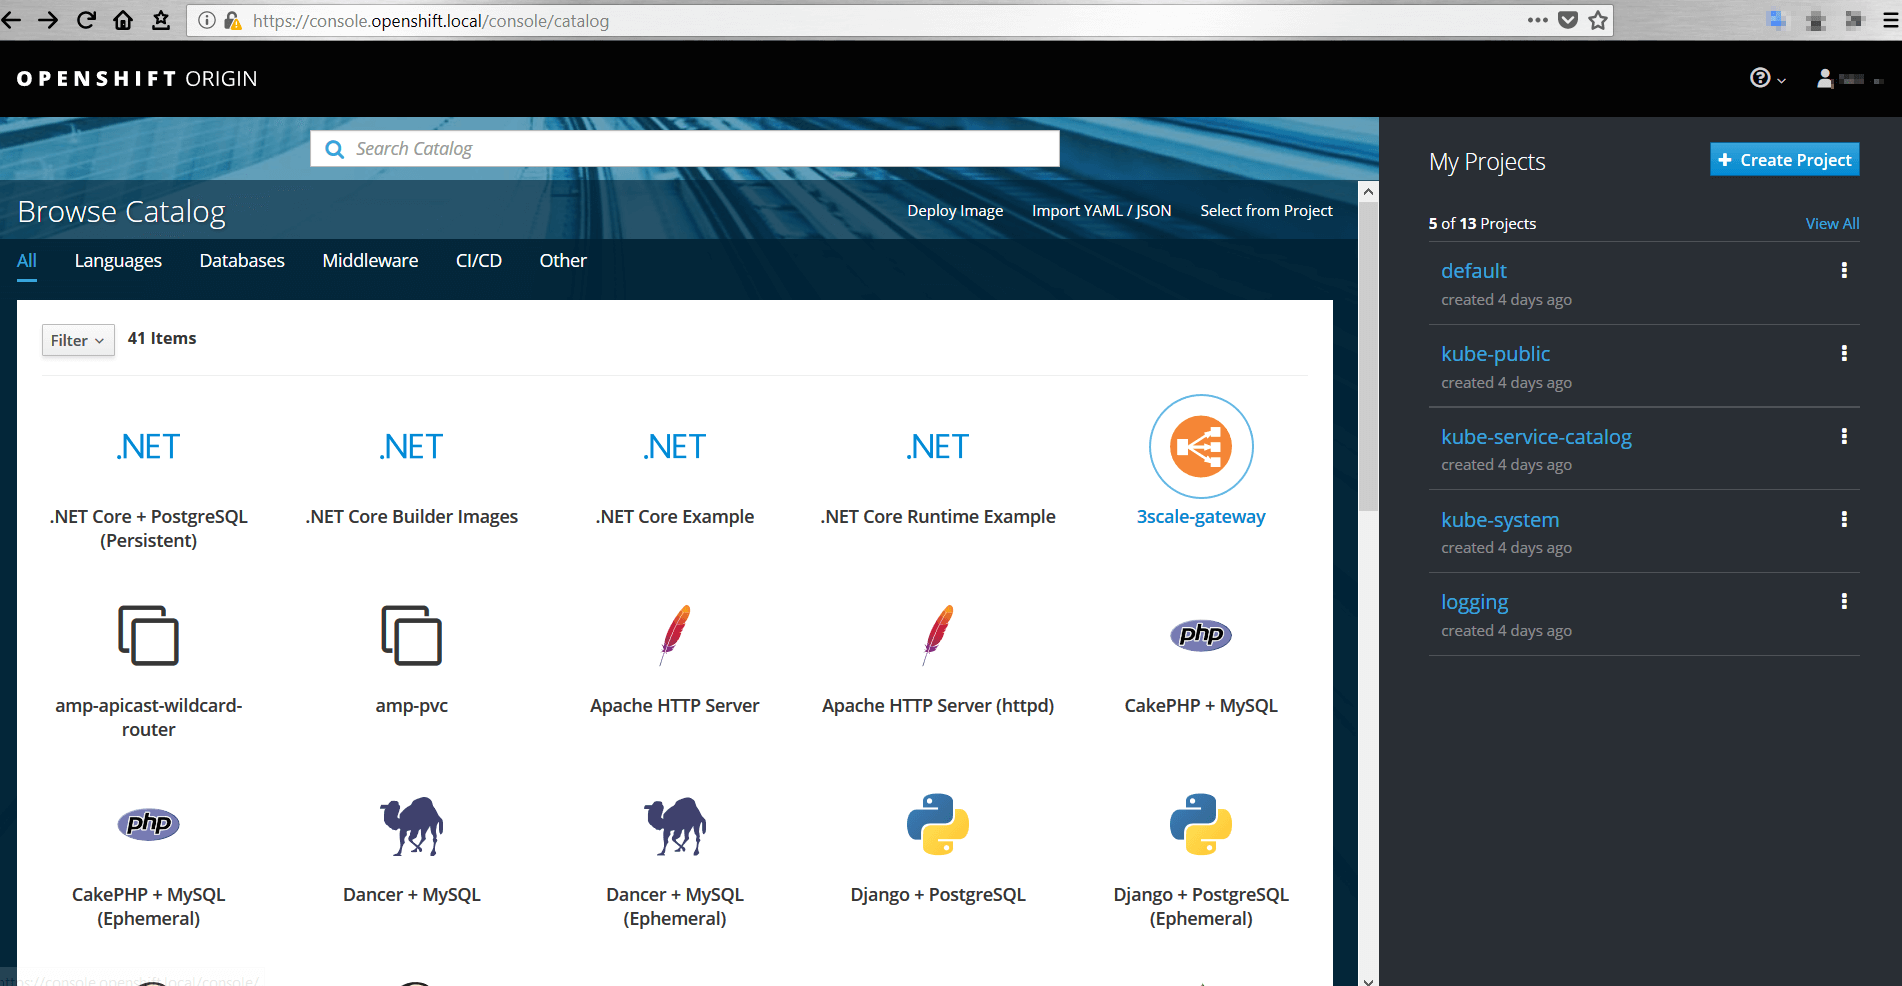
Step 8: Setup persistent storage using NFS server.
Our NFS server has IP: 192.168.2.20 and the follwoing export: /volume1/SHARED, in this example we will use the same directory as we have used for docker registry.
On os-master1 node create nfs-pv.yaml file:
# vi nfs-pv.yaml

apiVersion: v1
kind: PersistentVolume
metadata:
  name: pv0001
spec:
  capacity:
    storage: 5Gi
  accessModes:
  - ReadWriteOnce
  nfs:
    path: /volume1/SHARED/registry
    server: 192.168.2.20
    persistentVolumeReclaimPolicy: Recycle
Next, create nfs-claim.yaml file:
# vi nfs-claim.yaml

apiVersion: v1
kind: PersistentVolumeClaim
metadata:
  name: nfs-claim1
spec:
  accessModes:
    - ReadWriteOnce
  resources:
    requests:
      storage: 1Gi
As root on os-master1 node login to openshift console and run oc commands:
oc login -u system:admin -n default
oc create -f nfs-pv.yaml
oc create -f nfs-claim.yaml

oc get pv
pv0001 5Gi RWO Recycle Bound openshift-ansible-service-broker/etcd 1d

oc get pvc
nfs-claim1 Pending
Now it’s a good time to play with OpenShift projects: https://github.com/OpenShiftDemos
That’s all folks, feel free to leave your comments !!