Installing Oracle RAC 11gR2 on Linux 64bit
Yet another way of installing Oracle RAC 11gR2
This tutorial shows how to install Oracle RAC 11gR2 on Linux 64bit with NAS connected via Native Multipathing (Device Mapper-Multipath).
1. Introduction
Oracle Real Application Clusters (Oracle RAC) enables an Oracle database to run across a cluster of servers, providing fault tolerance, performance, and scalability with no application changes necessary. Oracle RAC provides high availability for applications by removing the single point of failure with a single server.
This guide describes how to install, configure, and manage Oracle RAC, Oracle Clusterware, and Oracle Automatic Storage Management (Oracle ASM). It provides examples for how you could deploy Oracle RAC on a two-node cluster, using the Oracle Linux operating system. This installation guide assumes several points, see below.
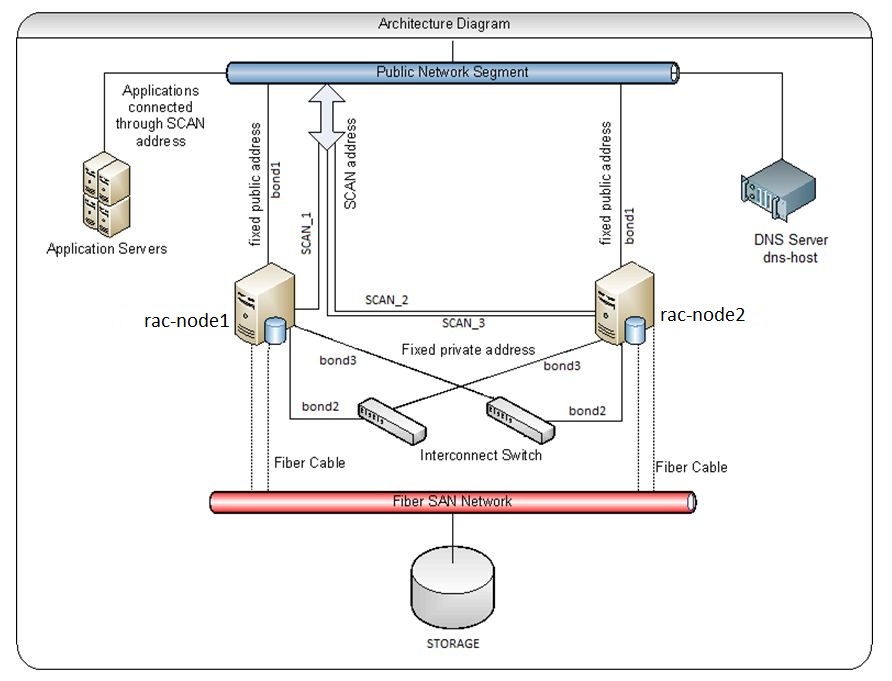
Table of Contents
1. Introduction
1.1. Assumptions to this guide
3. Oracle Database RAC 11g R2 Overview
3.2. Oracle RAC Configuration reference
4. Preparation for Oracle Database RAC 11gR2 Installation
4.1. Installing Required Linux Packages for Oracle RAC 11gR2
4.3. Manually Assigning Static IP Address – (The DNS Method)
4.4. Configuring Public and Private Network
4.5. Installing and configuring DNS server for Oracle RAC
4.6. Configuring SCAN without DNS (optional)
4.7. Stop the firewall on both nodes
4.8. Cluster Time Synchronization Service – NTP service
5. Create Job Role Separation Operating System Privileges Groups, Users, and Directories
5.1. Create Groups and User for Grid Infrastructure
5.2. Create Login Script for the grid User Account
5.3. Create Groups and User for Oracle Database Software
5.4. Create Login Script for the oracle User Account
5.5. Verify That the User nobody Exists
5.6. Create the Oracle Base Directory Path
5.7. Set Resource Limits for the Oracle Software Installation Users
6. Configure the Linux Servers for Oracle, kernel parameters
6.1. Configuring SElinux – oracle note: [ID 454196.1]
7. Installing and Configuring ASMLib 2.0
7.1. Install ASMLib 2.0 Packages on ERHL 5
7.2. Configure ASMLib
8. Create ASM Disks for Oracle
9. Install Oracle Grid Infrastructure for a Cluster
9.1. Postinstallation Tasks for Oracle Grid Infrastructure for a Cluster
9.2. Create ASM Disk Groups for Data and Fast Recovery Area (FRA)
10. Install Oracle Database 11g with Oracle Real Application Clusters
10.1. Install Oracle Database 11g Release 2 Software
10.2. Create the Oracle Cluster Database
10.3. Oracle Enterprise Manager Debase Control
11. Verify Oracle Grid Infrastructure and Database Configuration
1.1. Assumptions of this guide
- Red Hat Enterprise Linux 5.6 (64bit) Operating System has been installed on two nodes
- Memory and Swap space requirements for Oracle RAC 11g R2 has been met
- NAS storage has been connected as the Device-Mapper Multipath on Red Hat Enterprise Linux 5.6
- DNS server with three public IPs resolving to one database SCAN address/domain has been configured
A workaround has been described later in this guide to install Clusterware without DNS server.
However it is strongly not recommended – learn a proper way
- Cluster Time Synchronization Service, here NTP is up and running and available to the cluster
The following list contains other useful Oracle RAC guides or related documentation:
- Oracle Real Application Clusters Administration and Deployment Guide
- Oracle Clusterware Administration and Deployment Guide
- Oracle Real Application Clusters Installation Guide for Linux and UNIX
- Oracle Grid Infrastructure Installation Guide for Linux
- Oracle Maximum Availability Architecture – MAA
Special thanks for folks who wrote the following articles – Big Thanks Guys!:
- Build Your Own Oracle RAC 11g Cluster on Oracle Enterprise Linux and iSCSI (very well explained and broad article!)
- Oracle 11g Release 2 – SCAN explained
- 11gR2 Modify / Add Scan IP & Listeners
2. Download Oracle Software
Download and extract the required Oracle software packages from the Oracle Technology Network (OTN):
NOTE: If you do not currently have an account with Oracle OTN, just create one. This account is free.
(11.2.0.1.0) Linux x86-64 (Make sure to download and unzip both files to the same directory, instructions in this guide)
Oracle Database 11g Release 2 Grid Infrastructure (11.2.0.1.0) for Linux x86-64
- linux.x64_11gR2_grid.zip (1,052,897,657 bytes)
Contains the Grid Infrastructure Software including Oracle Clusterware, Automated Storage Management (ASM), and ASM Cluster File System. Download and install prior to installing Oracle Real Application Clusters, Oracle Real Application Clusters One Node, or other Oracle software in a Grid Environment
Oracle Database 11g Release 2 (11.2.0.1.0) for Linux x86-64
- linux.x64_11gR2_database_1of2.zip (1,239,269,270 bytes)
- linux.x64_11gR2_database_2of2.zip (1,111,416,131 bytes)
3. Oracle Database RAC 11g R2 Overview
3.1. Architecture Diagram
- High level overview of what w ar going to build:
image001.jpg
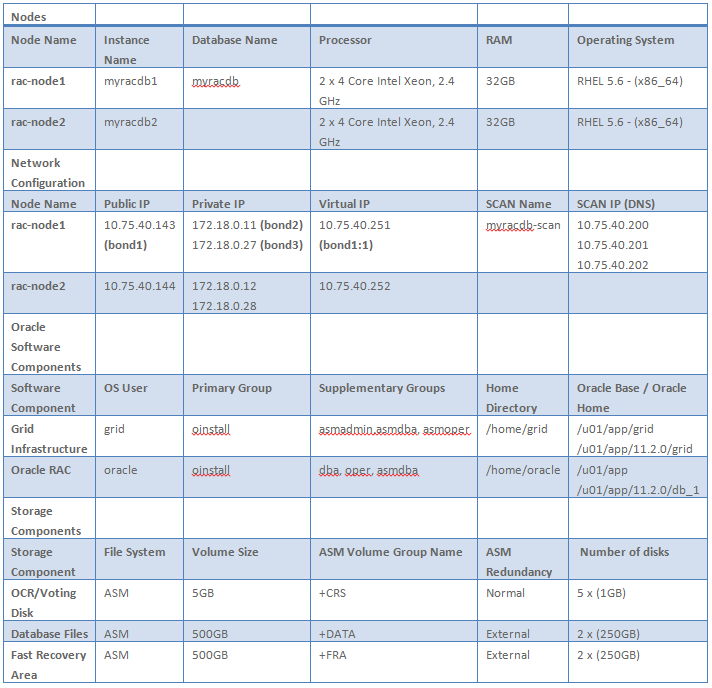
3.2. Oracle RAC Configuration reference
4. Preparation for Oracle Database RAC 11gR2 Installation
4.1. Installing Required Linux Packages for Oracle RAC 11gR2
Red Hat Enterprise Linux 64-bit (x86_64)
- binutils-2.17.50.0.6
- compat-libstdc++-33-3.2.3
- compat-libstdc++-33-3.2.3 (32 bit)
- elfutils-libelf-0.125
- elfutils-libelf-devel-0.125
- elfutils-libelf-devel-static-0.125
- gcc-4.1.2
- gcc-c++-4.1.2
- glibc-2.5-24
- glibc-2.5-24 (32 bit)
- glibc-common-2.5
- glibc-devel-2.5
- glibc-devel-2.5 (32 bit)
- glibc-headers-2.5
- ksh-20060214
- libaio-0.3.106
- libaio-0.3.106 (32 bit)
- libaio-devel-0.3.106
- libaio-devel-0.3.106 (32 bit)
- libgcc-4.1.2
- libgcc-4.1.2 (32 bit)
- libstdc++-4.1.2
- libstdc++-4.1.2 (32 bit)
- libstdc++-devel 4.1.2
- make-3.81
- sysstat-7.0.2
- unixODBC-2.2.11
- unixODBC-2.2.11 (32 bit)
- unixODBC-devel-2.2.11
- unixODBC-devel-2.2.11 (32 bit)
NOTE: In above list packages versions may vary. Please install the latest versions of the rpms available in your repository or DVD Linux disk.
Each of the packages listed above can be found on DVD Enterprise Linux 5.6 (x86_64). While it is possible to query each individual package to determine which ones are missing and need to be installed, an easier method is to run the rpm -Uvh PackageName command from the DVD as follows.
Note: For packages that already exist and are up to date, the RPM command will simply ignore the install and print a warning message to the console that the package is already installed.
Installing Linux packages from Enterprise Linux 5.6 (x86_64) – [DVD]
Mount DVD image to /media/crom as the root user and run the following commands:
mkdir -p /media/cdrom
mount -r /dev/cdrom /media/cdrom

cd /media/cdrom/Server

rpm -Uvh binutils-2.*
rpm -Uvh elfutils-libelf-0.*
rpm -Uvh glibc-2.*
rpm -Uvh glibc-common-2.*
rpm -Uvh ksh-2*
rpm -Uvh libaio-0.*
rpm -Uvh libgcc-4.*
rpm -Uvh libstdc++-4.*
rpm -Uvh make-3.*
rpm -Uvh elfutils-libelf-devel-*
rpm -Uvh gcc-4.*
rpm -Uvh gcc-c++-4.*
rpm -Uvh glibc-devel-2.*
rpm -Uvh glibc-headers-2.*
rpm -Uvh libstdc++-devel-4.*
rpm -Uvh unixODBC-2.*
rpm -Uvh compat-libstdc++-33*
rpm -Uvh libaio-devel-0.*
rpm -Uvh unixODBC-devel-2.*
rpm -Uvh sysstat-7.*
4.2. Network Configuration
We bond separate interfaces to a common interface to provide redundancy, in case of a NIC failure.
|
bond0 for maintenance |
eth0 eth1 |
|
bond1 |
eth2 eth3 |
|
bond2 |
eth4 eth5 |
|
bond3 |
eth6 eth7 |
The public interface names associated with the network adapters for each network must be the same on all nodes, and the private interface names associated with the network adaptors should be the same on all nodes. For example, with our two-node cluster, you cannot configure network adapters on node1 with bond1 as the public interface, but on node2 have bond2 as the public interface. Public interface names must be the same, so you must configure bond1 as public on both nodes. You should configure the private interfaces on the same network adapters as well. If bond2 and bond3 are the private interfaces for node1, then bond2 and bond3 must be the private interfaces for node2.
For the private network, the endpoints of all designated interconnect interfaces must be completely reachable on the network. There should be no node that is not connected to every private network interface. You can test if an interconnect interface is reachable using ping and/or traceroute.
During installation of Oracle grid infrastructure, you are asked to identify the planned use for each network interface that OUI detects on your cluster node. You must identify each interface as a public interface, a private interface, or not used and you must use the same private interfaces for both Oracle Clusterware and Oracle RAC.
NOTE: How to bond NIC interfaces can be found here.
4.3. Manually Assigning Static IP Address – (The DNS Method)
We do not plan to extend this RAC architecture with new nodes in the future. That’s why we chose to not use GNS. Manually defining static IP addresses is still available with Oracle Clusterware 11g Release 2 and will be the method used in this document to assign all required Oracle Clusterware networking components (public IP address for the node, RAC interconnect, virtual IP address, and SCAN).
Oracle recommends that static IP addresses be manually configured in a domain name server (DNS) before starting the Oracle grid infrastructure installation. This installation guide assumes that DNS server has been configured and resolves three IP addresses to the same database scan name (i.e. myracdb-scan) using Round Robin algoritm. Installation and configuration of the DNS server has been described in section Installing and configuring DNS server for Oracle RAC of this guide.
NOTE: If you do not have access to a DNS server, this guide provides an easy workaround in the section Configuring SCAN without DNS. The workaround involves modifying the nslookup utility and should be performed before installing Oracle grid infrastructure. This is temporary solution untill DNS server is available and it’s strongly not recommended to avoid installation errors in further stage.
4.4. Configuring Public and Private Network
Using the Network Configuration application, you need to configure both NIC devices as well as the /etc/hosts file. Both of these tasks can be completed using the Network Configuration GUI or manually by creating and editing appropriate files in /etc/sysconfig/network-scripts/ directory.
Notice that the /etc/hosts settings are the same for both nodes and that we removed any entry that has to do with IPv6.
For example (remove or comment this line):
#::1 localhost6.localdomain6 localhost6
Our Oracle RAC configuration has the following network settings.
Oracle RAC Node 1 – (rac-node1)
|
Oracle RAC Node 1 – (rac-node1) |
||||
|
Device |
IP Address |
Subnet |
Gateway |
Purpose |
|
bond1 |
10.75.40.143 |
255.255.255.0 |
10.75.40.129 |
Connects rac-node1 to the public network |
|
bond2 |
172.18.0.11 |
255.255.255.192 |
|
Connects rac-node1 (interconnect) to rac-node2 (rac-node2-priv) |
|
bond3 |
172.18.0.27 |
255.255.255.192 |
|
|
|
bond1:1 |
10.75.40.251 |
255.255.255.0 |
|
Virtual IP (VIP) is for fast connection establishment in failover dictation |
|
Configure DNS Servers: /etc/resolv.conf nameserver 10.75.40.139 nameserver 10.75.40.xxx search company.local |
||||
|
/etc/hosts – the same on both nodes (make sure that loopback (127…) doesn’t have host name) Also UPDATE DNS server to resolve to below entries |
||||
|
# Do not remove the following line, or various programs # that require network functionality will fail.
127.0.0.1 localhost.localdomain localhost
#Public network (bond1) 10.75.40.143 rac-node1 rac-node1 10.75.40.144 rac-node2 rac-node2
#Private Network (bond2) 172.18.0.11 rac-node11-priv rac-node11-priv 172.18.0.12 rac-node21-priv rac-node21-priv
# (bond3) 172.18.0.27 rac-node12-priv rac-node12-priv 172.18.0.28 rac-node22-priv rac-node22-priv
#Virtual Network (bond1:1) 10.75.40.251 rac-node1-vip rac-node1-vip 10.75.40.252 rac-node2-vip rac-node2-vip
#SCAN (optional only if DNS server has not been configured) #10.75.40.200 myracdb-scan.company.local myracdb-scan |
||||
Oracle RAC Node 2 – (rac-node2)
|
Oracle RAC Node 2 – (rac-node2) |
||||
|
Device |
IP Address |
Subnet |
Gateway |
Purpose |
|
bond1 |
10.75.40.144 |
255.255.255.0 |
10.75.40.129 |
Connects rac-node2 to the public network |
|
bond2 |
172.18.0.12 |
255.255.255.192 |
|
Connects rac-node2 (interconnect) to rac-node1 (rac-node1-priv) |
|
bond3 |
172.18.0.28 |
255.255.255.192 |
|
|
|
bond1:1 |
10.75.40.252 |
255.255.255.0 |
|
Virtual IP (VIP) is for fast connection establishment in failover dictation |
|
Configure DNS Servers: /etc/resolv.conf nameserver 10.75.40.139 nameserver 10.75.40.xxx search company.local |
||||
|
/etc/hosts – the same on both nodes (make sure that loopback (127…) doesn’t contain host name) Also UPDATE DNS server to resolve to below entries |
||||
|
# Do not remove the following line, or various programs # that require network functionality will fail.
127.0.0.1 localhost.localdomain localhost
#Public network (bond1) 10.75.40.143 rac-node1 rac-node1 10.75.40.144 rac-node2 rac-node2
#Private Network (bond2) 172.18.0.11 rac-node11-priv rac-node11-priv 172.18.0.12 rac-node21-priv rac-node21-priv
#bond3 172.18.0.27 rac-node12-priv rac-node12-priv 172.18.0.28 rac-node22-priv rac-node22-priv
#Virtual Network (bond1:1) 10.75.40.251 rac-node1-vip rac-node1-vip 10.75.40.252 rac-node2-vip rac-node2-vip
#SCAN (optional, only if DNS server has not been configured yet) #10.75.40.200 myracdb-scan.company.local myracdb-scan |
||||
Confirm the RAC Node Name is Not Listed in Loopback Address
Ensure that the node names ( rac-node1 or rac-node22) are not included for the loopback address in the /etc/hosts file. If the machine name is listed in the in the loopback address entry as below:
an example of incorrect entry:
127.0.0.1 rac-node1 localhost.localdomain localhost
Above hostname string rac-node1 must be removed as shown below:
127.0.0.1 localhost.localdomain localhost
4.5. Installing and configuring DNS server for Oracle RAC
NOTE: If you don’t want to go through manual DNS installation you can install Webmin – web based gui admin tool and configure BIND DNS server.
Oracle Red Hat Enterprise Linux delivers rpm packages for the name server “bind”. Bind is developed by the ISC (Internet systems consortium) and is the most used dns server. More information can be found here.
Installing required packages
For Red Hat EL 5 we need at least the following packages installed:
- bind-libs-9.*
- bind-9.*
- bind-utils-9.*
To install above packages use the same approach as described in section Installing Required Linux Packages for Oracle RAC 11gR2 of this guide.
Configuring the master dns server (secondary DNS server is out of the scope)
Creating the master DNS server which will reside on linux host. In our case the master dns server resides on temporary host DNS-HOST with ip adress 10.75.40.139
NOTE: For a “quick and dirty” configuration one configured DNS server is enough to complete the cluster verification tests. Make sure that you specified all node names (private, public and vip named) in /etc/hosts file on both nodes [rac-node1/2]!
Creating the required files
create /etc/named.conf file and paste the following code
[root@dns-host named]# mv /etc/named.conf /etc/named.conf.org
[root@dns-host named]# vi /etc/named.conf
Paste the following code:
options {
# The directory statement defines the name server's working directory
directory "/var/named";

# Write dump and statistics file to the log subdirectory. The
# pathenames are relative to the chroot jail.
dump-file "/var/log/named_dump.db";
statistics-file "/var/log/named.stats";

# The forwarders record contains a list of servers to which queries
# should be forwarded. Enable this line and modify the IP address to
# your provider's name server. Up to three servers may be listed.
#forwarders { 192.0.2.1; 192.0.2.2; };
# Enable the next entry to prefer usage of the name server declared in
# the forwarders section.
#forward first;
# The listen-on record contains a list of local network interfaces to
# listen on. Optionally the port can be specified. Default is to
# listen on all interfaces found on your system. The default port is
# 53.
#listen-on port 53 { 127.0.0.1; };
# The listen-on-v6 record enables or disables listening on IPv6
# interfaces. Allowed values are 'any' and 'none' or a list of
# addresses.
listen-on-v6 { none; };

# The next three statements may be needed if a firewall stands between
# the local server and the internet.
#query-source address * port 53;
#transfer-source * port 53;
#notify-source * port 53;
# The allow-query record contains a list of networks or IP addresses
# to accept and deny queries from. The default is to allow queries
# from all hosts.
#allow-query { 127.0.0.1; };
# If notify notify ">is set to yes (default), notify messages are sent to other
# name servers when the the zone data is changed. Instead of setting
# a global 'notify' statement in the 'options' section, a separate
# 'notify' can be added to each zone definition.
notify no;
};
logging {
# Log queries to a file limited to a size of 100 MB.
channel query_logging {
file "/var/named/named_querylog"
versions 3 size 100M;
print-time yes; // timestamp log entries
};
category queries {
query_logging;
};

# Or log this kind alternatively to syslog.
channel syslog_queries {
syslog user;
severity info;
};
category queries { syslog_queries; };
# Log general name server errors to syslog.
channel syslog_errors {
syslog user;
severity error;
};
category default { syslog_errors; };
# Don't log lame server messages.
category lame-servers { null; };
};
acl acl_transf { 10.75.40.139; };
# The following zone definitions don't need any modification. The first one
# is the definition of the root name servers. The second one defines
# localhost while the third defines the reverse lookup for localhost.
#zone "." in {
# type hint;
# file "root.hint";
#};
zone "localhost" in {
type master;
file "localhost.zone";
};
zone "0.0.127.in-addr.arpa" in {
type master;
file "127.0.0.zone";
};
zone "company.local" in {
type master;
file "db";
allow-transfer { acl_transf; };
};
Modify the following file:
/var/named/127.0.0.zone
[root@dns-host named]$ mv /var/named/127.0.0.zone /var/named/127.0.0.zone.org

[root@dns-host named]$ vi /var/named/127.0.0.zone
Paste the following code into /var/named/127.0.0.zone
$TTL 1W
@ IN SOA localhost. root.localhost. (
42 ; serial (d. adams)
2D ; refresh
4H ; retry
6W ; expiry
1W ) ; minimum
IN NS localhost.
1 IN PTR localhost.
Paste below code into the /var/named/localhost.zone
$TTL 1W
@ IN SOA @ root (
42 ; serial (d. adams)
2D ; refresh
4H ; retry
6W ; expiry
1W ) ; minimum
IN NS @
IN A 127.0.0.1
Modify the following file: /var/named/db
[root@dns-host named]# mv /var/named/db /var/named/db.org

[root@dns-host named]# vi /var/named/db
Paste th efollowing code into /var/named/db
$ORIGIN .

company.local SOA dns-host. (

22 ; serial

900 ; refresh (15 minutes)

600 ; retry (10 minutes)

86400 ; expire (1 day)

3600 ; minimum (1 hour)

)

NS dns-host.

$ORIGIN company.local.

rac-node1 A 10.75.40.143
rac-node2 A 10.75.40.144
rac-node1-vip A 10.75.40.251
rac-node2-vip A 10.75.40.252
rac-node11-priv A 172.18.0.11
rac-node21-priv A 172.18.0.12
rac-node12-priv A 172.18.0.27
rac-node22-priv A 172.18.0.28

myracdb-scan A 10.75.40.200
myracdb-scan A 10.75.40.201
myracdb-scan A 10.75.40.202
Change file permissions:
NOTE: User and group “named” must be created in the system. If otherwise – create it.
[root@dns-host named]# touch /var/named/named_querylog

[root@dns-host named]# chown -R named:named /var/named/

[root@dns-host named]# chown named:named /etc/named.conf

#After that we can start named daemon for the first time:

[root@dns-host named]# /etc/init.d/named start
Configure DNS servers on RAC hosts
In order to point servers to the right DNS server edit the file /etc/resolv.conf in RAC nodes and update file with the following entries:
nameserver 10.75.40.139 search company.local
NOTE: In production environment you would have two DNS nameservers
Test DNS server response:
[user@rac-node1 ~]$ nslookup myracdb-scan

nslookup myracdb-scan

Server: 10.75.40.139
Address: 10.75.40.139#53

Non-authoritative answer:
Name: myracdb-scan
Address: 10.75.40.200
Name: myracdb-scan
Address: 10.75.40.201
Name: myracdb-scan
Address: 10.75.40.202
Troubleshooting DNS Server
If you experience problems check out the following log files for more detailed information:
- /var/log/messages
- /var/named/named_querylog
4.6. Configuring SCAN without DNS (optional)
Modify the nslookup utility as root on both Oracle RAC nodes as follows.
First, rename the original nslookup binary to nslookup.original on both Oracle RAC nodes:
[root@rac-node1 ~]# mv /usr/bin/nslookup /usr/bin/nslookup.original
Next, create a new shell script named /usr/bin/nslookup as shown below while replacing xx.xxx.x.xx with your primary DNS (can be a fake), racnode-cluster-scan with your SCAN host name, and yyy.yyy.y.yyy with your SCAN IP address.
|
FROM a tempalte |
TO be like (example from rac-node1) |
|
#!/bin/bash
HOSTNAME=${1}
if [[ $HOSTNAME = “ racnode-cluster-scan ” ]]; then echo “Server: xx.xxx.x.xx“ echo “Address: xx.xxx.x.xx#53″ echo “Non-authoritative answer:” echo “Name: racnode-cluster-scan” echo “Address: yyy.yyy.y.yyy“ else /usr/bin/nslookup.original $HOSTNAME fi |
#!/bin/bash
HOSTNAME=${1}
if [[ $HOSTNAME = “myracdb-scan” ]]; then echo “Server: 10.75.40.139” echo “Address: 10.75.40.139#53” echo “” echo “Non-authoritative answer:” echo “Name: myracdb-scan“ echo “Address: 10.75.40.200” echo “Name: myracdb-scan“ echo “Address: 10.75.40.201” echo “Name: myracdb-scan“ echo “Address: 10.75.40.202” else /usr/bin/nslookup.original $HOSTNAME fi |
- Finally, change the new nslookup shell script to be executable:
[root@rac-node1 ~]# chmod 755 /usr/bin/nslookup
Remember to perform these actions on both Oracle RAC nodes. The new nslookup shell script simply echo’s back your SCAN IP address whenever the oracle installation test script calls nslookup with your SCAN host name; otherwise, it calls the original nslookup binary.
4.7. Stop the firewall on both nodes
As the root user perform the following on both nodes:
/etc/rc.d/init.d/iptables stop

chkconfig iptables off

/etc/rc.d/init.d/iptables status
4.8. Cluster Time Synchronization Service – NTP service
Oracle Clusterware 11g Release 2 and later requires time synchronization across all nodes within a cluster where Oracle RAC is deployed. Oracle provide two options for time synchronization: an operating system configured network time protocol (NTP), or the new Oracle Cluster Time Synchronization Service (CTSS). Oracle Cluster Time Synchronization Service (ctssd) is designed for organizations whose Oracle RAC databases are unable to access NTP services.
On both nodes; modify the NTP initialization file to set the -x flag, which prevents time from being adjusted backward. Restart the network time protocol daemon after you complete this task.
To do this on Oracle Enterprise Linux, edit the /etc/sysconfig/ntpd file to add the -x flag, as in the following example:
# Drop root to id 'ntp:ntp' by default.

OPTIONS="-x -u ntp:ntp -p /var/run/ntpd.pid"

# Set to 'yes' to sync hw clock after successful ntpdate

SYNC_HWCLOCK=no

# Additional options for ntpdate

NTPDATE_OPTIONS=""
Restart ntp service as the root user:
/sbin/service ntpd restart
5. Create Job Role Separation Operating System Privileges Groups, Users, and Directories
The following O/S groups will be created:
|
Description |
OS Group Name |
OS Users Assigned to this Group |
Oracle Privilege |
Oracle Group Name |
|
Oracle Inventory and Software Owner |
oinstall |
grid, oracle |
|
|
|
Oracle Automatic Storage Management (ASM) Group |
asmadmin |
grid |
SYSASM |
OSASM |
|
ASM Database Administrator Group |
asmdba |
grid, oracle |
SYSDBA for ASM |
OSDBA for ASM |
|
ASM Operator Group |
asmoper |
grid |
SYSOPER for ASM |
OSOPER for ASM |
|
Database Administrator |
dba |
oracle |
SYSDBA |
OSDBA |
|
Database Operator |
oper |
oracle |
SYSOPER |
OSOPER |
5.1. Create Groups and User for Grid Infrastructure
Creating the recommended OS groups and user for Grid Infrastructure on both Oracle RAC nodes.
[root@rac-node1 ~]#
groupadd -g 1000 oinstall
groupadd -g 1200 asmadmin
groupadd -g 1201 asmdba
groupadd -g 1202 asmoper
useradd -m -u 1100 -g oinstall -G asmadmin,asmdba,asmoper -d /home/grid -s /bin/bash grid

[root@rac-node1 ~]# id grid
uid=1100(grid) gid=1000(oinstall) groups=1000(oinstall),1200(asmadmin),1201(asmdba),1202(asmoper)

#Set the password for the grid account:

[root@rac-node1 ~]# passwd grid

#now, perform above tasks on the second node.
5.2. Create Login Script for the grid User Account
Log in to both Oracle RAC nodes as the grid user account and create the following login script ( .bash_profile):
Note: When setting the Oracle environment variables for each Oracle RAC node, make certain to assign each RAC node a unique Oracle SID.
For our environment, we have the following entries per node:
rac-node1: ORACLE_SID=+ASM1 (.bash_profile file on node1)
rac-node2: ORACLE_SID=+ASM2 (.bash_profile file on node2)
MAKE SURE YOU HAVE “+ASM2” ENTRY ON NODE2 BUT NOT “+ASM1”
Switch to grid user, clean and edit .bash_profile file:
[root@rac-node1 ~]# su - grid
[grid@rac-node1 ~]$ echo > .bash_profile
[grid@rac-node1 ~]$ vi .bash_profile
Paste the following configuration and save the file .bash_profile
# ---------------------------------------------------
# .bash_profile
# ---------------------------------------------------
# OS User: grid
# Application: Oracle Grid Infrastructure
# Version: Oracle 11g Release 2
# ---------------------------------------------------
# Get the aliases and functions
if [ -f ~/.bashrc ]; then
. ~/.bashrc
fi
alias ls="ls -FA"
# ---------------------------------------------------
# ORACLE_SID
# ---------------------------------------------------
# Specifies the Oracle system identifier (SID)
# for the Automatic Storage Management (ASM)instance
# running on this node.
#
#Each RAC node must have a unique ORACLE_SID.
#
#(i.e. +ASM1, +ASM2,...)
# ---------------------------------------------------
ORACLE_SID=+ASM1; export ORACLE_SID
# ---------------------------------------------------
# JAVA_HOME
# ---------------------------------------------------
# Specifies the directory of the Java SDK and Runtime
# Environment.
# ---------------------------------------------------
JAVA_HOME=/usr/local/java; export JAVA_HOME
# ---------------------------------------------------
# ORACLE_BASE
# ---------------------------------------------------
# Specifies the base of the Oracle directory structure
# for Optimal Flexible Architecture (OFA) compliant
# installations. The Oracle base directory for the
# grid installation owner is the location where
# diagnostic and administrative logs, and other logs
# associated with Oracle ASM and Oracle Clusterware
# are stored.
# ---------------------------------------------------
ORACLE_BASE=/u01/app/grid; export ORACLE_BASE
# ---------------------------------------------------
# ORACLE_HOME
# ---------------------------------------------------
# Specifies the directory containing the Oracle
# Grid Infrastructure software. For grid
# infrastructure for a cluster installations, the Grid
# home must not be placed under one of the Oracle base
# directories, or under Oracle home directories of
# Oracle Database installation owners, or in the home
# directory of an installation owner. During
# installation, ownership of the path to the Grid
# home is changed to root. This change causes
# permission errors for other installations.
# ---------------------------------------------------
ORACLE_HOME=/u01/app/11.2.0/grid; export ORACLE_HOME
# ---------------------------------------------------
# ORACLE_PATH
# ---------------------------------------------------
# Specifies the search path for files used by Oracle
# applications such as SQL*Plus. If the full path to
# the file is not specified, or if the file is not
# in the current directory, the Oracle application
# uses ORACLE_PATH to locate the file.
# This variable is used by SQL*Plus, Forms and Menu.
# ---------------------------------------------------
ORACLE_PATH=/u01/app/oracle/common/oracle/sql;
export ORACLE_PATH
# ---------------------------------------------------
# SQLPATH
# ---------------------------------------------------
# Specifies the directory or list of directories that
# SQL*Plus searches for a login.sql file.
# ---------------------------------------------------
# SQLPATH=/u01/app/common/oracle/sql; export SQLPATH
# ---------------------------------------------------
# ORACLE_TERM
# ---------------------------------------------------
# Defines a terminal definition. If not set, it
# defaults to the value of your TERM environment
# variable. Used by all character mode products.
# ---------------------------------------------------
ORACLE_TERM=xterm; export ORACLE_TERM
# ---------------------------------------------------
# NLS_DATE_FORMAT
# ---------------------------------------------------
# Specifies the default date format to use with the
# TO_CHAR and TO_DATE functions. The default value of
# this parameter is determined by NLS_TERRITORY. The
# value of this parameter can be any valid date
# format mask, and the value must be surrounded by
# double quotation marks. For example:
#
# NLS_DATE_FORMAT = "MM/DD/YYYY"
#
# ---------------------------------------------------
NLS_DATE_FORMAT="DD-MON-YYYY HH24:MI:SS"; export NLS_DATE_FORMAT
# ---------------------------------------------------
# TNS_ADMIN
# ---------------------------------------------------
# Specifies the directory containing the Oracle Net
# Services configuration files like listener.ora,
# tnsnames.ora, and sqlnet.ora.
# ---------------------------------------------------
TNS_ADMIN=$ORACLE_HOME/network/admin; export TNS_ADMIN
# ---------------------------------------------------
# ORA_NLS11
# ---------------------------------------------------
# Specifies the directory where the language,
# territory, character set, and linguistic definition
# files are stored.
# ---------------------------------------------------
ORA_NLS11=$ORACLE_HOME/nls/data; export ORA_NLS11
# ---------------------------------------------------
# PATH
# ---------------------------------------------------
# Used by the shell to locate executable programs;
# must include the $ORACLE_HOME/bin directory.
# ---------------------------------------------------
PATH=.:${JAVA_HOME}/bin:${PATH}:$HOME/bin:$ORACLE_HOME/bin
PATH=${PATH}:/usr/bin:/bin:/usr/bin/X11:/usr/local/bin
PATH=${PATH}:/u01/app/common/oracle/bin
export PATH
# ---------------------------------------------------
# LD_LIBRARY_PATH
# ---------------------------------------------------
# Specifies the list of directories that the shared
# library loader searches to locate shared object
# libraries at runtime.
# ---------------------------------------------------
LD_LIBRARY_PATH=$ORACLE_HOME/lib
LD_LIBRARY_PATH=${LD_LIBRARY_PATH}:$ORACLE_HOME/oracm/lib
LD_LIBRARY_PATH=${LD_LIBRARY_PATH}:/lib:/usr/lib:/usr/local/lib
export LD_LIBRARY_PATH
# ---------------------------------------------------
# CLASSPATH
# ---------------------------------------------------
# Specifies the directory or list of directories that
# contain compiled Java classes.
# ---------------------------------------------------
CLASSPATH=$ORACLE_HOME/JRE
CLASSPATH=${CLASSPATH}:$ORACLE_HOME/jlib
CLASSPATH=${CLASSPATH}:$ORACLE_HOME/rdbms/jlib
CLASSPATH=${CLASSPATH}:$ORACLE_HOME/network/jlib
export CLASSPATH
# ---------------------------------------------------
# THREADS_FLAG
# ---------------------------------------------------
# All the tools in the JDK use green threads as a
# default. To specify that native threads should be
# used, set the THREADS_FLAG environment variable to
# "native". You can revert to the use of green
# threads by setting THREADS_FLAG to the value
# "green".
# ---------------------------------------------------
THREADS_FLAG=native; export THREADS_FLAG
# ---------------------------------------------------
# TEMP, TMP, and TMPDIR
# ---------------------------------------------------
# Specify the default directories for temporary
# files; if set, tools that create temporary files
# create them in one of these directories.
# ---------------------------------------------------
export TEMP=/tmp
export TMPDIR=/tmp
# ---------------------------------------------------
# UMASK
# ---------------------------------------------------
# Set the default file mode creation mask
# (umask) to 022 to ensure that the user performing
# the Oracle software installation creates files
# with 644 permissions.
# ---------------------------------------------------
umask 022
5.3. Create Groups and User for Oracle Database Software
Creating the recommended OS groups and user for the Oracle database software on both Oracle RAC nodes
[root@rac-node1 ~]#
groupadd -g 1300 dba
groupadd -g 1301 oper
useradd -m -u 1101 -g oinstall -G dba,oper,asmdba -d /home/oracle -s /bin/bash oracle

[root@rac-node1 ~]# id oracle
uid=1101(oracle) gid=1000(oinstall) groups=1000(oinstall),1201(asmdba),1300(dba),1301(oper)

#Set the password for the oracle account:
[root@rac-node1 ~]# passwd oracle

#now, perform above tasks on the second node.
5.4. Create Login Script for the oracle User Account
Log in to both Oracle RAC nodes as the oracle user account and create the following login script
( .bash_profile ):
NOTE: When setting the Oracle environment variables for each Oracle RAC node, make certain to assign each RAC node a unique Oracle SID. For this example, we used:
in rac-node1 : ORACLE_SID=myracdb1
in rac-node2 : ORACLE_SID=myracdb2
Switch to oracle user, clean and edit .bash_profile file:
[root@rac-node1 ~]$ su - oracle

[oracle @rac-node1 ~]$ echo > /home/oracle/.bash_profile
[oracle @rac-node1 ~]$ vi /home/oracle/.bash_profile
Paste the following configuration and save the file
Setup: ORACLE_SID and ORACLE_UNQNAME according to your name convention
# ---------------------------------------------------
# .bash_profile
# ---------------------------------------------------
# OS User: oracle
# Application: Oracle Database Software Owner
# Version: Oracle 11g Release 2
# ---------------------------------------------------
# Get the aliases and functions
if [ -f ~/.bashrc ]; then
. ~/.bashrc
fi
alias ls="ls -FA"
# ---------------------------------------------------
# ORACLE_SID
# ---------------------------------------------------
# Specifies the Oracle system identifier (SID) for
# the Oracle instance running on this node.
#
#Each RAC node must have a unique ORACLE_SID.
#(i.e. racdb1, racdb2,...)
# ---------------------------------------------------
ORACLE_SID=racdb1; export ORACLE_SID
# ---------------------------------------------------
# ORACLE_UNQNAME
# ---------------------------------------------------
# In previous releases of Oracle Database, you were
# required to set environment variables for
# ORACLE_HOME and ORACLE_SID to start, stop, and
# check the status of Enterprise Manager. With
# Oracle Database 11g release 2 (11.2) and later, you
# need to set the environment variables ORACLE_HOME
# and ORACLE_UNQNAME to use Enterprise Manager.
# Set ORACLE_UNQNAME equal to the database unique
# name.
# ---------------------------------------------------
ORACLE_UNQNAME=racdb; export ORACLE_UNQNAME
# ---------------------------------------------------
# JAVA_HOME
# ---------------------------------------------------
# Specifies the directory of the Java SDK and Runtime
# Environment.
# ---------------------------------------------------
JAVA_HOME=/usr/local/java; export JAVA_HOME
# ---------------------------------------------------
# ORACLE_BASE
# ---------------------------------------------------
# Specifies the base of the Oracle directory structure
# for Optimal Flexible Architecture (OFA) compliant
# database software installations.
# ---------------------------------------------------
ORACLE_BASE=/u01/app/oracle; export ORACLE_BASE
# ---------------------------------------------------
# ORACLE_HOME
# ---------------------------------------------------
# Specifies the directory containing the Oracle
# Database software.
# ---------------------------------------------------
ORACLE_HOME=$ORACLE_BASE/product/11.2.0/dbhome_1
export ORACLE_HOME
# ---------------------------------------------------
# ORACLE_PATH
# ---------------------------------------------------
# Specifies the search path for files used by Oracle
# applications such as SQL*Plus. If the full path to
# the file is not specified, or if the file is not
# in the current directory, the Oracle application
# uses ORACLE_PATH to locate the file.
# This variable is used by SQL*Plus, Forms and Menu.
# ---------------------------------------------------
ORACLE_PATH=/u01/app/common/oracle/sql
export ORACLE_PATH
# ---------------------------------------------------
# SQLPATH
# ---------------------------------------------------
# Specifies the directory or list of directories that
# SQL*Plus searches for a login.sql file.
# ---------------------------------------------------
# SQLPATH=/u01/app/common/oracle/sql; export SQLPATH
# ---------------------------------------------------
# ORACLE_TERM
# ---------------------------------------------------
# Defines a terminal definition. If not set, it
# defaults to the value of your TERM environment
# variable. Used by all character mode products.
# ---------------------------------------------------
ORACLE_TERM=xterm; export ORACLE_TERM
# ---------------------------------------------------
# NLS_DATE_FORMAT
# ---------------------------------------------------
# Specifies the default date format to use with the
# TO_CHAR and TO_DATE functions. The default value of
# this parameter is determined by NLS_TERRITORY. The
# value of this parameter can be any valid date
# format mask, and the value must be surrounded by
# double quotation marks. For example:
#
# NLS_DATE_FORMAT = "MM/DD/YYYY"
#
# ---------------------------------------------------
NLS_DATE_FORMAT="DD-MON-YYYY HH24:MI:SS"
export NLS_DATE_FORMAT
# ---------------------------------------------------
# TNS_ADMIN
# ---------------------------------------------------
# Specifies the directory containing the Oracle Net
# Services configuration files like listener.ora,
# tnsnames.ora, and sqlnet.ora.
# ---------------------------------------------------
TNS_ADMIN=$ORACLE_HOME/network/admin; export TNS_ADMIN
# ---------------------------------------------------
# ORA_NLS11
# ---------------------------------------------------
# Specifies the directory where the language,
# territory, character set, and linguistic definition
# files are stored.
# ---------------------------------------------------
ORA_NLS11=$ORACLE_HOME/nls/data; export ORA_NLS11
# ---------------------------------------------------
# PATH
# ---------------------------------------------------
# Used by the shell to locate executable programs;
# must include the $ORACLE_HOME/bin directory.
# ---------------------------------------------------
PATH=.:${JAVA_HOME}/bin:${PATH}:$HOME/bin:$ORACLE_HOME/bin
PATH=${PATH}:/usr/bin:/bin:/usr/bin/X11:/usr/local/bin
PATH=${PATH}:/u01/app/common/oracle/bin
export PATH
# ---------------------------------------------------
# LD_LIBRARY_PATH
# ---------------------------------------------------
# Specifies the list of directories that the shared
# library loader searches to locate shared object
# libraries at runtime.
# ---------------------------------------------------
LD_LIBRARY_PATH=$ORACLE_HOME/lib
LD_LIBRARY_PATH=${LD_LIBRARY_PATH}:$ORACLE_HOME/oracm/lib
LD_LIBRARY_PATH=${LD_LIBRARY_PATH}:/lib:/usr/lib:/usr/local/lib
export LD_LIBRARY_PATH
# ---------------------------------------------------
# CLASSPATH
# ---------------------------------------------------
# Specifies the directory or list of directories that
# contain compiled Java classes.
# ---------------------------------------------------
CLASSPATH=$ORACLE_HOME/JRE
CLASSPATH=${CLASSPATH}:$ORACLE_HOME/jlib
CLASSPATH=${CLASSPATH}:$ORACLE_HOME/rdbms/jlib
CLASSPATH=${CLASSPATH}:$ORACLE_HOME/network/jlib
export CLASSPATH
# ---------------------------------------------------
# THREADS_FLAG
# ---------------------------------------------------
# All the tools in the JDK use green threads as a
# default. To specify that native threads should be
# used, set the THREADS_FLAG environment variable to
# "native". You can revert to the use of green
# threads by setting THREADS_FLAG to the value
# "green".
# ---------------------------------------------------
THREADS_FLAG=native; export THREADS_FLAG
# ---------------------------------------------------
# TEMP, TMP, and TMPDIR
# ---------------------------------------------------
# Specify the default directories for temporary
# files; if set, tools that create temporary files
# create them in one of these directories.
# ---------------------------------------------------
export TEMP=/tmp
export TMPDIR=/tmp
# ---------------------------------------------------
# UMASK
# ---------------------------------------------------
# Set the default file mode creation mask
# (umask) to 022 to ensure that the user performing
# the Oracle software installation creates files
# with 644 permissions.
# ---------------------------------------------------
umask 022
5.5. Verify That the User nobody Exists
Before installing the software, complete the following procedure to verify that the user nobody exists on both Oracle RAC nodes:
To determine if the user exists, issue the following command:
# id nobody uid=99(nobody) gid=99(nobody) groups=99(nobody)
If this command displays information about the nobody user, then you do not have to create that user.
If the user nobody does not exist, then enter the following command as the root user to create it:
# /usr/sbin/useradd nobody
Repeat this procedure on all the other Oracle RAC nodes in the cluster.
5.6. Create the Oracle Base Directory Path
Following has to be performed on both Oracle RAC nodes in the cluster as root.
[root@rac-node1 ~]#

mkdir -p /u01/app/grid
mkdir -p /u01/app/11.2.0/grid
chown -R grid:oinstall /u01

mkdir -p /u01/app/oracle
chown oracle:oinstall /u01/app/oracle
chmod -R 775 /u01
5.7. Set Resource Limits for the Oracle Software Installation Users
To improve the performance of the software on Linux systems, you must increase the following resource limits for the Oracle software owner users ( grid, oracle):
|
Shell Limit |
Item in limits.conf |
Hard Limit |
|
Maximum number of open file descriptors |
nofile |
65536 |
|
Maximum number of processes available to a single user |
nproc |
16384 |
|
Maximum size of the stack segment of the process |
stack |
10240 |
To make these changes, run the following as root:
On each Oracle RAC node, add the following lines to the /etc/security/limits.conf file (the following example shows the software account owners oracle and grid):
[root@rac-node1 ~]# cat >> /etc/security/limits.conf <<EOF
grid soft nproc 2047
grid hard nproc 16384
grid soft nofile 1024
grid hard nofile 65536
oracle soft nproc 2047
oracle hard nproc 16384
oracle soft nofile 1024
oracle hard nofile 65536
EOF
On each Oracle RAC node, add or edit the following line in the /etc/pam.d/login file, if it does not exist:
[root@rac-node1 ~]$ cat >> /etc/pam.d/login <<EOF
session required pam_limits.so
EOF
Depending on your shell environment, make the following changes to the default shell startup file, to change ulimit setting for all Oracle installation owners (note that these examples show the users oracle and grid):
For the Bourne, Bash, or Korn shell, add the following lines to the /etc/profile file by running the following command:
[root@rac-node1 ~]# cat >> /etc/profile <<EOF
if [ \$USER = "oracle" ] || [ \$USER = "grid" ]; then
if [ \$SHELL = "/bin/ksh" ]; then
ulimit -p 16384
ulimit -n 65536
else
ulimit -u 16384 -n 65536
fi
umask 022
fi

EOF
For the C shell (csh or tcsh), add the following lines to the /etc/csh.login file by running the following command:
[root@rac-node1 ~]# cat >> /etc/csh.login <<EOF

if ( \$USER == "oracle" || \$USER == "grid" )
 then
 limit maxproc 16384
 limit descriptors 65536
endif

EOF
6. Configure the Linux Servers for Oracle, kernel parameters
NOTE: One of the options to apply below settings is to copy sysctl.conf file from rac-node1 host on which kernel parameters have already been configured.
The kernel parameters described in this section will need to be defined on both Oracle RAC nodes. This section provides information about setting those kernel parameters required for Oracle. Instructions for placing them in a startup script ( /etc/sysctl.conf).
On both Oracle RAC nodes, verify that the kernel parameters described in this section are set to values greater than or equal to the recommended values. Also note that when setting the four semaphore values that all four values need to be entered on one line.
Oracle Database 11g release 2 on RHEL 5 requires the kernel parameter settings shown below. The values given are minimums, so if your system uses a larger value, do not change it.
kernel.shmmax = 4294967295
kernel.shmall = 2097152
kernel.shmmni = 4096
kernel.sem = 250 32000 100 128
fs.file-max = 6815744
net.ipv4.ip_local_port_range = 9000 65500
net.core.rmem_default=262144
net.core.rmem_max=4194304
net.core.wmem_default=262144
net.core.wmem_max=1048576
fs.aio-max-nr=1048576
RHEL 5 already comes configured with default values defined for the following kernel parameters:
kernel.shmall
kernel.shmmax
Use the default values if they are the same or larger than the required values.
This guide assumes a fresh new install of Oracle Enterprise Linux 5 and as such, many of the required kernel parameters are already set (see above). This being the case, you can simply copy / paste the following to both Oracle RAC nodes while logged in as root:
[root@rac-node1 ~]$ cat >> /etc/sysctl.conf <<EOF

# Controls the maximum number of shared memory segments system wide

kernel.shmmni = 4096

# Sets the following semaphore values:

# SEMMSL_value SEMMNS_value SEMOPM_value SEMMNI_value

kernel.sem = 250 32000 100 128

# Sets the maximum number of file-handles that the Linux kernel will allocate

fs.file-max = 6815744

# Defines the local port range that is used by TCP and UDP

# traffic to choose the local port

net.ipv4.ip_local_port_range = 9000 65500

# Default setting in bytes of the socket "receive" buffer which

# may be set by using the SO_RCVBUF socket option

net.core.rmem_default=262144

# Maximum setting in bytes of the socket "receive" buffer which

# may be set by using the SO_RCVBUF socket option

net.core.rmem_max=4194304

# Default setting in bytes of the socket "send" buffer which

# may be set by using the SO_SNDBUF socket option

net.core.wmem_default=262144

# Maximum setting in bytes of the socket "send" buffer which

# may be set by using the SO_SNDBUF socket option

net.core.wmem_max=1048576

# Max number of allowable concurrent asynchronous I/O requests

fs.aio-max-nr=1048576

EOF
To activate the new kernel parameter values for the currently running system, run the following as root on both Oracle RAC nodes in the cluster:
[root@rac-node1 ~]# sysctl -p
6.1. Configuring SElinux – oracle note: [ID 454196.1]
Switch SELinux from the default “Enforcing” mode that it is running in, to the “disable” mode.
Edit /etc/sysconfig/selinux file as the root user:
[root@rac-node1 ~]$ vi /etc/sysconfig/selinux
and set a SELINUX variable to “disabled”
SELINUX=disabled
Restart Operating system or issue the following command as the root user to switch to Permissive mode:
Commands, as root:
[root@rac-node1 ~]$ getenforce (returns "Enforcing")
[root@rac-node1 ~]$ setenforce 0
[root@rac-node1 ~]$ getenforce (returns "Permissive")
7. Installing and Configuring ASMLib 2.0
The installation and configuration procedures in this section should be performed on both of the Oracle RAC nodes in the cluster. Creating the Automatic Storage Management (ASM) disks, however, will only need to be performed on a single node within the cluster (rac-node1).
ASM will be used as the shared file system and volume manager for Oracle Clusterware files (OCR and voting disk), Oracle Database files (data, online redo logs, control files, archived redo logs), and the Fast Recovery Area.
7.1. Install ASMLib 2.0 Packages on ERHL 5
The ASMLib 2.0 software stack includes the following packages:
64-bit (x86_64) Installations
- ASMLib Kernel Driver: oracleasm-x.x.x-x.el5-x.x.x-x.el5.x86_64.rpm – (for default kernel)
- Userspace Library: oracleasmlib-x.x.x-x.el5.x86_64.rpm
- Driver Support Files: oracleasm-support-x.x.x-x.el5.x86_64.rpm
Oracle ASMLib Downloads for Red Hat Enterprise Linux Server 5
Download and install the following drivers for kernel 2.6.18-238.el5
- oracleasm-2.6.18-238.el5-2.0.5-1.el5.x86_64.rpm
- oracleasmlib-2.0.4-1.el5.x86_64.rpm
- oracleasm-support-2.1.7-1.el5.x86_64.rpm
After downloading the rpms to both Oracle RAC nodes in the cluster, install it using the following commands as the root user:
[root@rac-node1 ~]# rpm -Uvh oracleasm-support-2.1.3-1.el5.x86_64.rpm
[root@rac-node1 ~]# rpm -Uvh oracleasm-2.6.18-164.el5-2.0.5-1.el5.x86_64.rpm
[root@rac-node1 ~]# rpm -Uvh oracleasmlib-2.0.4-1.el5.x86_64.rpm
7.2. Configure ASMLib
Configuring and load the ASM kernel module. This task needs to be run on both Oracle RAC nodes as the root user.
[root@rac-node1 ~]# /usr/sbin/oracleasm configure -i

Configuring the Oracle ASM library driver.
This will configure the on-boot properties of the Oracle ASM library
driver. The following questions will determine whether the driver is
loaded on boot and what permissions it will have. The current values
will be shown in brackets ('[]'). Hitting <ENTER> without typing an
answer will keep that current value. Ctrl-C will abort.

Default user to own the driver interface []: grid

Default group to own the driver interface []: asmadmin

Start Oracle ASM library driver on boot (y/n) [n]: y

Scan for Oracle ASM disks on boot (y/n) [y]: y

Writing Oracle ASM library driver configuration: done
The script completes the following tasks:
- Creates the /etc/sysconfig/oracleasm configuration file
- Creates the /dev/oracleasm mount point
- Mounts the ASMLib driver file system
Enter the following command to load the oracleasm kernel module:
[root@rac-node1 ~]$ /usr/sbin/oracleasm init
Repeat this procedure on all nodes in the cluster (rac-node1 and rac-node2).
NOTE: To avoid ASM issue with Multipath devices on Linux – ORA-15186
In all RAC nodes modify the /etc/sysconfig/oracleasm with:
ORACLEASM_SCANORDER="dm"
ORACLEASM_SCANEXCLUDE="sd"
In all nodes restart the asmlib as the root;
# /etc/init.d/oracleasm stop
# /etc/init.d/oracleasm start
8. Create ASM Disks for Oracle
Creating the ASM disks only needs to be performed from one node in the RAC cluster as the root user.
One of the prerequisites was to prepare the storage as the Device-Mapper Multipath.
Users should be able to display information about multipathed devices.
To display information about available devices issue the following command as the root user:
Exaple:
[root@rac-node1 ~]# multipath –ll

mpath1 (3600a0b800011a1ee0000040646828cc5) dm-1 IBM,1815 FAStT

[size=1024M][features=1 queue_if_no_path][hwhandler=1 rdac]

\_ round-robin 0 [prio=6][active]

\_ 29:0:0:1 sdf 8:80 [active][ready]

\_ 28:0:1:1 sdl 8:176 [active][ready]

\_ round-robin 0 [prio=0][enabled]

\_ 28:0:0:1 sdb 8:16 [active][ghost]

\_ 29:0:1:1 sdq 65:0 [active][ghost]
Record the mpath numbers and the capacity of the devices.
In our example we are going to create the following ASM DISKS:
|
Storage Component |
File System |
DISK Name |
Number of disks |
Multipathed Device |
|
OCR/Voting Disk |
ASM |
CRSVOL1 CRSVOL2 CRSVOL3 CRSVOL4 CRSVOL5 |
5 x (1GB) |
/dev/mapper/mpath* i.e. /dev/mapper/mpath0 /dev/mapper/mpath1 … |
|
Database Files |
ASM |
DATAVOL1 DATAVOL2 |
2 x (250GB) |
/dev/mapper/mpath* i.e. /dev/mapper/mpath5 /dev/mapper/mpath6 |
|
Recovery Area |
ASM |
FRAVOL1 FRAVOL2 |
2 x (250GB) |
/dev/mapper/mpath* i.e. /dev/mapper/mpath7 /dev/mapper/mpath8 |
NOTE: Determine mpathX device number according to your OS configuration!
In this example we have the following configuration:
1GB mpath0
1GB mpath1
1GB mpath2
1GB mpath3
1GB mpath4
250GB mpath5
250GB mpath6
250GB mpath7
250GB mpath8
To create the ASM disks using the Multipathed Device target names to local device name mappings, issue the following commands as the root:
CRSVOL:
[root@rac-node1 ~]# /usr/sbin/oracleasm createdisk CRSVOL1 /dev/mapper/mpath0
[root@rac-node1 ~]# /usr/sbin/oracleasm createdisk CRSVOL2 /dev/mapper/mpath1
[root@rac-node1 ~]# /usr/sbin/oracleasm createdisk CRSVOL3 /dev/mapper/mpath2
[root@rac-node1 ~]# /usr/sbin/oracleasm createdisk CRSVOL4 /dev/mapper/mpath3
[root@rac-node1 ~]# /usr/sbin/oracleasm createdisk CRSVOL5 /dev/mapper/mpath4

Writing disk header: done
Instantiating disk: done
DATAVOL:
[root@rac-node1 ~]# /usr/sbin/oracleasm createdisk DATAVOL1 /dev/mapper/mpath5
[root@rac-node1 ~]# /usr/sbin/oracleasm createdisk DATAVOL2 /dev/mapper/mpath6

Writing disk header: done
Instantiating disk: done
FRAVOL:
[root@rac-node1 ~]# /usr/sbin/oracleasm createdisk FRAVOL1 /dev/mapper/mpath7
[root@rac-node1 ~]# /usr/sbin/oracleasm createdisk FRAVOL2 /dev/mapper/mpath8

Writing disk header: done
Instantiating disk: done
To make the disk available on the other nodes in the cluster ( rac-node2), enter the following command as the root on each node:
[root@rac-node2 ~]# /usr/sbin/oracleasm scandisks

Reloading disk partitions: done

Cleaning any stale ASM disks...
Scanning system for ASM disks...

Instantiating disk "DATAVOL1"
Instantiating disk "DATAVOL2"

Instantiating disk "CRSVOL1"
Instantiating disk "CRSVOL2"
Instantiating disk "CRSVOL3"
Instantiating disk "CRSVOL4"
Instantiating disk "CRSVOL5"

Instantiating disk "FRAVOL1"
Instantiating disk "FRAVOL2"
Now you can test that the ASM disks were successfully created by using the following command on both nodes in the RAC cluster as the root user account. This command identifies shared disks attached to the node that are marked as Automatic Storage Management disks:
[root@rac-node1 ~]$ /usr/sbin/oracleasm listdisks

CRSVOL1
CRSVOL2
CRSVOL3
CRSVOL4
CRSVOL5

DATAVOL1
DATAVOL2

FRAVOL1
FRAVOL2
9. Install Oracle Grid Infrastructure for a Cluster
Perform the following installation procedures from only one of the Oracle RAC nodes in the cluster (rac-node1). The Oracle grid infrastructure software (Oracle Clusterware and Automatic Storage Management) will be installed to both of the Oracle RAC nodes in the cluster by the Oracle Universal Installer.
NOTE: At any time during installation, if you have a question about what you are being asked to do, click the “Help” button on the OUI page.
Complete the following steps to install Oracle grid infrastructure on your cluster.
Upload installation packages on the server (rac-node1) into home users directory.
- Oracle Database 11g Release 2 Grid Infrastructure (11.2.0.1.0) for Linux
o linux.x64_11gR2_grid.zip – /home/grid
- Oracle Database 11g Release 2 (11.2.0.1.0) for Linux
o linux.x64_11gR2_database_1of2.zip – /home/oracle
o linux.x64_11gR2_database_2of2.zip – /home/oracle
Extract the Oracle Grid Infrastructure software as the grid user into a /home/grid/stage directory:
[grid@rac-node1 ~]$ cd; unzip linux.x64_11gR2_grid.zip -d /home/grid/stage
Switch to oracle user and extract Oracle Database software into a /home/oracle/stage directory
[oracle@rac-node1~]$ cd; for i in *.zip; do unzip $i –d /home/oracle/stage; done
Perform the following tasks as the grid user to install Oracle Grid Infrastructure:
From this point make sure you have X Server running on your localhost to be able to display graphical interfaces – for example Xming X Server for Windows
[grid@rac-node1 ~]$ cd /home/grid/stage/grid [grid@rac-node1 grid]$ ./runInstaller
Oracle Installer will start:


9.1. Postinstallation Tasks for Oracle Grid Infrastructure for a Cluster
Perform the following postinstallation procedures on both Oracle RAC nodes in the cluster to verify Oracle Clusterware Installation.
Run the following commands on both nodes in the RAC cluster as the grid user:
- Check CRS Status
[grid@rac-node1 ~]$ crsctl check crs

CRS-4638: Oracle High Availability Services is online

CRS-4537: Cluster Ready Services is online

CRS-4529: Cluster Synchronization Services is online

CRS-4533: Event Manager is online
- Check Cluster Nodes
[grid@rac-node1 ~]$ lsnodes -n
rac-node1 1 rac-node2 2
- Confirming Oracle ASM Function for Oracle Clusterware Files
[grid@rac-node1 ~]$ srvctl status asm -a
ASM is running on rac-node1, rac-node2
ASM is enabled.
- Check Oracle Cluster Registry (OCR) and voting disks
[grid@rac-node1 ~]$ ocrcheck
[grid@rac-node1 ~]$ crsctl query css votedisk
9.2. Create ASM Disk Groups for Data and Fast Recovery Area (FRA)
Run the ASM Configuration Assistant (asmca) as the grid user from only one node in the cluster (rac-node1) to create the additional ASM disk group which will be used later in this guide to create the clustered database.
The ASM disk group will be named +DATA and will be used to store all Oracle physical database files (data, online redo logs, control files).
Perform the following tasks as the grid user to create additional ASM disk group:
[grid@rac-node1 ~]$ asmca &
|
Screen Name |
Response |
|
Disk Groups |
From the “Disk Groups” tab, click the [Create] button. |
|
Create Disk Group |
DATA
The “Create Disk Group” shows two of the ASMLib volumes DATAVOL1 and DATAVOL2 and two for FRA.
NEXT FRA
|
|
Disk Groups |
After creating the ASM disk groups, you will be returned to the initial dialog. Click the [Exit] button. |
10. Install Oracle Database 11g with Oracle Real Application Clusters
Perform the Oracle Database software installation from only one of the Oracle RAC nodes in the cluster (rac-node1). The Oracle Database software will be installed to both of Oracle RAC nodes in the cluster by the Oracle Universal Installer using SSH protocol.
We will skip the “Create Database” option when installing the Oracle Database software. The clustered database will be created later in this guide using the Database Configuration Assistant (DBCA) after all installs have been completed.
10.1. Install Oracle Database 11g Release 2 Software
- Make sure that “oinstall” group has write permission to /u01/app directory if not run the following commands
#NODE1 and NODE2 as root

[root@rac-node1 ~]# chmod 775 /u01/app

[root@rac-node2 ~]# chmod 775 /u01/app
Perform the following tasks as the oracle user on the first node to install the Oracle Database software:
NOTE: X Server will need to be running on local host.
[oracle@rac-node1 ~]$ cd /home/oracle/stage/database

[oracle@rac-node1 database]$ ./runInstaller
|
Screen Name |
Response |
|
Installation Location |
Specify the Oracle base and Software location (Oracle_home) as follows: |
|
Prerequisite Checks |
The installer will run through a series of checks to determine if both Oracle RAC nodes meet the minimum requirements for installing and configuring the Oracle Database Examples software. Starting with 11g release 2 (11.2), if any checks fail, the installer (OUI) will create shell script programs, called fixup scripts, to resolve many incomplete system configuration requirements. If OUI detects an incomplete task that is marked “fixable”, then you can easily fix the issue by generating the fixup script by clicking the [Fix & Check Again] button. The fixup script is generated during installation. You will be prompted to run the script as root in a separate terminal session. When you run the script, it raises kernel values to required minimums, if necessary, and completes other operating system configuration tasks. If all prerequisite checks pass (as was the case for my install), the OUI continues to the Summary screen. |
|
Summary |
Click [Finish] to start the installation. |
|
Install Product |
The installer performs the Oracle Database software installation process on both Oracle RAC nodes. |
|
Finish |
At the end of the installation, click the [Close] button to exit the OUI. |
10.2. Create the Oracle Cluster Database
The database creation process should only be performed from one of the Oracle RAC nodes in the cluster (rac-node1). Use the Oracle Database Configuration Assistant (DBCA) to create the clustered database.
Before executing the DBCA, make sure that the $ORACLE_HOME and $PATH are set appropriately for the
$ORACLE_BASE/product/11.2.0/dbhome_1 environment. Setting environment variables in the login script for the oracle user account was covered in section Create Login Script for the oracle User Account
To start the database creation process, run the following as the oracle user:
[oracle@rac-node1 ~]$ dbca &
|
Screen Name |
Response |
|
Welcome Screen |
Select Oracle Real Application Clusters database. |
|
Operations |
Select Create a Database. |
|
Database Templates |
Select General Purpose Database. |
|
Database Identification |
Cluster database configuration:
Database naming
Node Selection. |
|
Management Options |
Leave the default options here, which is to Configure Enterprise Manager / Configure Database Control for local management. |
|
Database Credentials |
Select to Use the Same Administrative Password for All Accounts. Enter the password (twice) and make sure the password does not start with a digit number. |
|
Database File Locations |
Specify storage type and locations for database files.
NOTE: If installer doesn’t “see” ASM disk group +DATA even if you press [Browse] button, then press [Back] button and do the following without exiting the installer: Login as a root user to rac-node1 and issue the following command: [root@rac-node1 ~]# usermod -g oinstall -G dba,asmdba oracle
Go back to installer and press [Next]. Now installer should see ASM disk group +DATA |
|
Specify ASMSNMP Password |
Specify the ASMSNMP password for the ASM instance. |
|
Recovery Configuration |
Check the option for Specify Fast Recovery Area. For the Fast Recovery Area, click the [Browse] button and select the disk group name +FRA
|
|
Database Content |
Leave all of the Database Components (and destination tablespaces) set to their default values and do not select the Sample Schemas. |
|
Initialization Parameters |
Change parameters for your environment Memory:
|
|
Database Storage |
Leave all at their default settings |
|
Creation Options |
Keep the default option Create Database selected. Select to Generate Database Creation Scripts. Click [Finish] to start the database creation process. After acknowledging the database creation report and script generation dialog, the database creation will start. Click [OK] on the “Summary” screen. |
|
End of Database Creation |
At the end of the database creation, exit from the DBCA. |
When the DBCA has completed, we will have a fully functional Oracle RAC cluster running.
As the oracle user verify whether clustered database is open:
[oracle@rac-node1 ~]$ su - grid -c "crsctl status resource -w "TYPE co 'ora'" -t" Password: *****
10.3. Oracle Enterprise Manager Debase Control
If you configured Oracle Enterprise Manager (Database Control), it can be used to view the database configuration and current status of the database.
The URL for this example is: https://rac-node1:1158/em
[oracle@rac-node1 ~]$ emctl status dbconsole

Oracle Enterprise Manager 11g Database Control Release 11.2.0.1.0
Copyright (c) 1996, 2009 Oracle Corporation. All rights reserved.
https://rac-node1:1158/em/console/aboutApplication

Oracle Enterprise Manager 11g is running.

------------------------------------------------------------------

Logs are generated in directory /u01/app/oracle/product/11.2.0/dbhome_1/rac-node1_myracdb/sysman/log
11. Verify Oracle Grid Infrastructure and Database Configuration
To Start/Stop/Status oracle database:
- All Oracle Instances
[oracle@rac-node1 ~]$ srvctl stop database -d myracdb
[oracle@rac-node1 ~]$ srvctl start database -d myracdb
[oracle@rac-node1 ~]$ srvctl status database -d myracdb

Instance myracdb1 is running on node rac-node1
Instance myracdb2 is running on node rac-node2
- Single Oracle Instance – (Status of Specific Instance)
[oracle@rac-node1 ~]$ srvctl stop instance -d myracdb -i myracdb1
[oracle@rac-node1 ~]$ srvctl start instance -d myracdb -i myracdb1

[oracle@rac-node1 ~]$ srvctl status instance -d myracdb -i myracdb1

Instance myracdb1 is running on node rac-node1
- Check CRS Status
[grid@rac-node1 ~]$ crsctl check crs
- Check Cluster Nodes
[grid@rac-node1 ~]$ olsnodes -n
rac-node1 1 rac-node2 2
- Check Oracle TNS Listener Process on Both Nodes
[grid@rac-node1 ~]$ ps -ef | grep lsnr | grep -v 'grep' | grep -v 'ocfs' | awk '{print $9}'

[grid@rac-node2 ~]$ ps -ef | grep lsnr | grep -v 'grep' | grep -v 'ocfs' | awk '{print $9}'
- Confirming Oracle ASM Function for Oracle Clusterware Files
[grid@rac-node1 ~]$ srvctl status asm -a
ASM is running on rac-node1,rac-node2
ASM is enabled.
- Check Oracle Cluster Registry (OCR)
[grid@rac-node1 ~]$ ocrcheck
- Check Voting Disk
[grid@rac-node1 ~]$ crsctl query css votedisk
For more detaild information use the following toll:
$ srvctl

Usage: srvctl <command> <object> [<options>]

commands: enable|disable|start|stop|relocate|status|add|remove|modify|getenv|setenv|unsetenv|config

objects: database|instance|service|nodeapps|vip|asm|diskgroup|listener|srvpool|server|scan|scan_listener|
oc4j|home|filesystem|gns

For detailed help on each command and object and its options use:

srvctl <command> -h or

srvctl <command> <object> -h

For example:

[oracle@rac-node1 ~]$ srvctl status nodeapps
That’s all Folks! Hope you enjoyed reading.