Data Masking with Oracle Enterprise Manager 12c Cloud Control
Data Masking in Oracle Enterprise Manager 12c Cloud Control
This tutorial shows you how to identify sensitive data, create Application Data Model, select appropriate mask formats for the sensitive fields, and apply the mask.
First of all I would like to mention that I don’t want to reinvent the wheel. We will use Oracle 11g/10g tutorial as a reference; Replacing Sensitive Data By Using the Data Masking Pack and I’m going to adopt this tutorial to 12c and its features.
Oracle Data Masking pack is integrated in OEM 12c and can be found in Enterprise > Quality Management top left menu of the OEM 12c.
Prerequisites:
- Readers are familiar with Data masking concepts
- Oracle EM 12c has been installed
- Staging Oracle database 11g has been installed on Linux OS and added to targets in OEM 12c
- OEM 12c user has sufficient privileges to develop and deploy data masking definitions:
- EM_USER, PUBLIC, EM_ALL_OPERATOR
- Database user has sufficient privileges in a test database to use data masking packages and execute data masking scripts. Minimum privileges required for data masking;
- SELECT_CATALOG_ROLE
- SELECT ANY DICTIONARY
- EXECUTE on DBMS_CRYPTO, DBMS_RANDOM packages
- ALTER SYSTEM
- CREATE, DROP, ALTER, SELECT, INSERT, and COMPILE the objects being masked
- The predefined masking formats use functions defined in the DM_FMTLIB package. To use the predefined masking formats on a staging database, you must manually install the DM_FMTLIB package on that database. To install the DM_FMTLIB package, see “Installing the DM_FMTLIB Package” .
- Download and unzip the 12c_DM_setup.zip file into your working directory. In this tutorial the working directory is /tmp/datamask. This SQL script will create HR_TEST schema with password welcome1 and populate schema with objects and test data. It also provides sql script to create mask_data table with 10k rows of fake data.
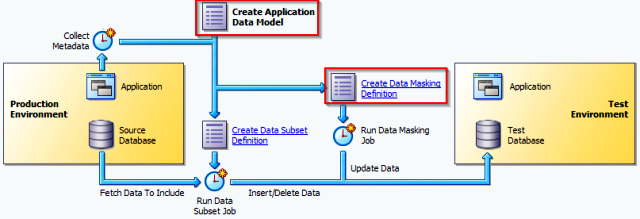
The Application Data Model
One of the cool features in OEM 12c is the Application Data Model. ADM stores the list of applications, tables and relationships between table columns that are either declared in the data dictionary, imported from application metadata or user-specified. The Application Data Model maintains sensitive data types and their associated columns and is used by Secure Test Data Management features such as Data Masking and Data Subsetting, to produce test data securely. In Cloud Control 12c a database schema is being called as an application. Application Data Model can hold multiple schemas for example HR, HR_TEST, OE, OE_TEST.
Test scenario
In this tutorial, we review the HR_TEST schema in a staging environment to identify sensitive data and then select appropriate mask formats for the sensitive data. After creating the mask, we then proceed to apply the mask and replace the sensitive fields in the production copy with realistic but scrubbed data.
Creating Tables for the Tutorial
To create tables to use during this data masking tutorial, perform the following steps:
1. Navigate to /tmp/datamask and unzip 12c_DM_setup.zip
[oracle@/tmp/datamask]$ cd /tmp/datamask/; unzip 12c_DM_setup.zip

[oracle@/tmp/datamask]$ ls -1
12c_DM_setup.sql
mask_data.sql
2. Log in to SQL*Plus as the SYSTEM or SYSDBA user and run SQL scripts (on staging database host)
[oracle@/tmp/datamask]$ sqlplus / as sysdba

SQL*Plus: Release 11.2.0.2.0 Production on Tue Dec 5 09:06:54 2033
Copyright (c) 1982, 2010, Oracle.  All rights reserved.
Connected to:
Oracle Database 11g Enterprise Edition Release 11.2.0.2.0 - 64bit Production
With the Partitioning, Automatic Storage Management, OLAP, Data Mining
and Real Application Testing options

SQL> @/tmp/datamask/12c_DM_setup.sql

SQL> --- Cleanup from possible previous executions

SQL> DROP USER HR_TEST CASCADE;

…

107 rows updated.
3. The HR_TEST user and objects has been created.
SQL> select * from all_users where username='HR_TEST';

USERNAME                          USER_ID CREATED
------------------------------ ---------- ---------
HR_TEST                               121 05-DEC-12
SQL>
4. Login as HR_TEST user and execute mask_data.sql to create a table with 10.000 rows of fake data
SQL>connect hr_test/welcome1
Connected.

SQL>@/tmp/datamask/mask_data.sql

…

1 row created.
SQL>
Identifying Sensitive Data
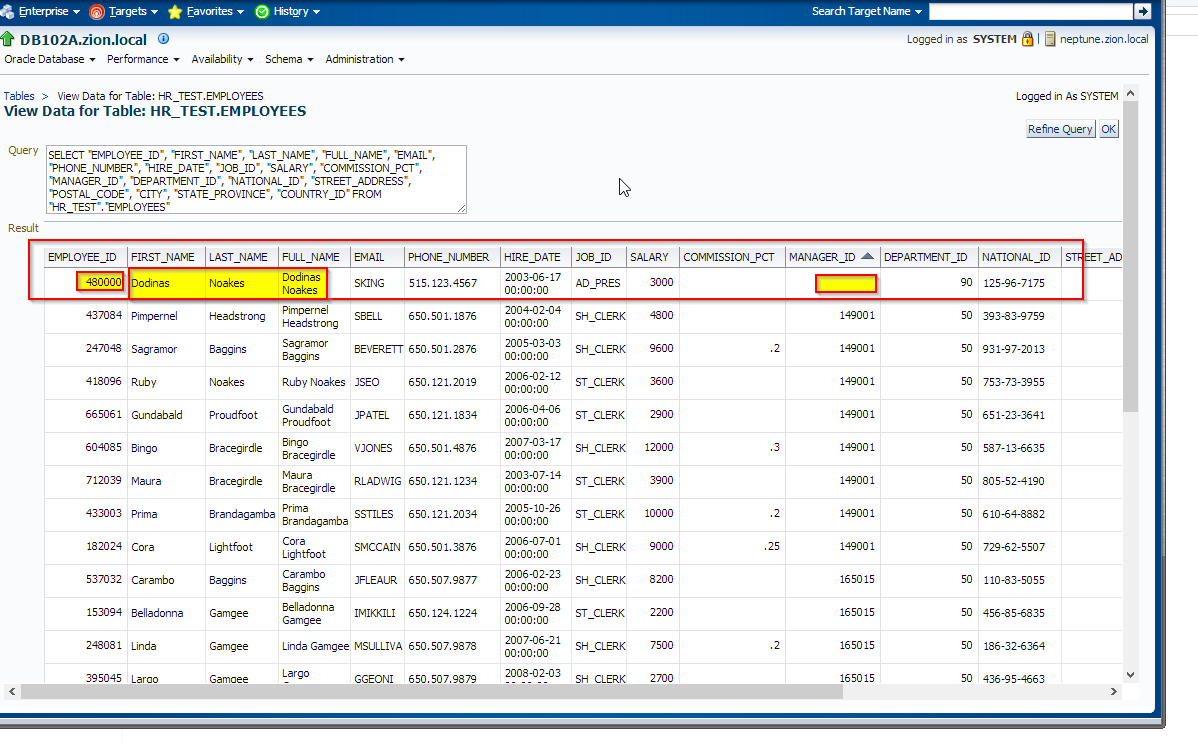
Let’s take a look at HR_TEST.EMPLOYEES table to determine at glance which columns should be masked.
SQL> select * from HR_TEST.EMPLOYEES;
See results here EMPLOYEES.htm
OEM 12c introduces Enterprise Manager’s Data Discovery and Modelling (DDM) capability to enable operations such as Sensitive Data Discovery and Data Masking. DDM enables scanning and tagging of sensitive data and modelling of data relationships that are encapsulated within an Application Data Model.
First we have to create Application Data Model and discover/define sensitive columns in tables of HR_TEST schema; next we will create relationships between columns and finally create Data Masking Definitions. In the end we will create and execute data masking sql script.
Creating Application Data Model
1. First, in order to prevent from the following error:
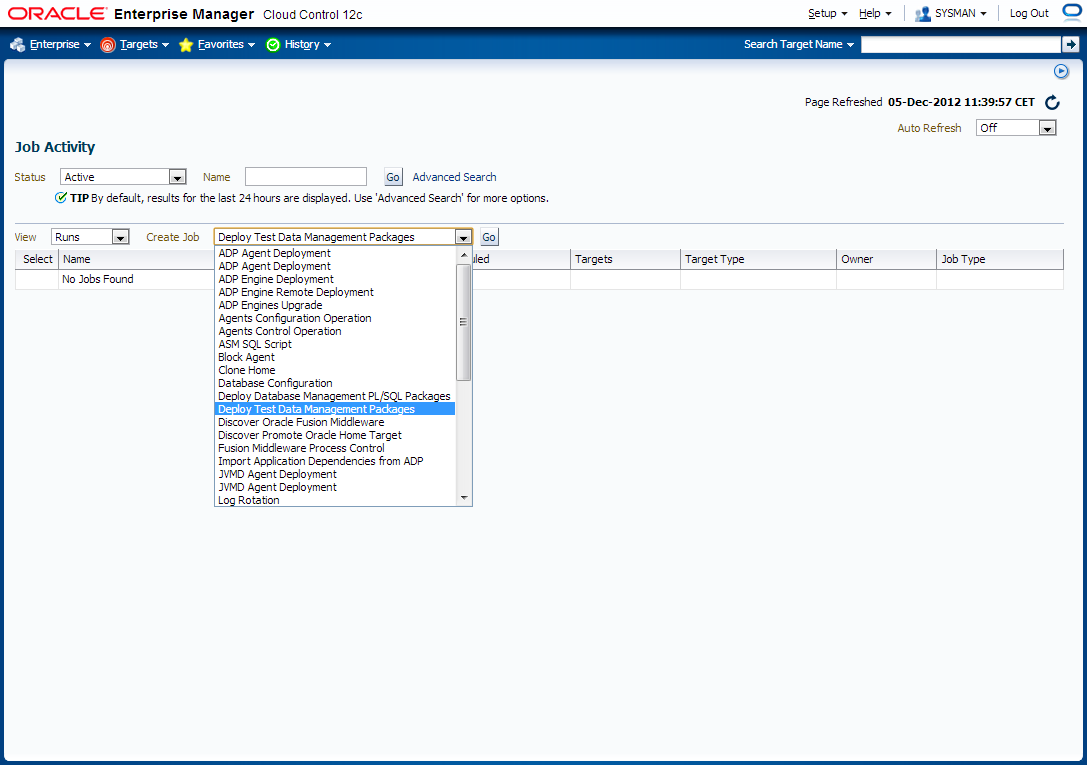
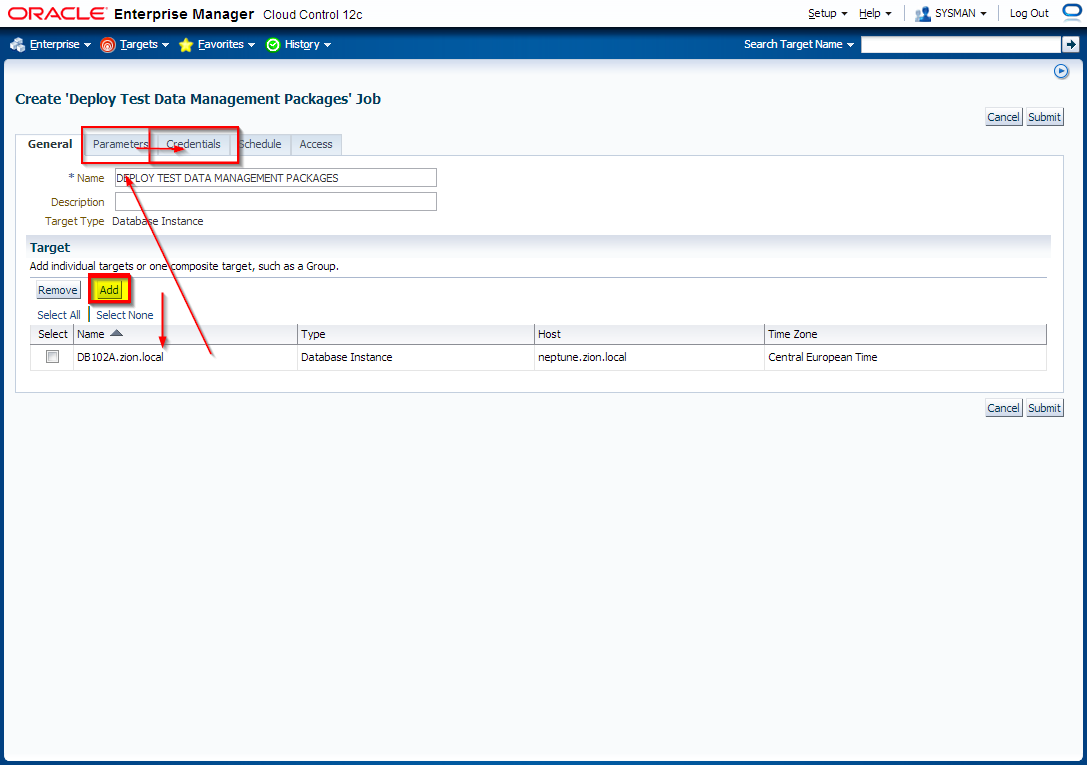
The Test Data Management package needed to perform this action is not deployed on the source database or is not accessible. The package can be deployed via the Jobs page using the Deploy Test Data Management Packages job type.
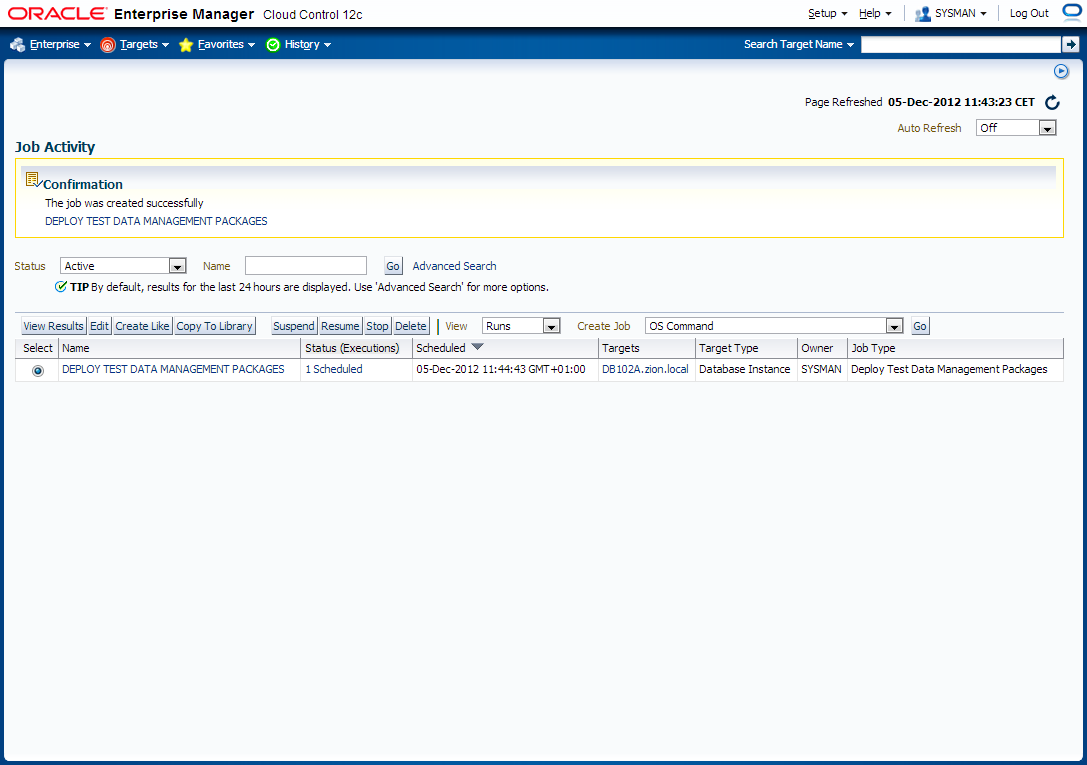
Deploy Test Data Management Packages to a staging database.
Login to OEM 12c and navigate to Enterprise -> Job -> Activity window and schedule a job to deploy required packages.


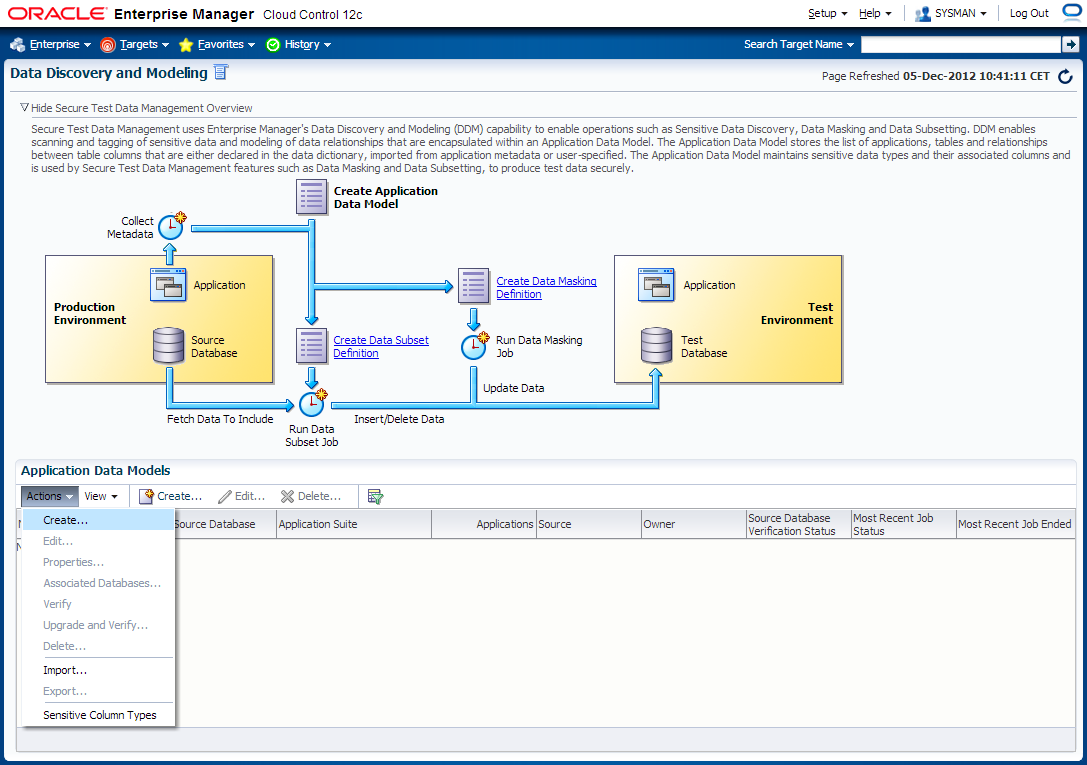
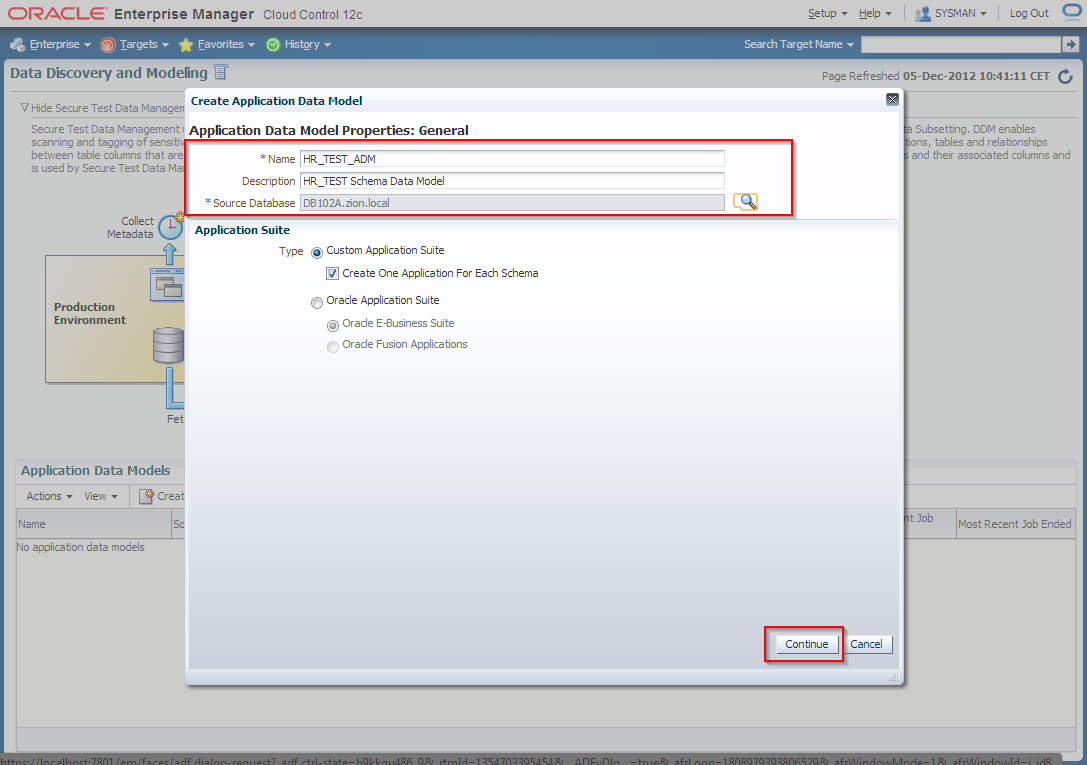
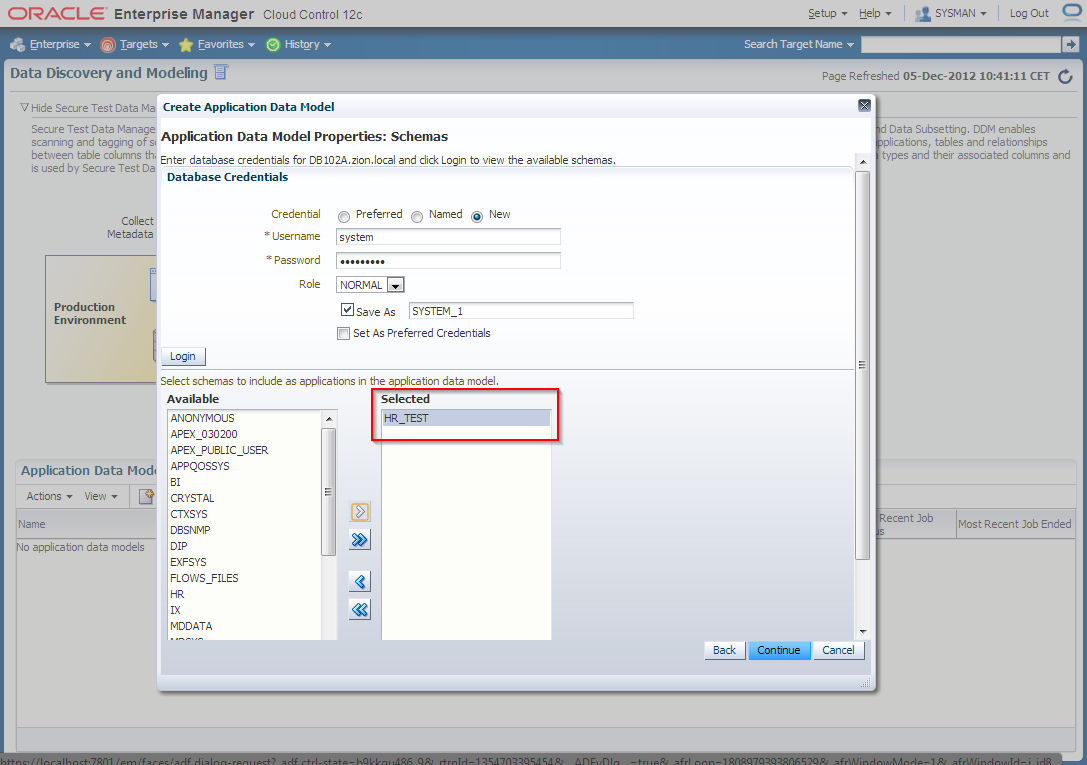
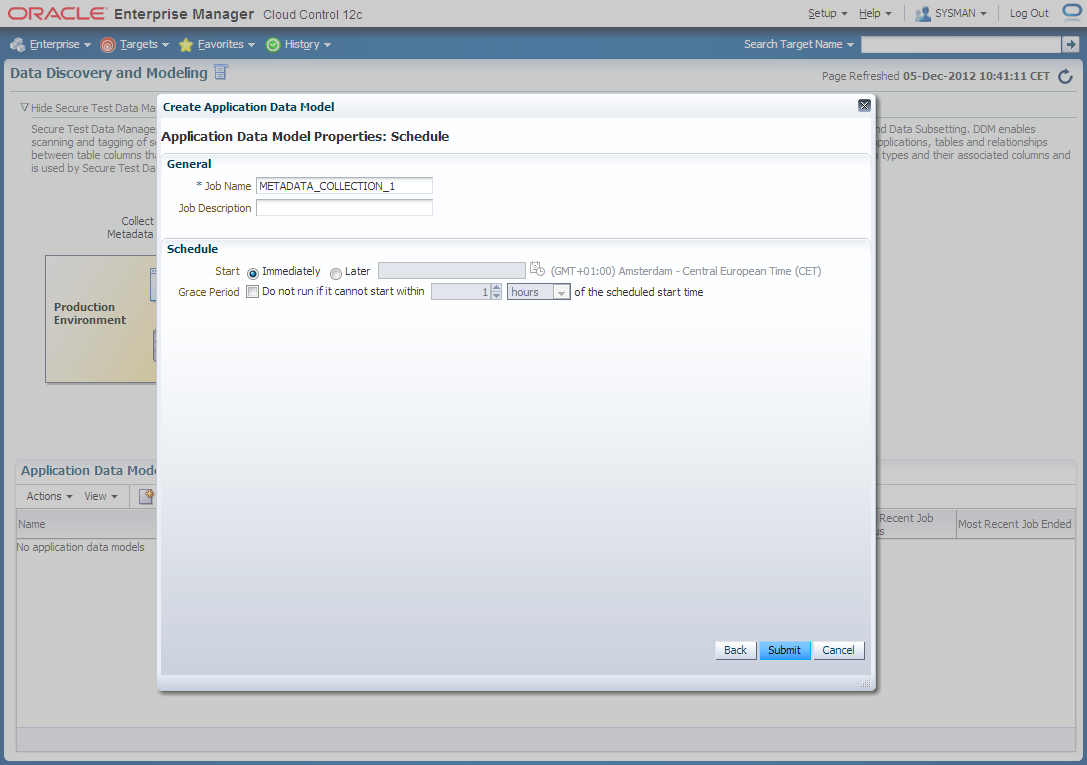
2. Create Application Data Model
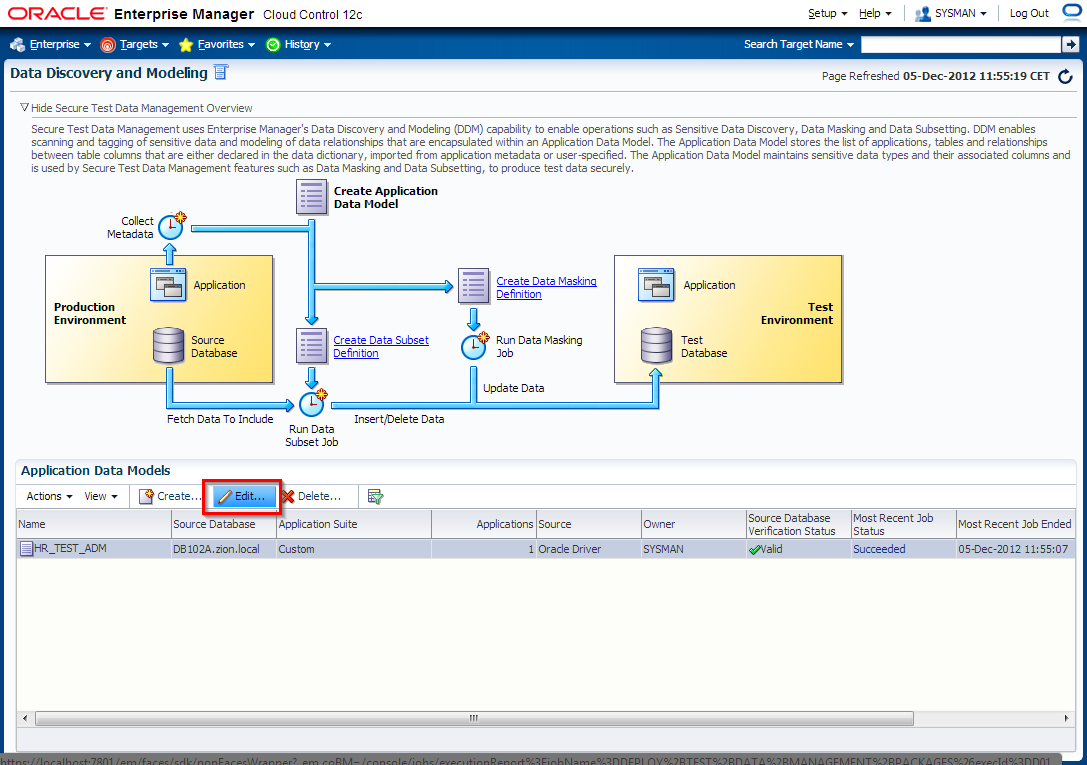
Navigate to Enterprise -> Quality Management -> Data Discovery and Modelling


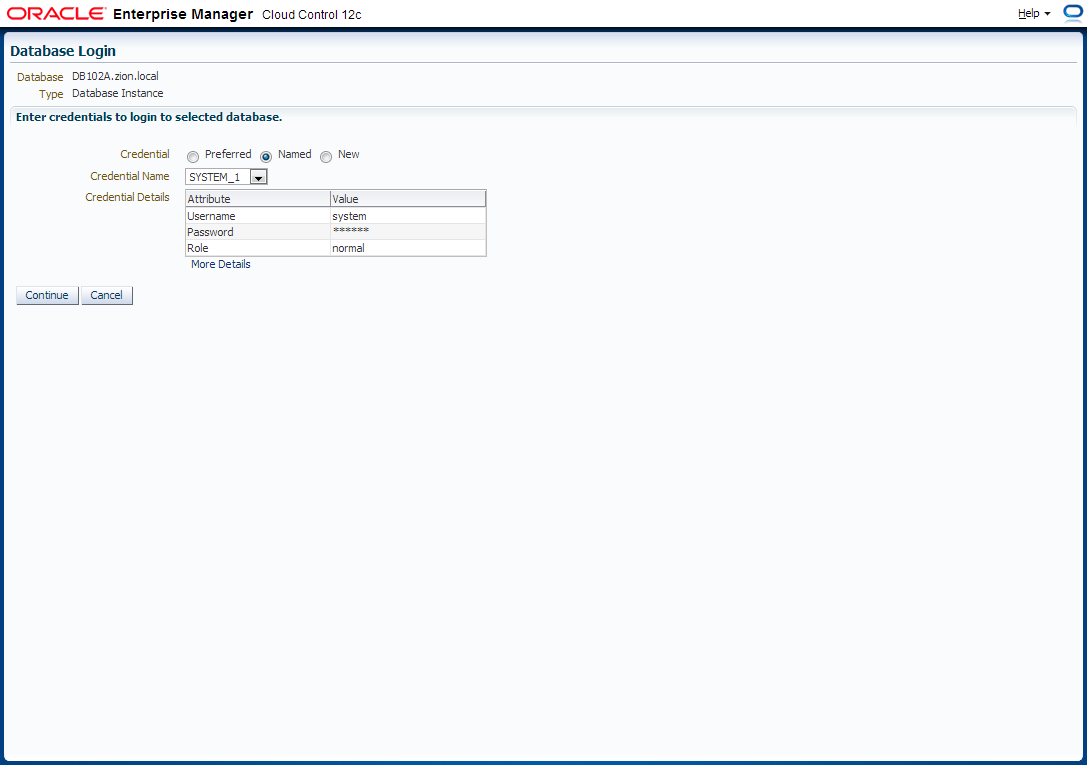
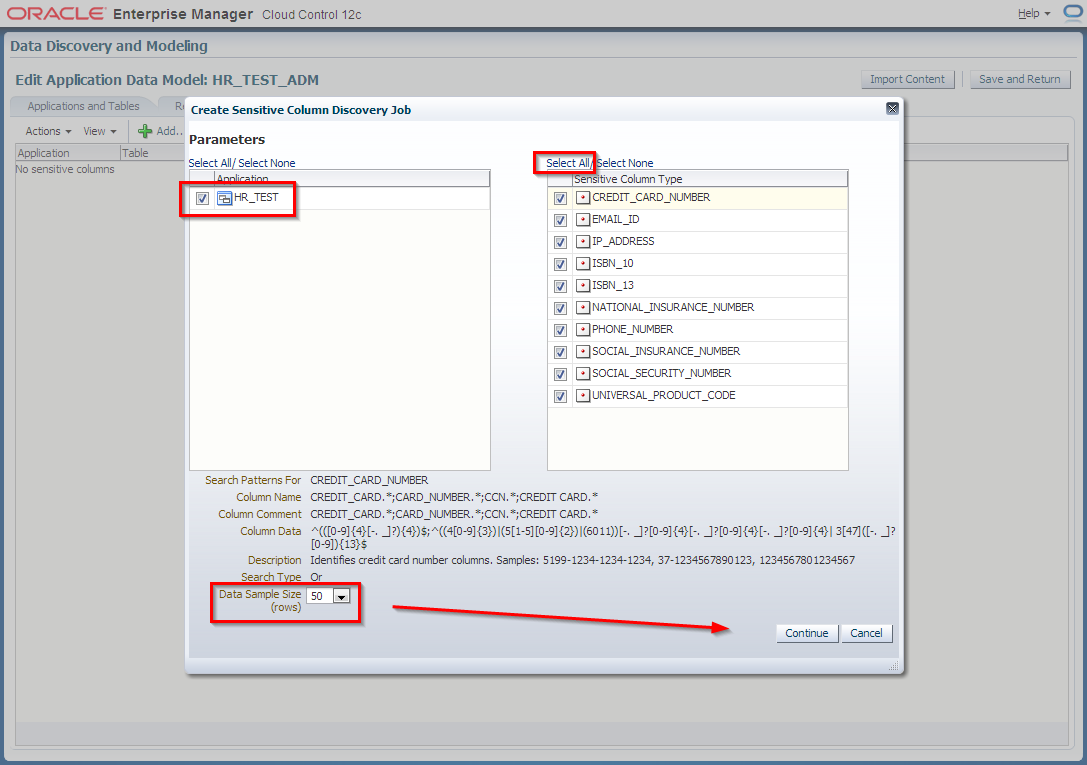
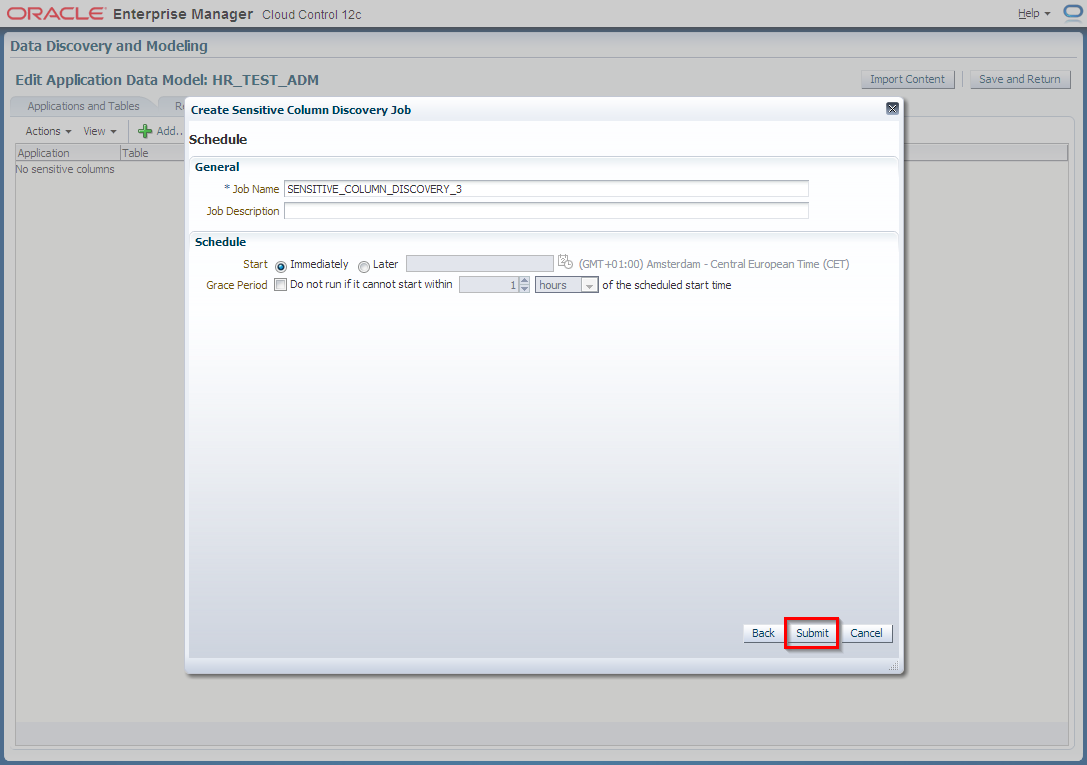
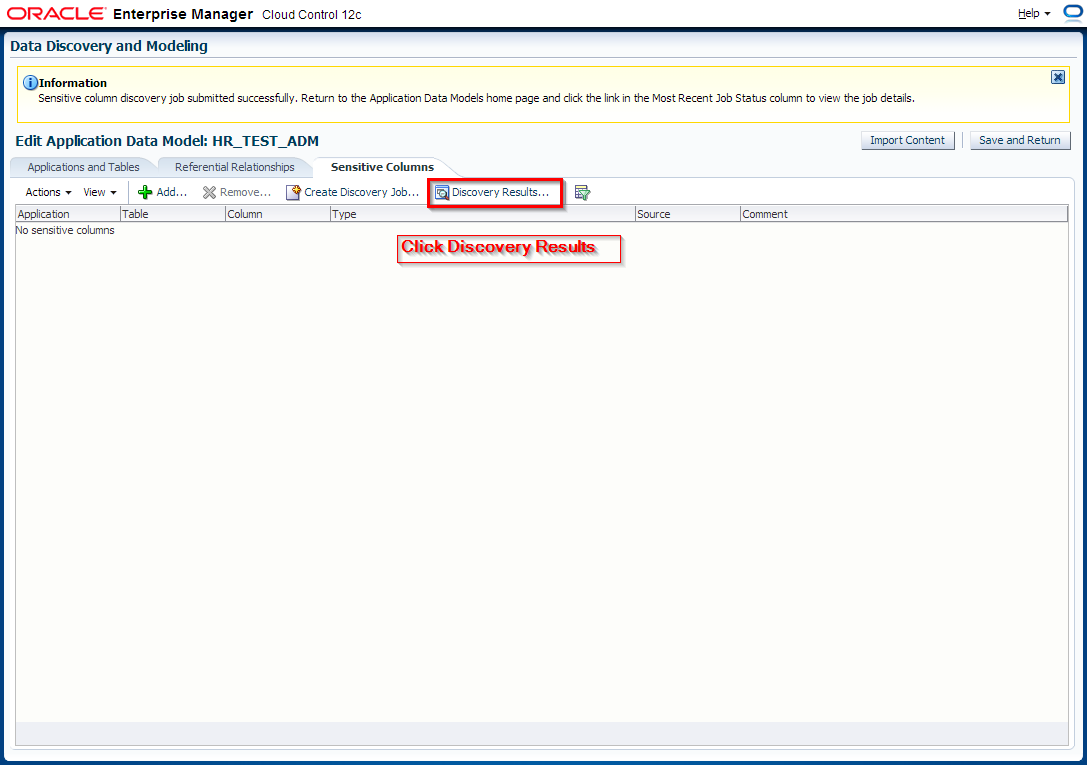
3. Edit HR_TEST_ADM Application Data Model and schedule sensitive columns discovery job
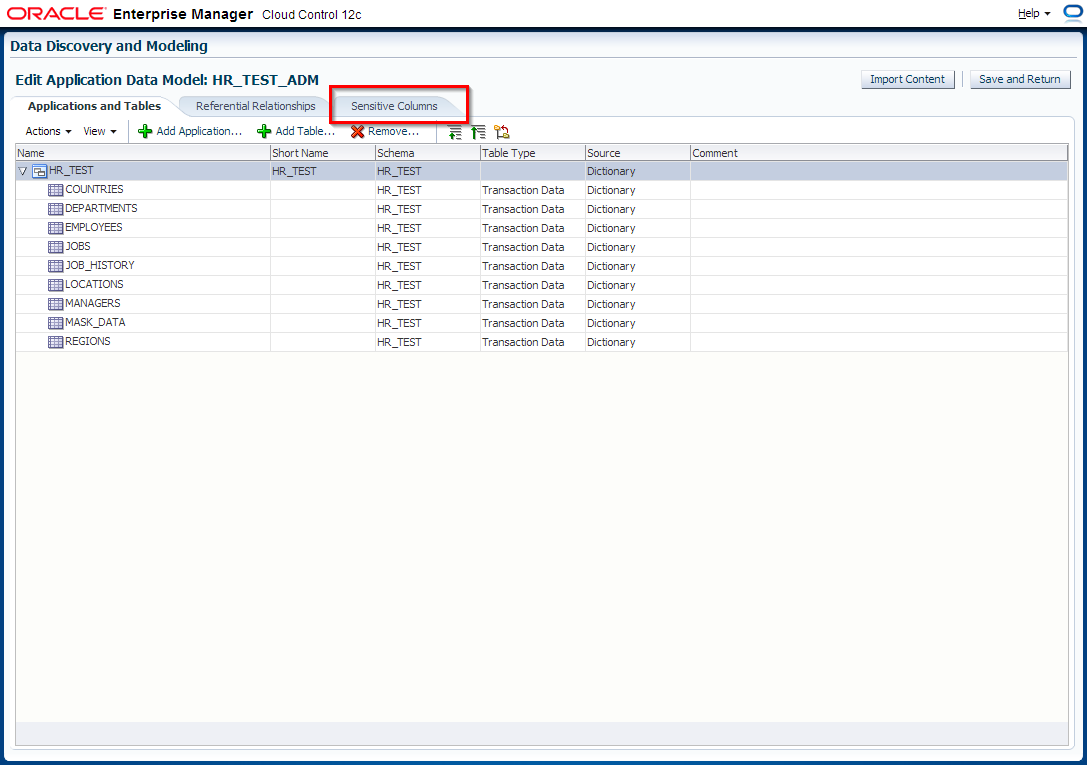

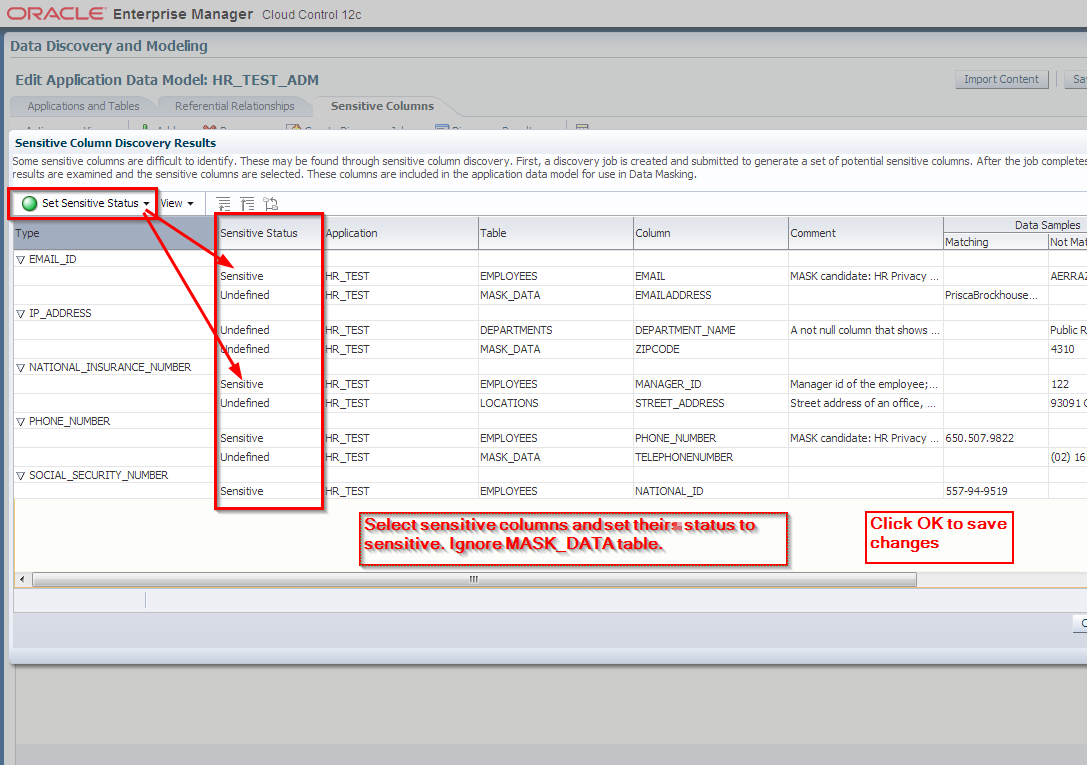
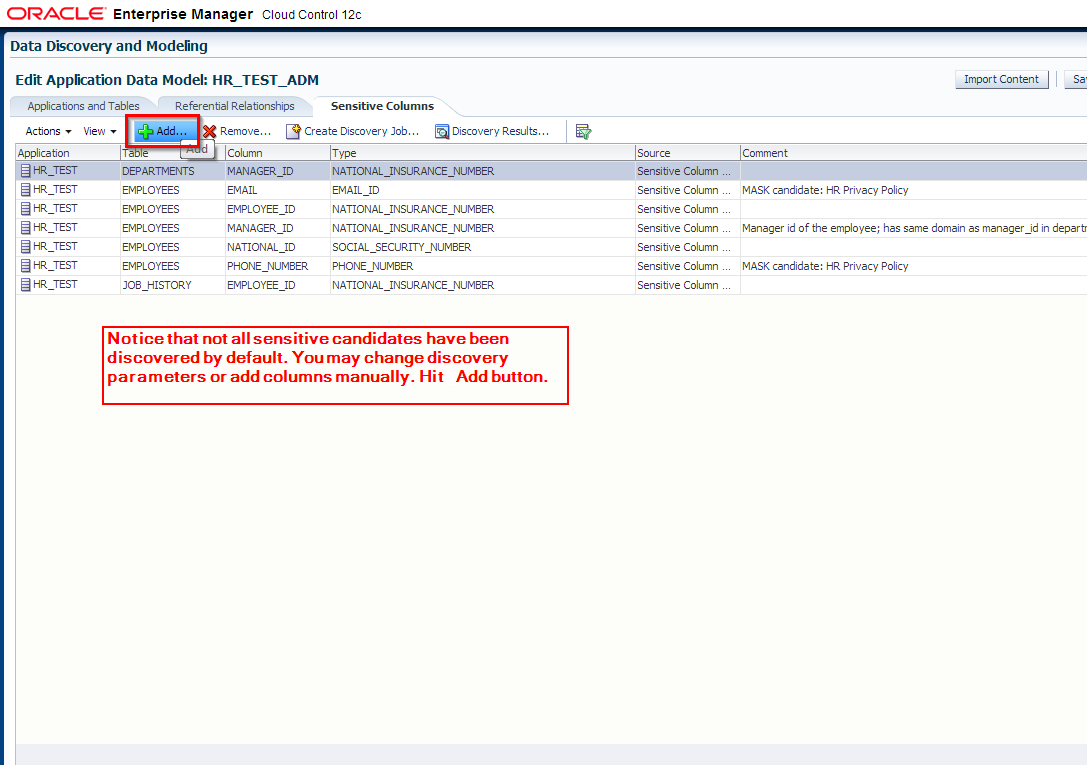
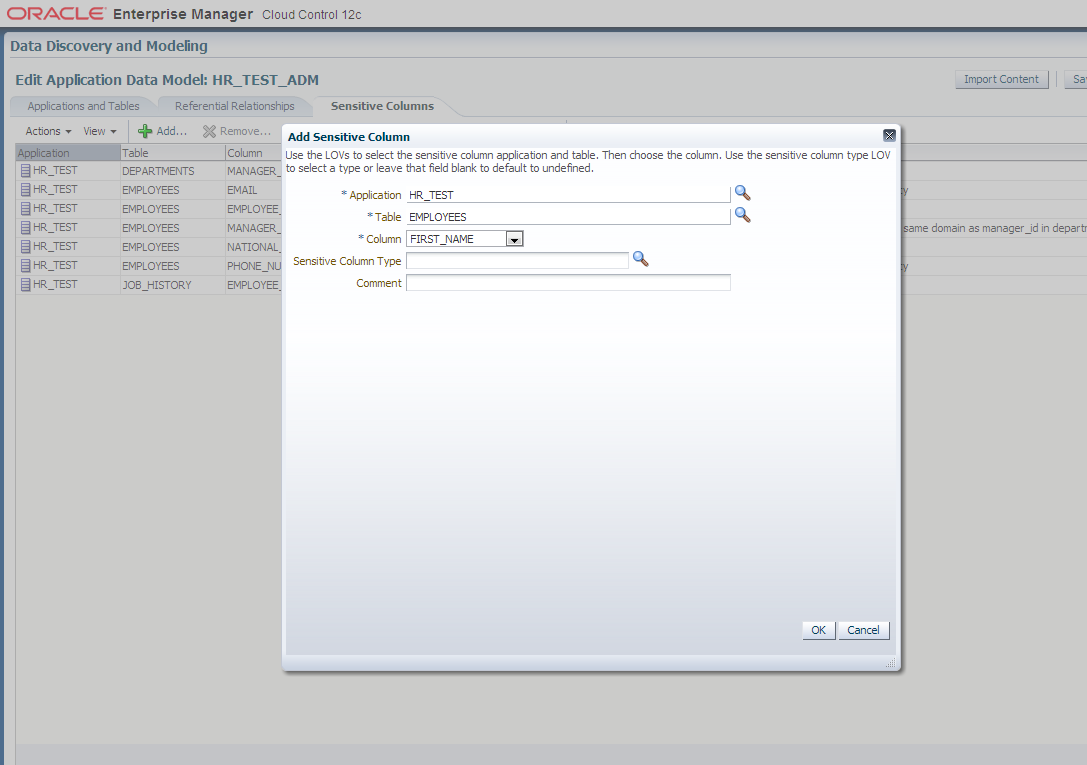
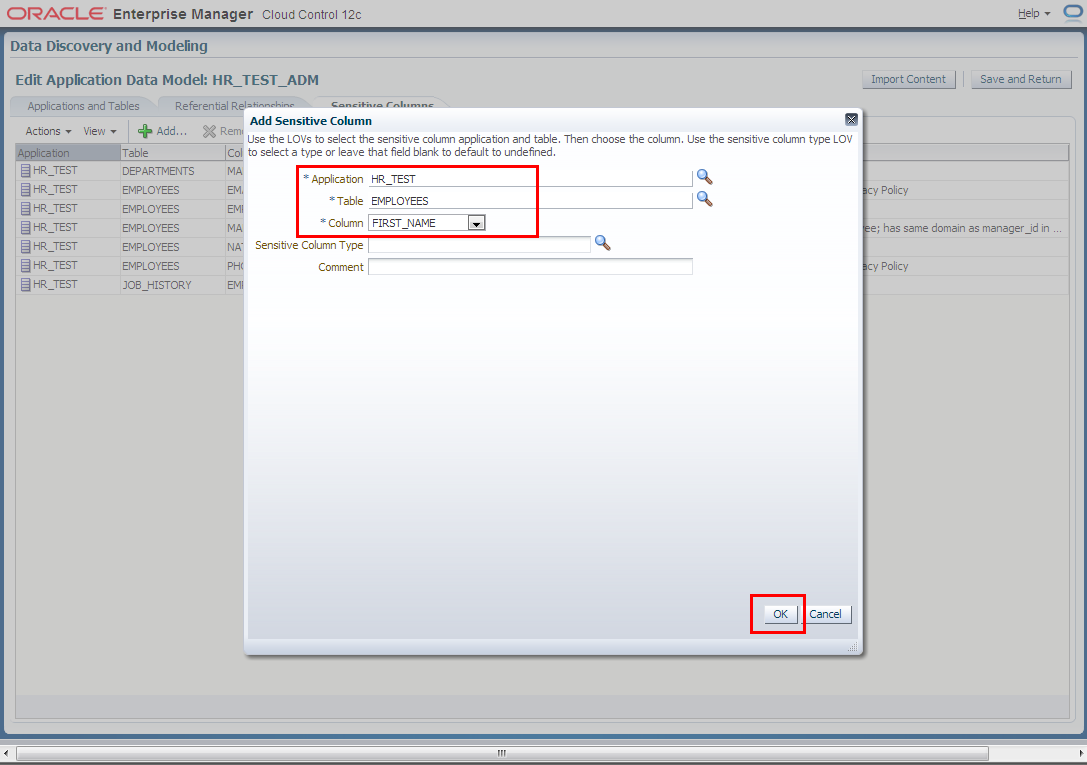
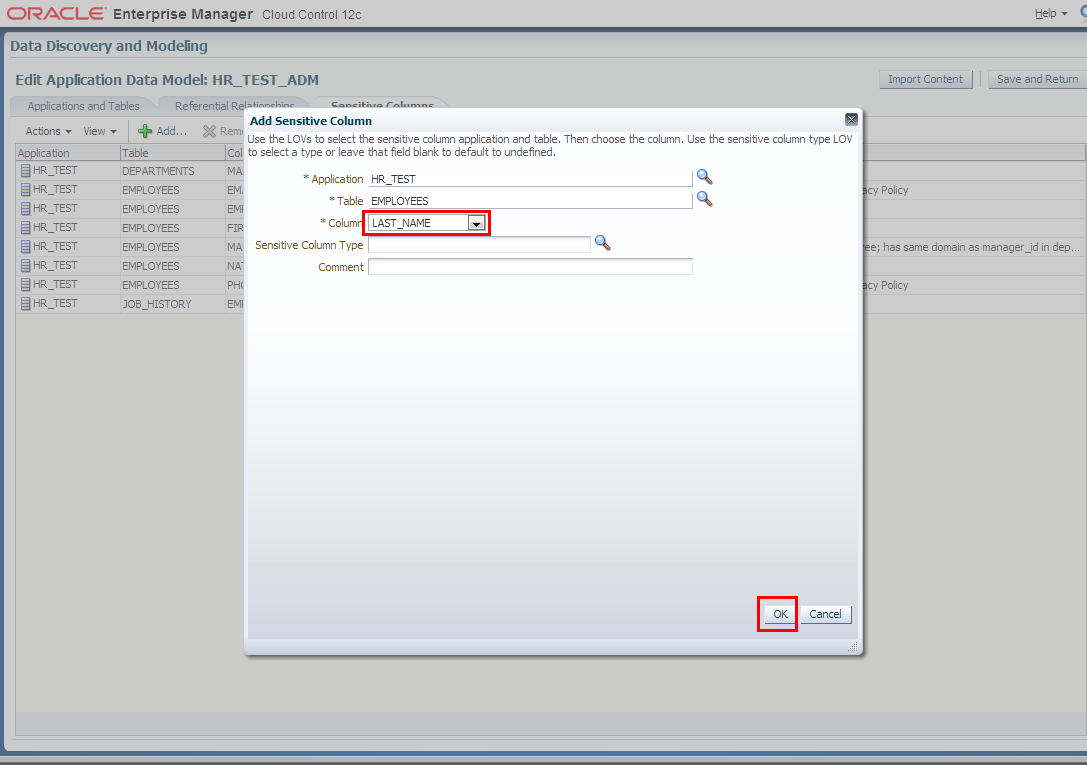
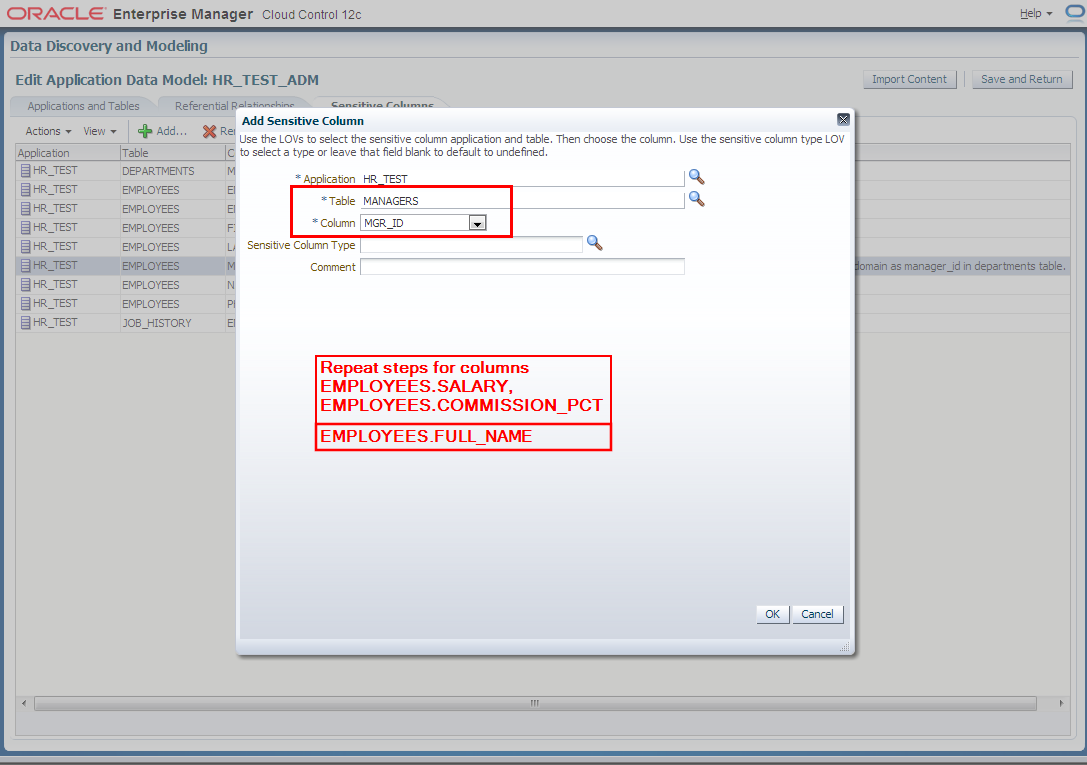
4. Manually add columns to sensitive columns list. These columns have not been discovered automatically but are also masking candidates.
- EMPLOYEES.FIRST_NAME
- EMPLOYEES.LAST_NAME
- EMPLOYEES.FULL_NAME
- EMPLOYEES.SALARY
- EMPLOYEES.COMMISSION_PCT
- MANAGERS.MGR_ID

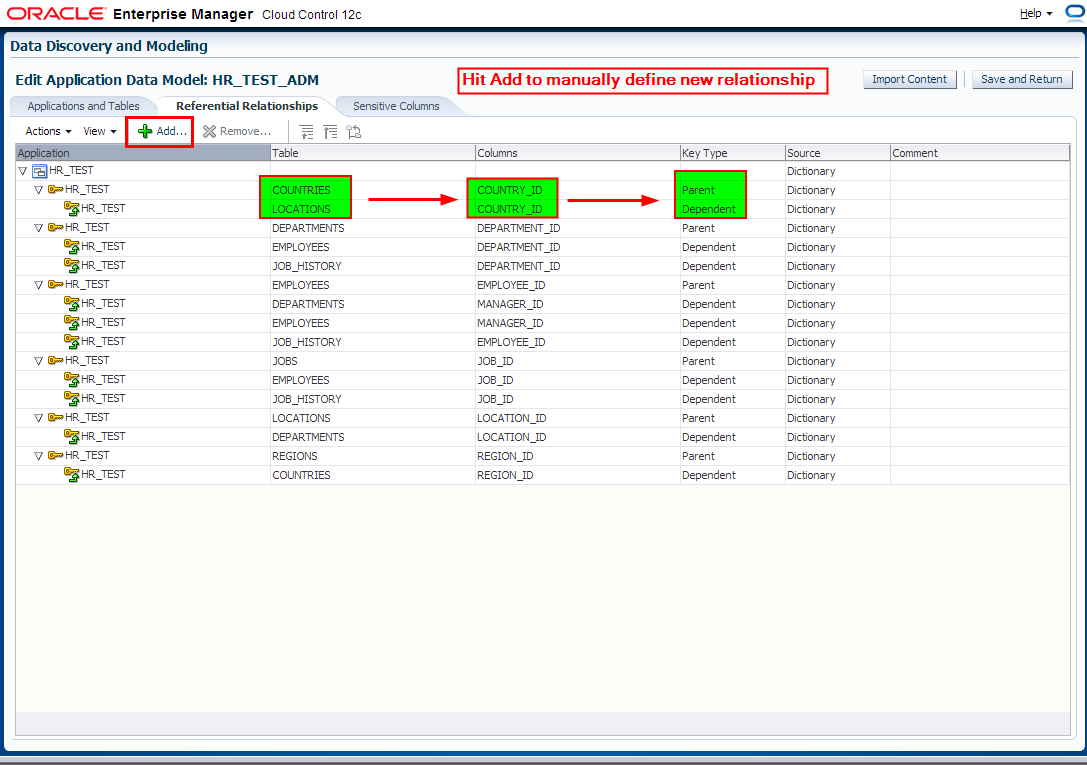
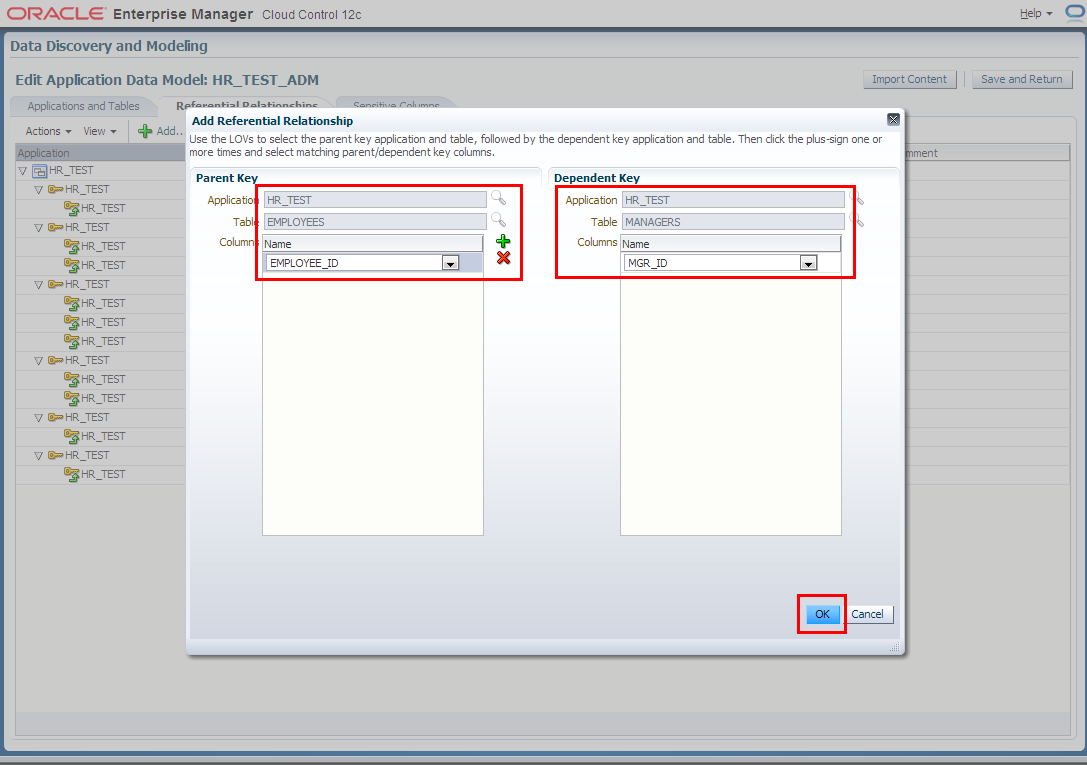
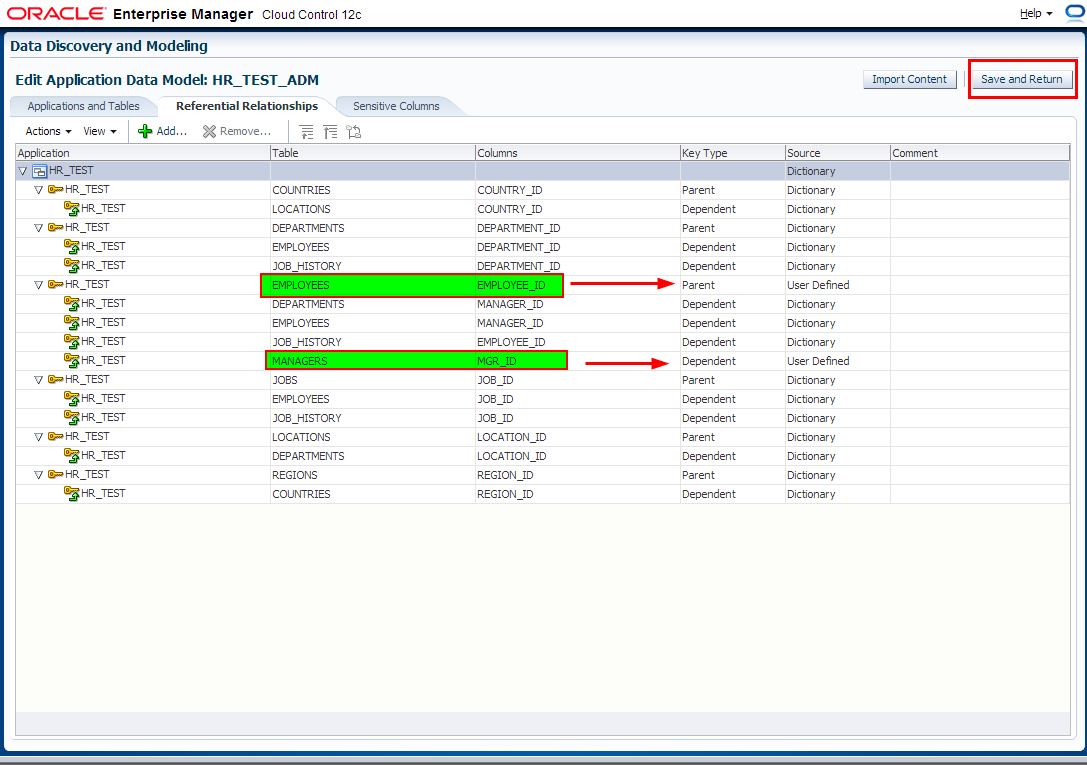
5. Next we switch to “Referential Relationships” tab in Edit Application Data Model: HR_TEST_ADM window to manually define one more relationships between EMPLOYEES.EMPLOYEE_ID and MANAGERS.MGR_ID columns.
Note that most of the referential relationships have been defined automatically following the foreign keys columns, during the Application Data Model HR_TEST_ADM creation task.
NOTE: Referential Relationships window can be also used to define relationships between multiple columns residing in other schemas (applications) which even might come from other databases within an application chain. In order to include multiple schemas you would have to add them into the Application Data Model – add new application. In order to include schemas (applications) from other databases you would have to clone that schemas into a staging database and then update Application Data Model with new objects. HR_TEST_ADM might contain multiple schemas.
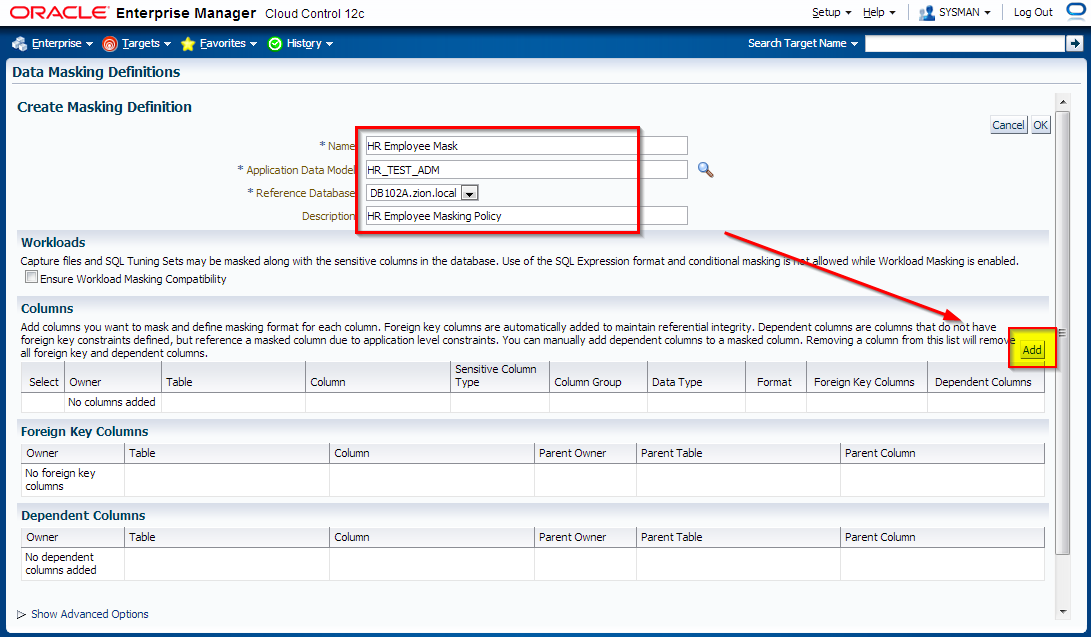
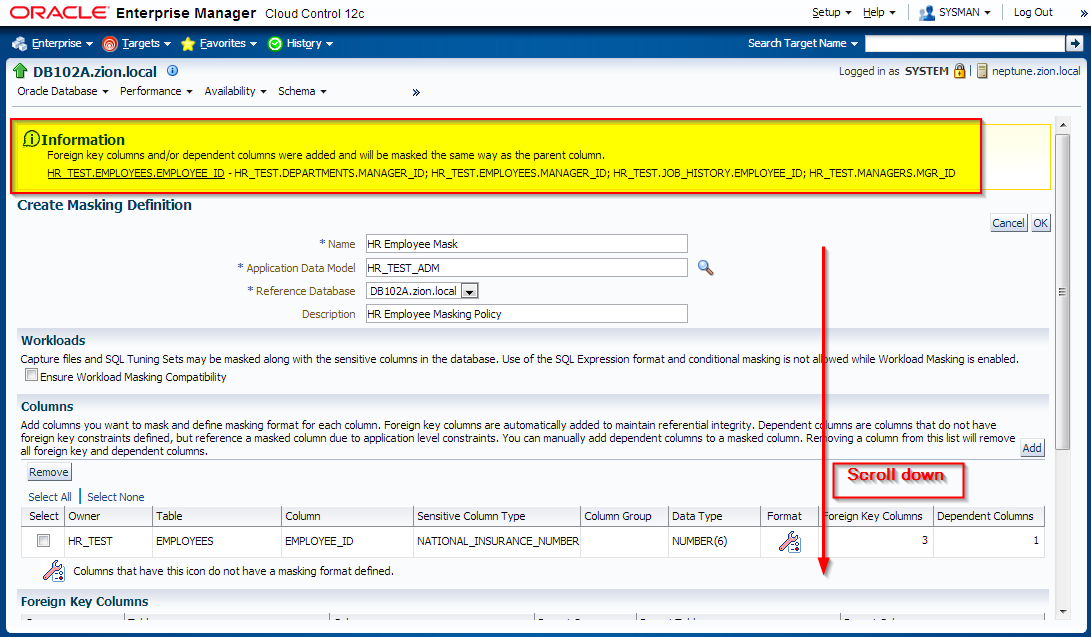
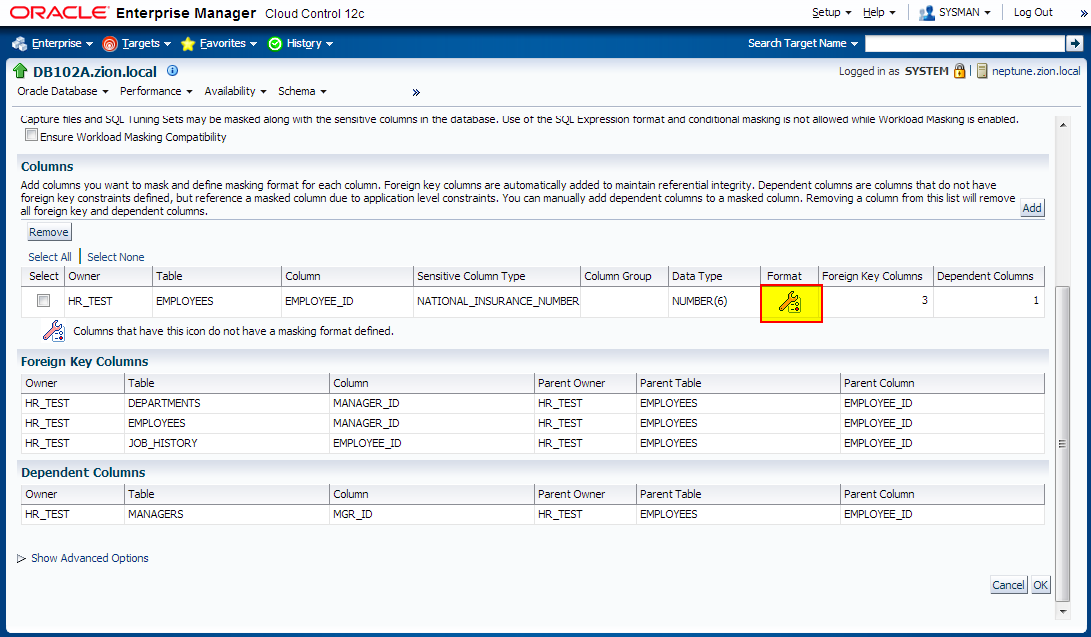
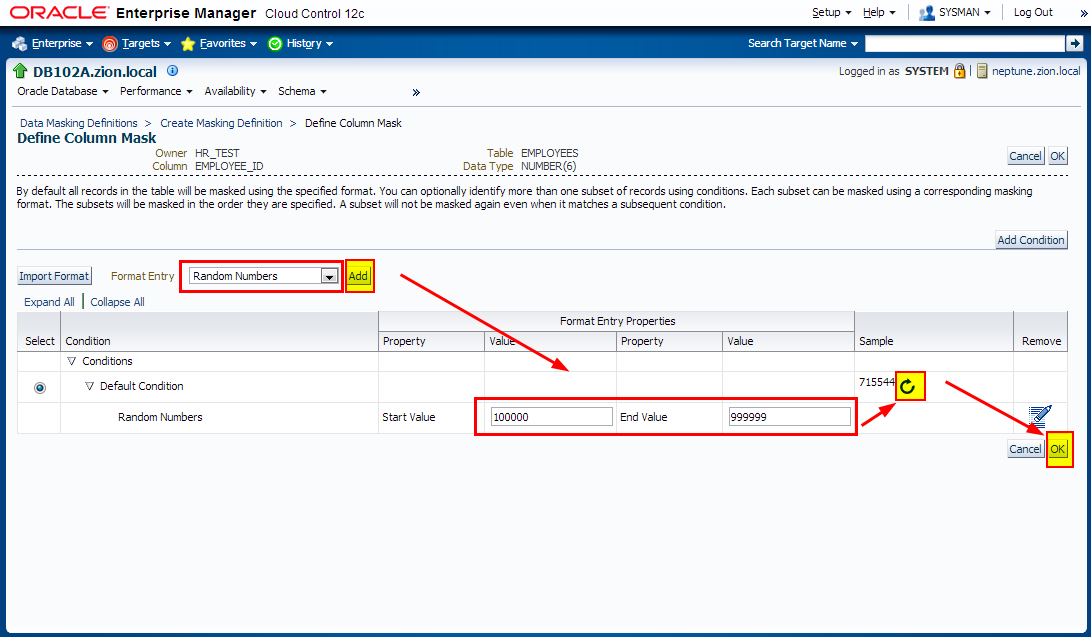
Creating Masking Definitions: EMPLOYEE_ID Column
It has been decided that EMPLOYEES.EMPLOYEE_ID column contains sensitive data. Let’s create a masking definition for the EMPLOYEE_ID column of the HR_TEST.EMPLOYEES table. We must also add a dependent column to the masking definition. The MANAGERS.MGR_ID column is not declared as a foreign key, but is dependent on EMPLOYEES.EMPLOYEE_ID at the application level.
Login to OEM 12c and navigate to Enterprise -> Quality Management -> Data Masking Definitions


Creating Masking Formats and Definitions: FIRST_NAME and LAST_NAME columns
1. Creating Masking Formats for FIRST_NAME and LAST_NAME
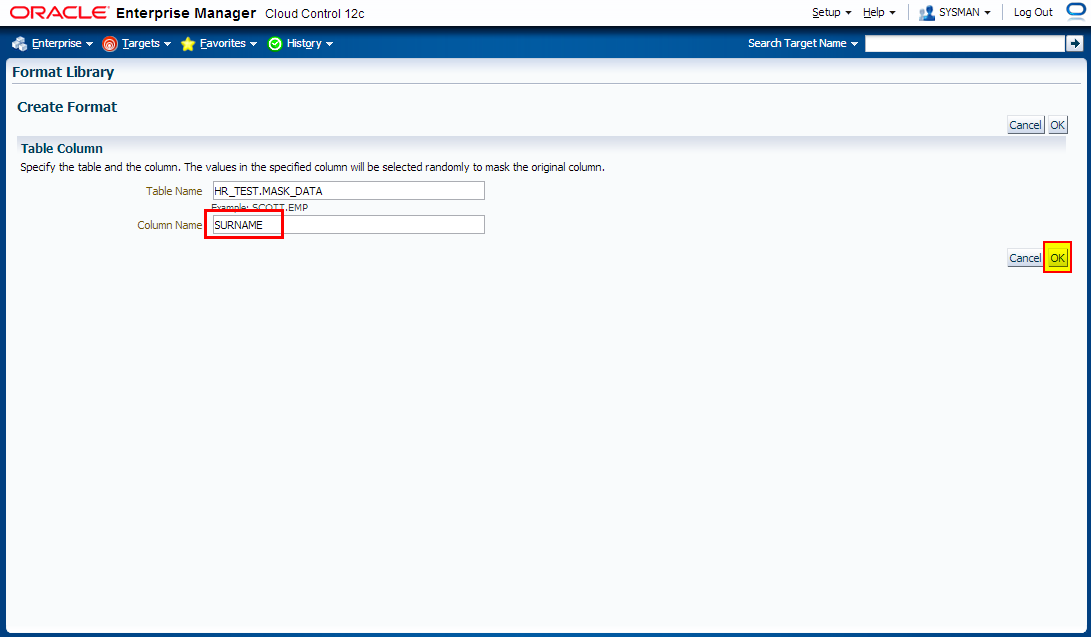
Create the masking formats for the EMPLOYEES.FIRST_NAME and EMPLOYEES.LAST_NAME columns by using the HR_TEST.MASK_DATA table as the source of masking data. These steps illustrate how you would use a data table from a commercial data provider to mask confidential data such as names. Our MASK_DATA table has been generated at www.fakenamegenerator.com and consists of 10k rows of fake data (see /tmp/datamask/mask_data.sql ).
Before we define masking definitions let’s create masking formats for FIRST_NAME and LAST_NAME that we can use when creating masking definitions.
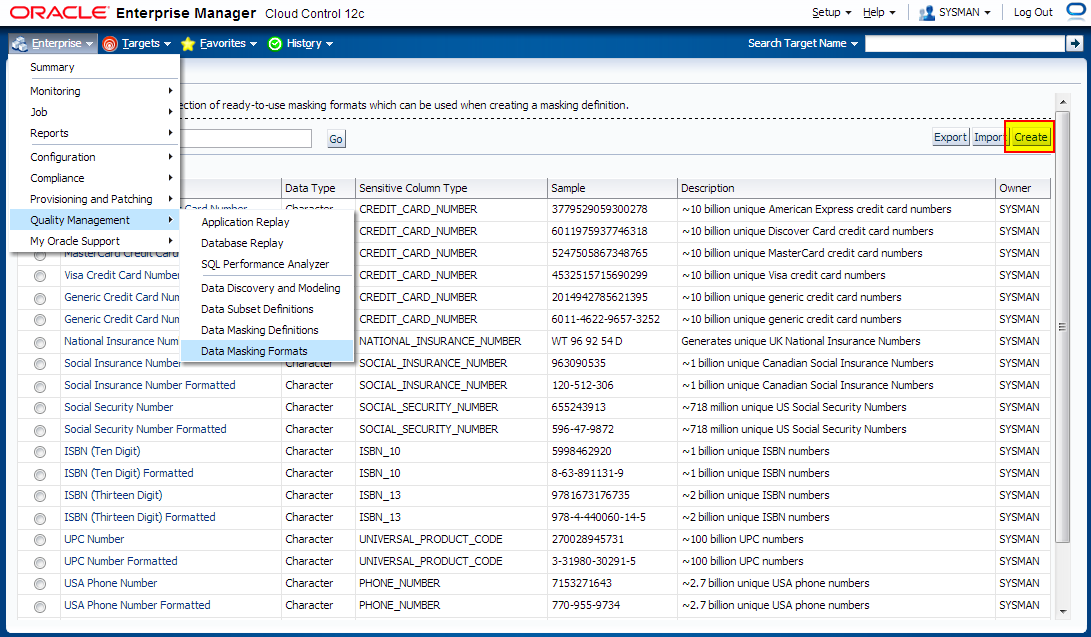
Navigate to Enterprise -> Quality Management -> Data Masking Formats


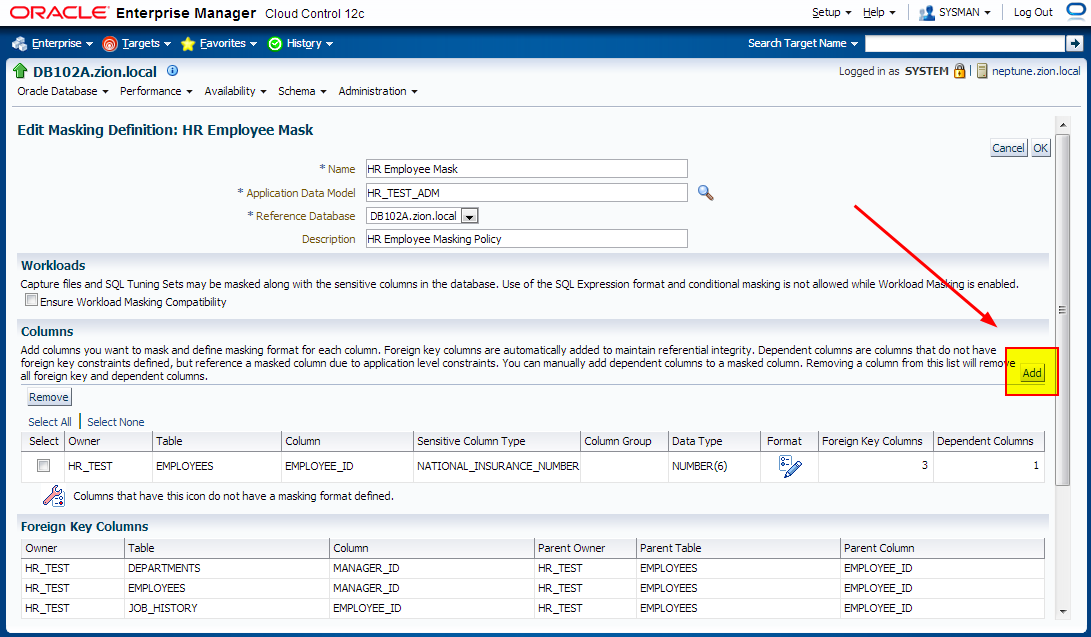
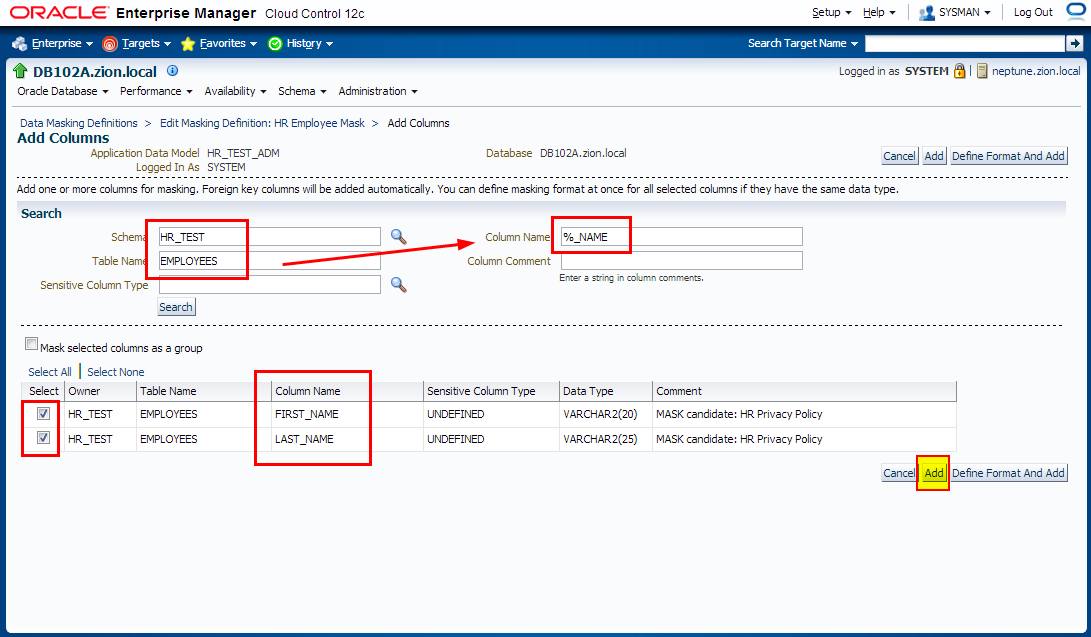
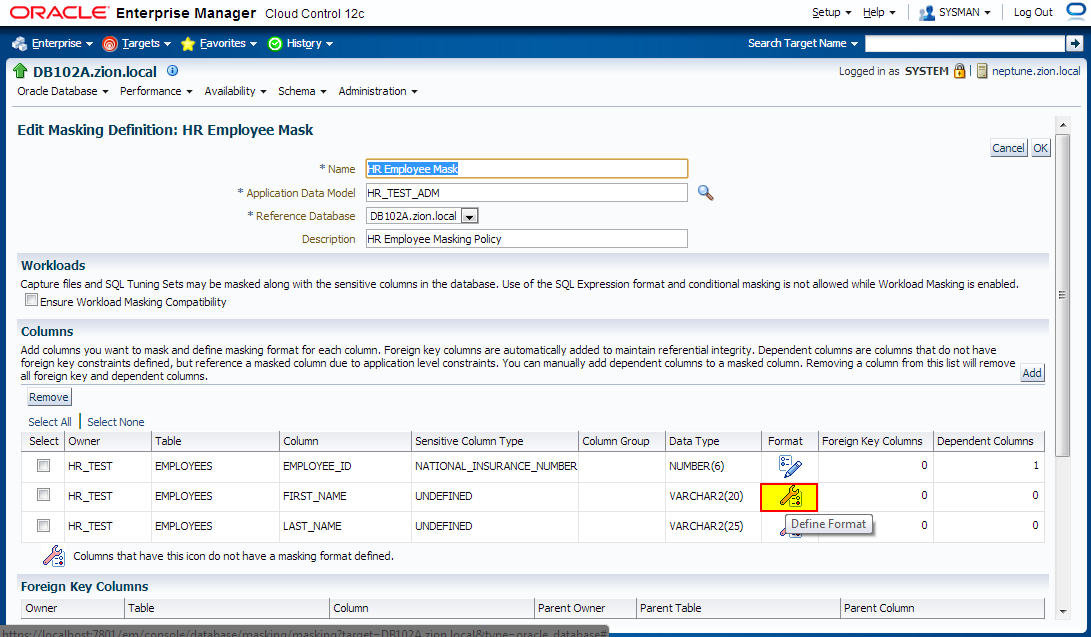
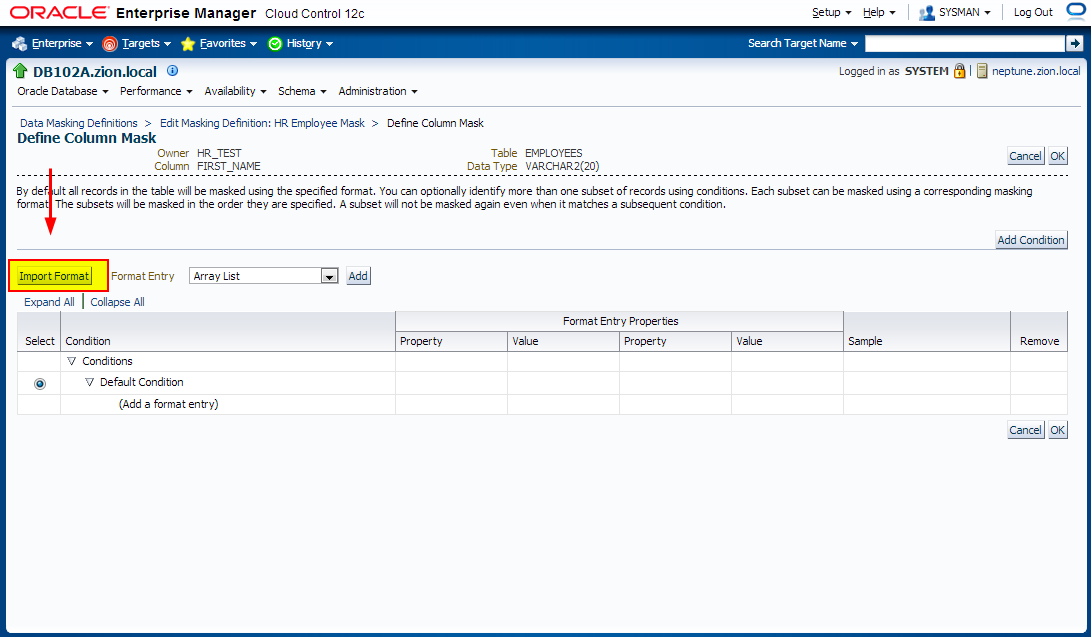
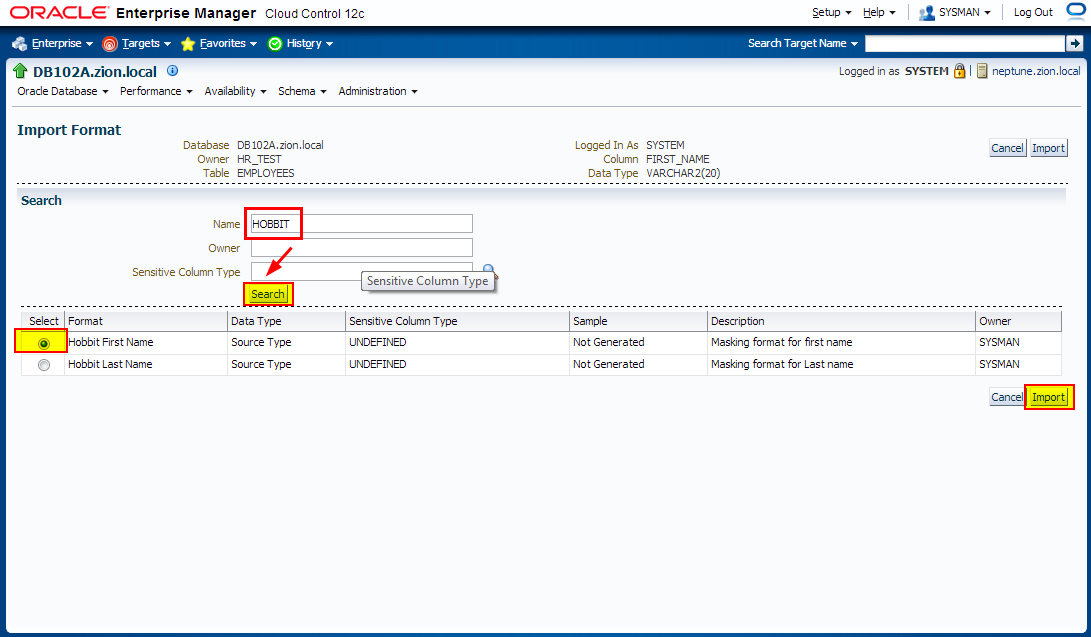
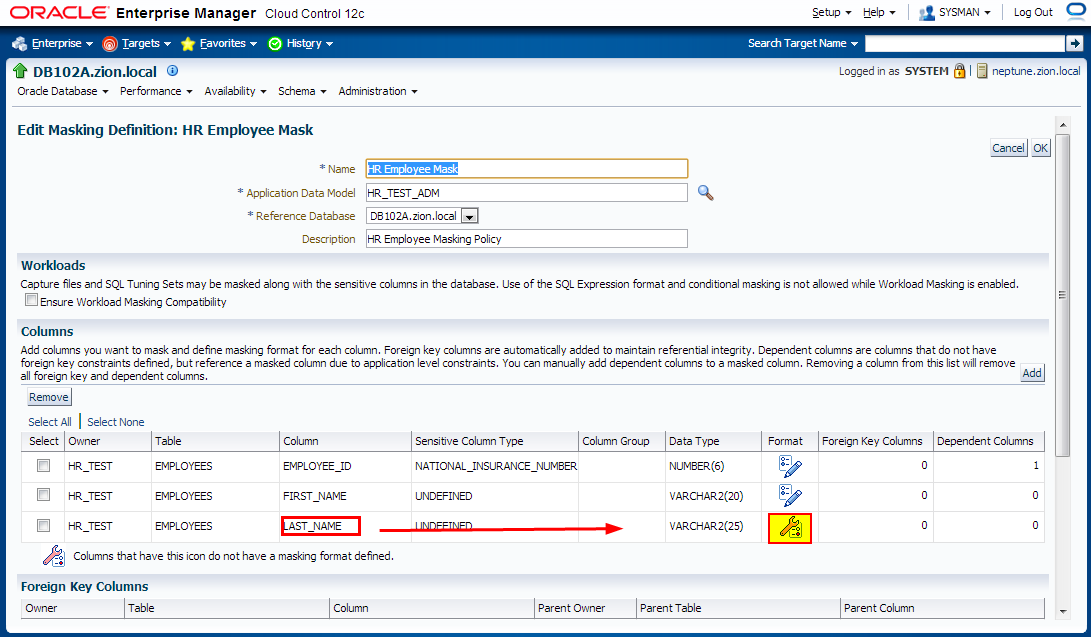
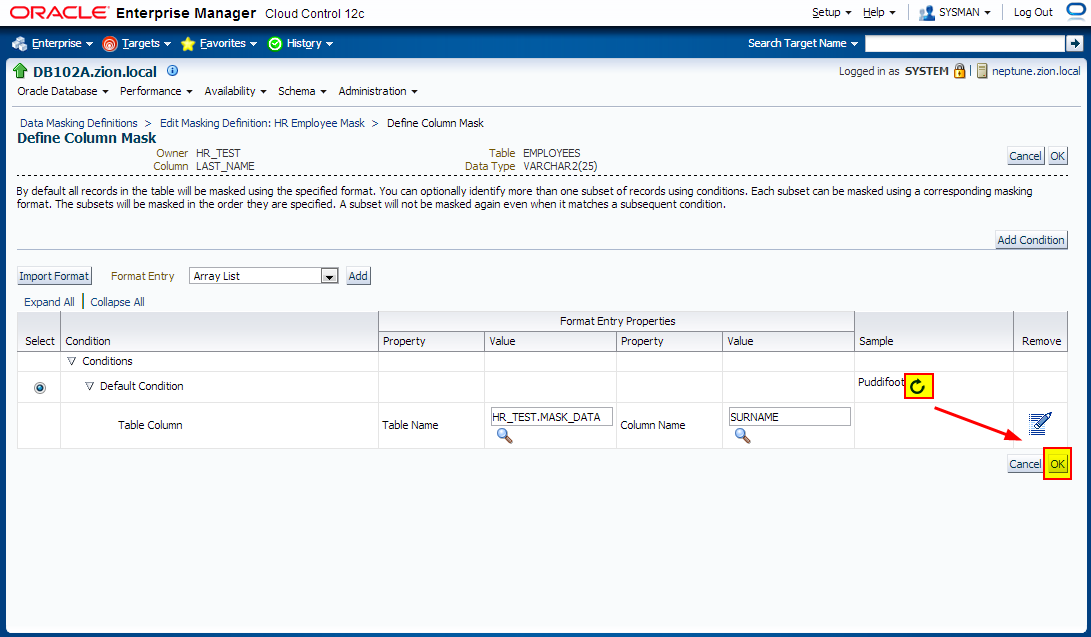
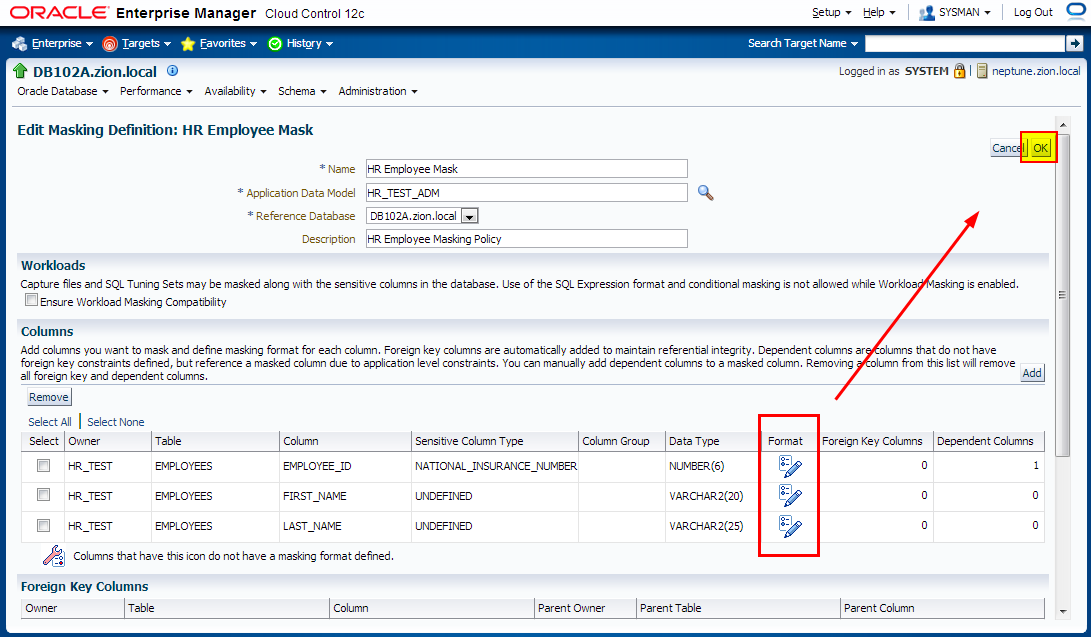
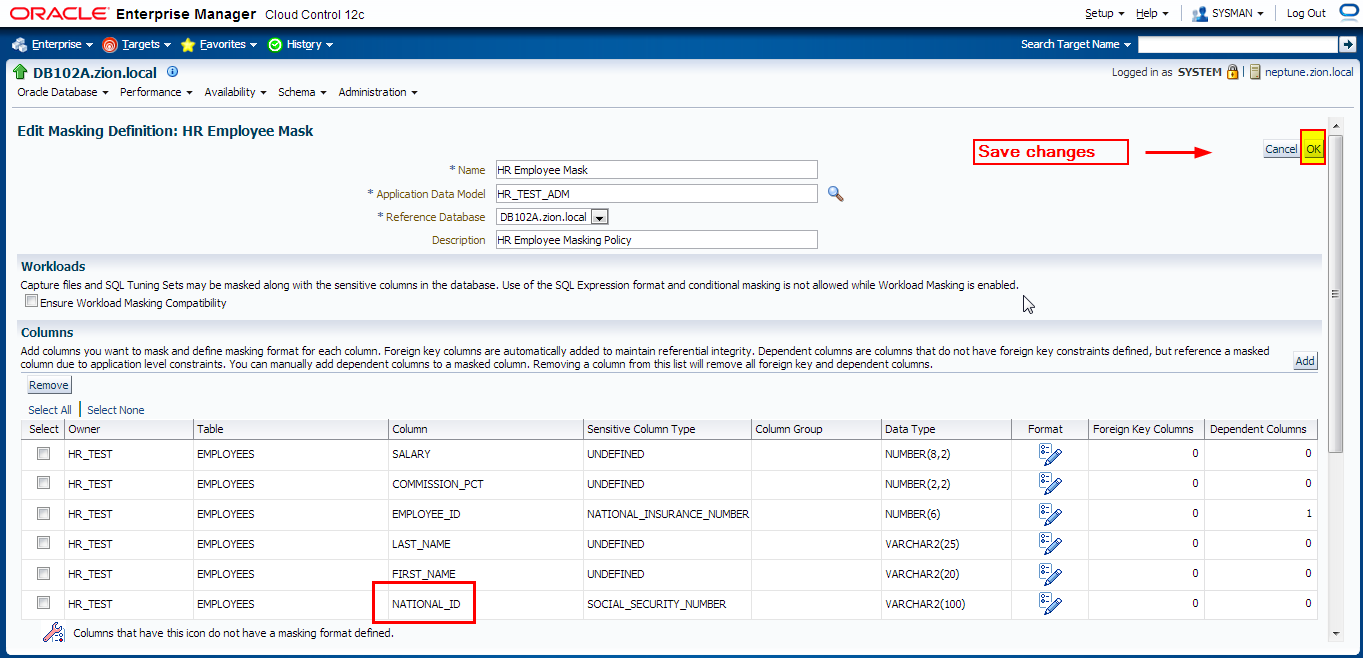
2. Creating Masking Definitions for FIRST_NAME and LAST_NAME
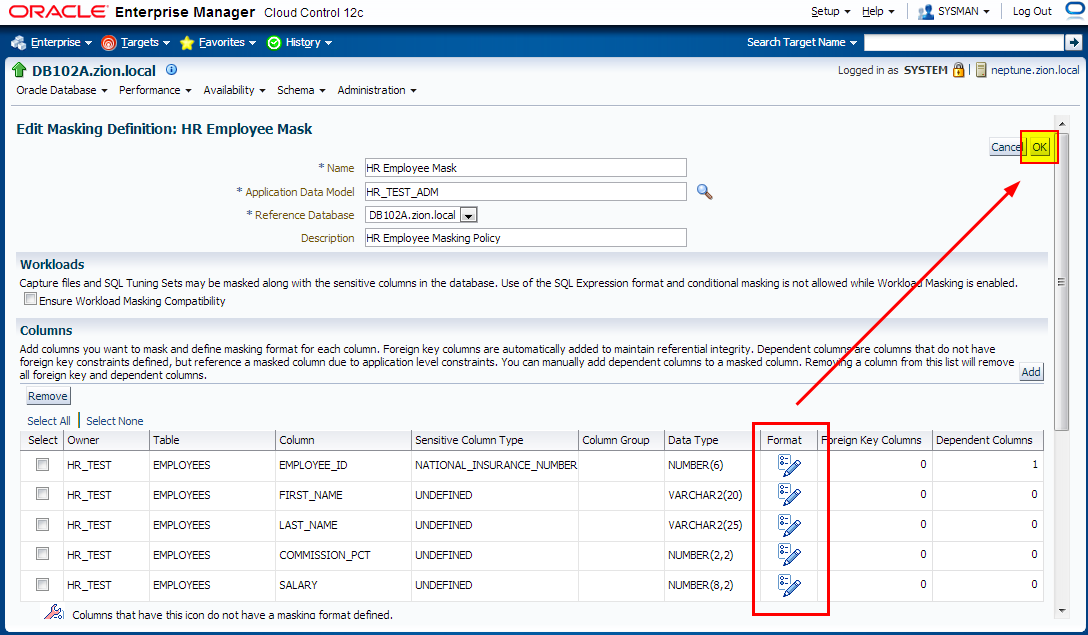
Create the masking definitions for the EMPLOYEES.FIRST_NAME and EMPLOYEES.LAST_NAME columns. Use the mask formats that we defined in the previous step.
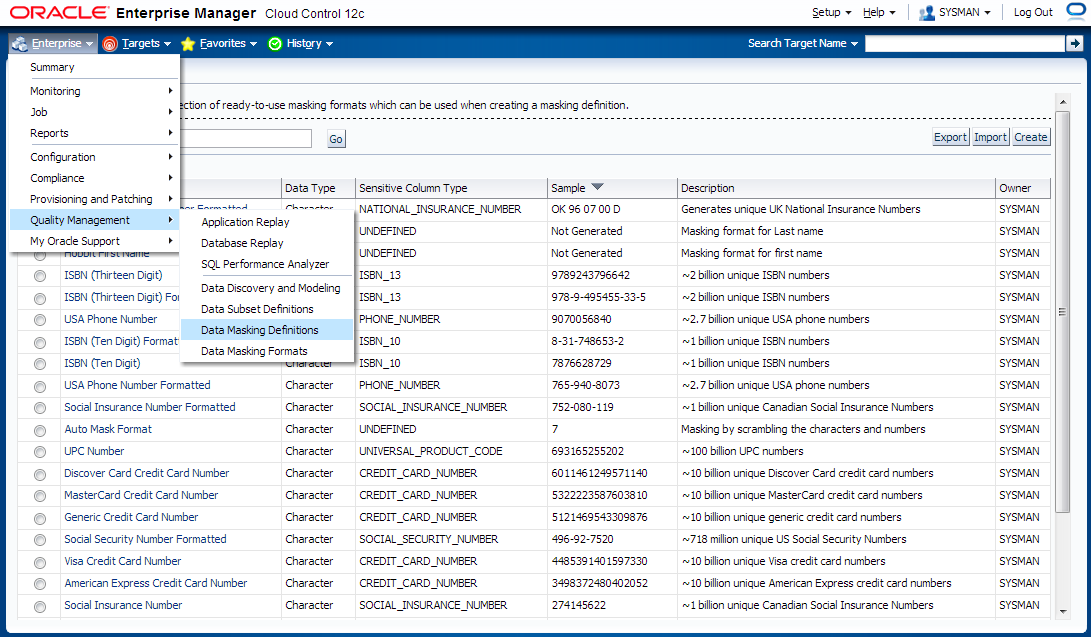
Navigate to Enterprise -> Quality Management -> Data Masking Definitions
Edit existing masking definition HR Employee Mask.


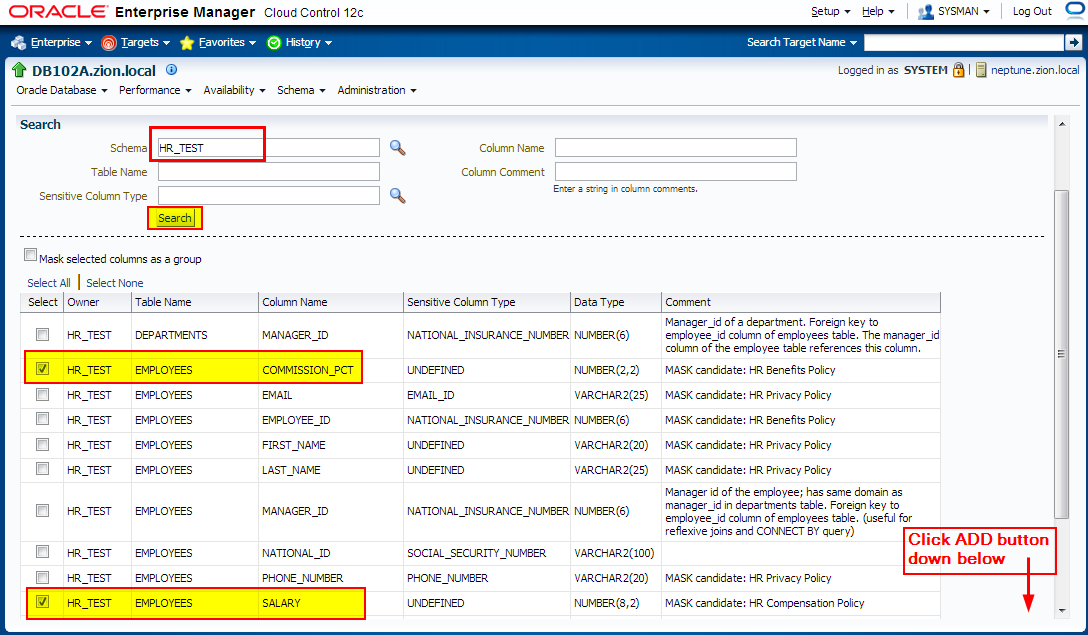
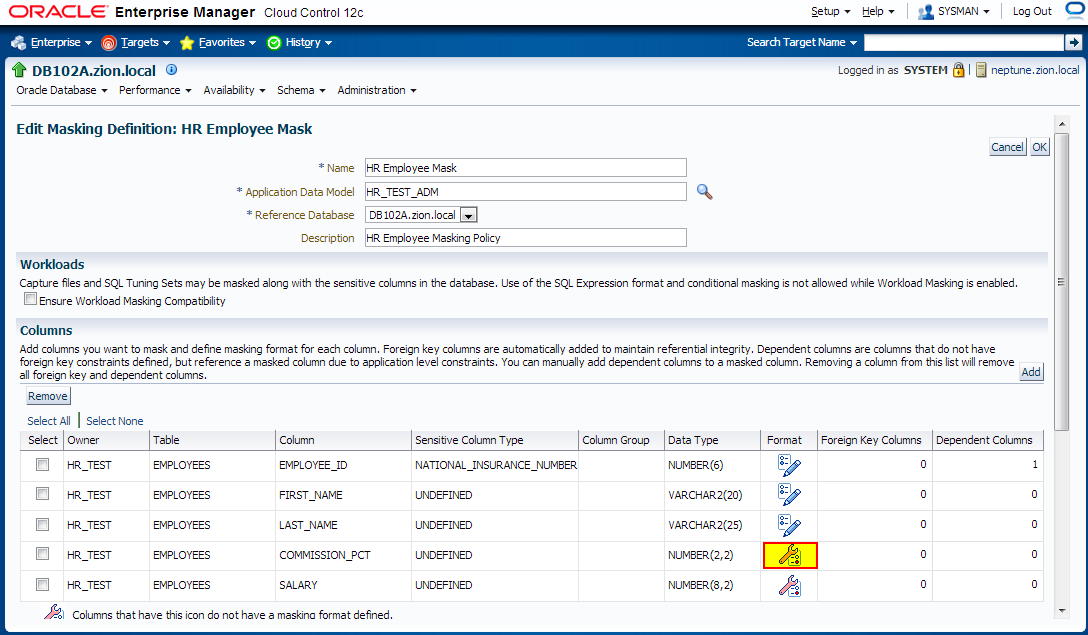
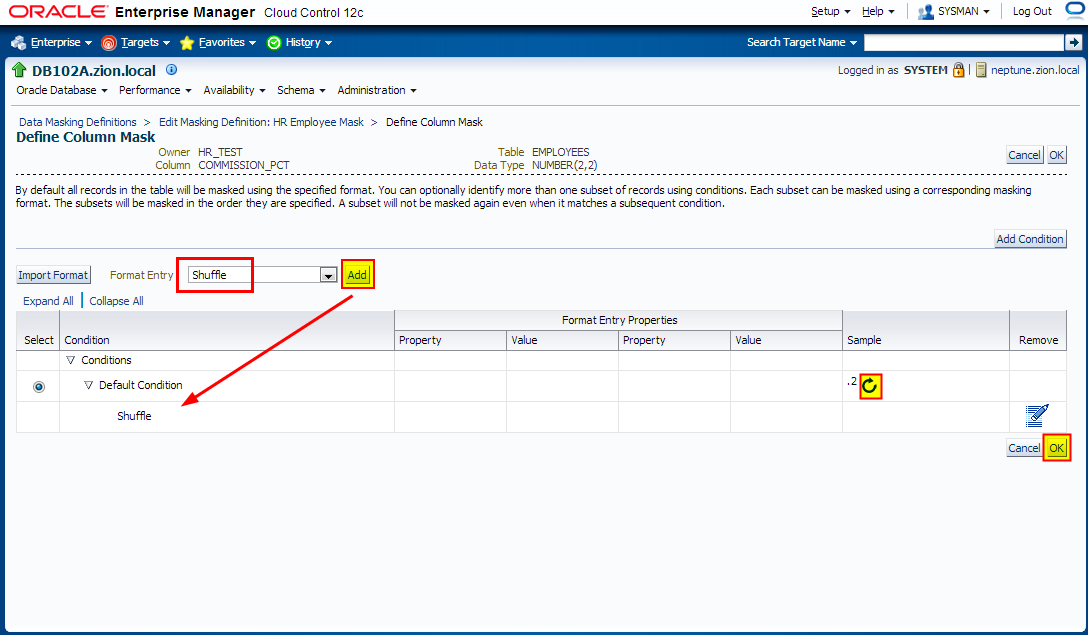
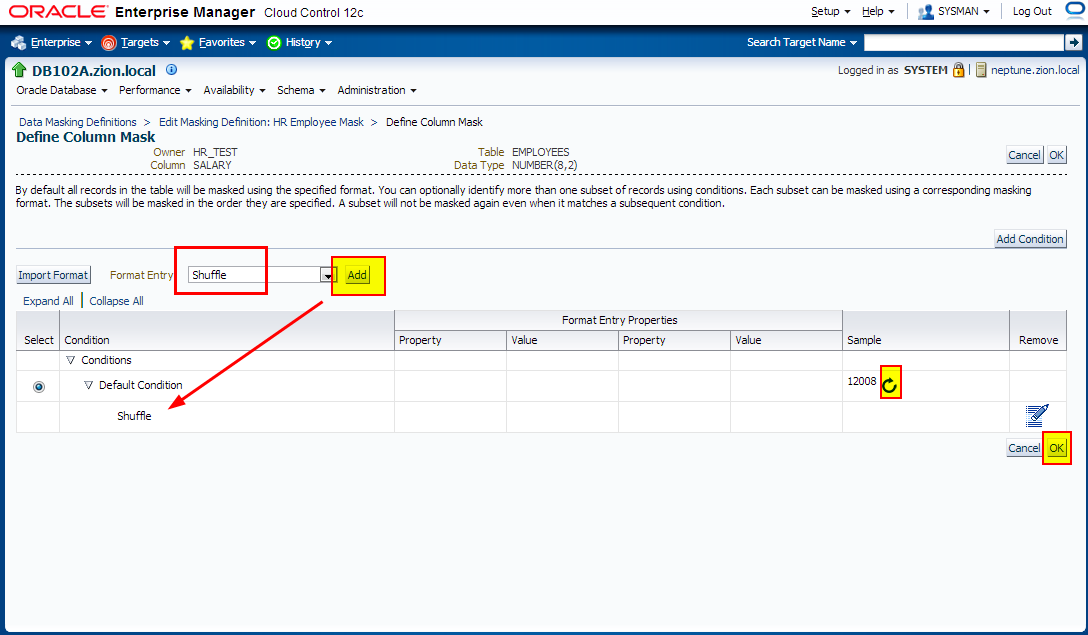
3. Creating Masking Definitions: SALARY, COMMISSION_PCT columns using shuffle function
Navigate to Enterprise -> Quality Management -> Data Masking Definitions
Edit existing masking definition HR Employee Mask, add SALARY, COMMISSION_PCT columnsand configure masking format;


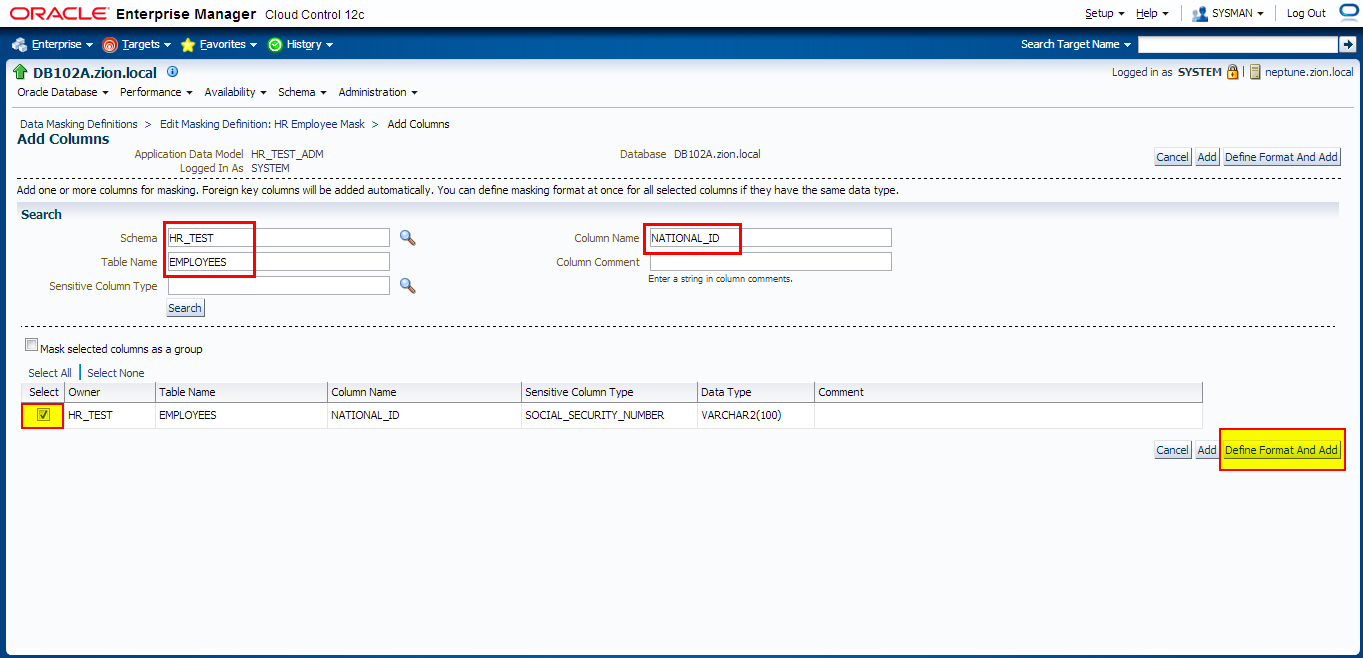
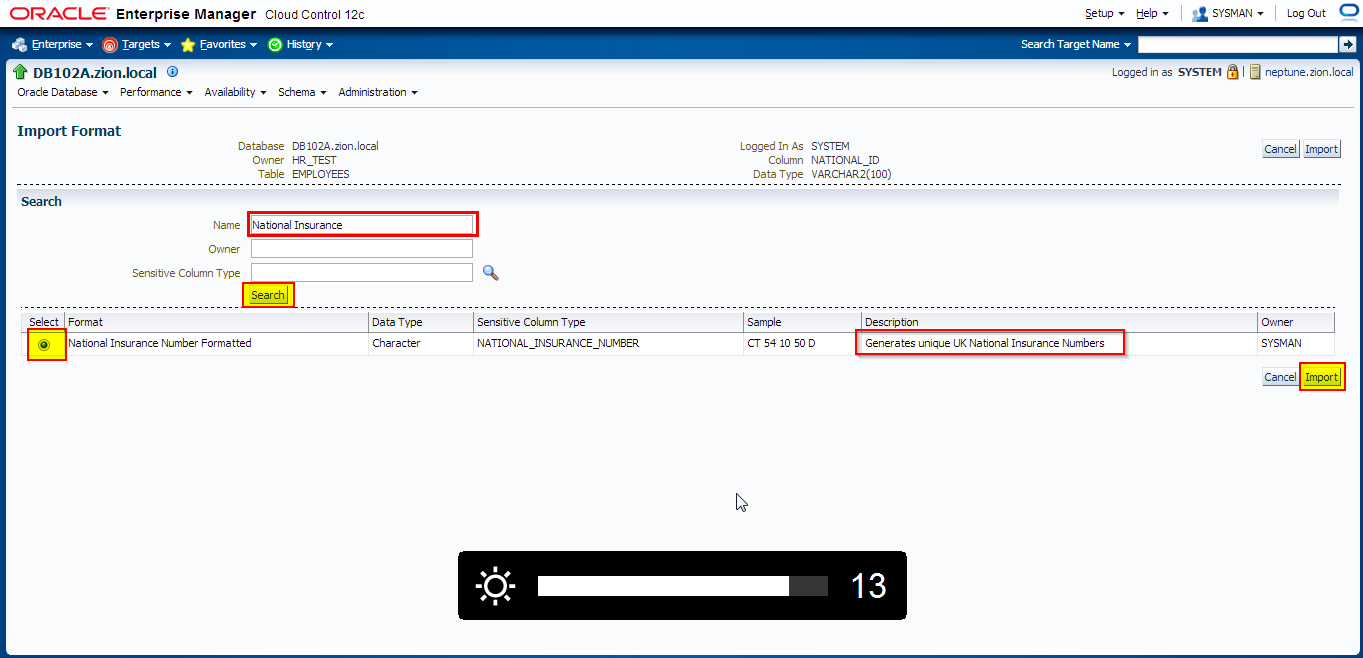
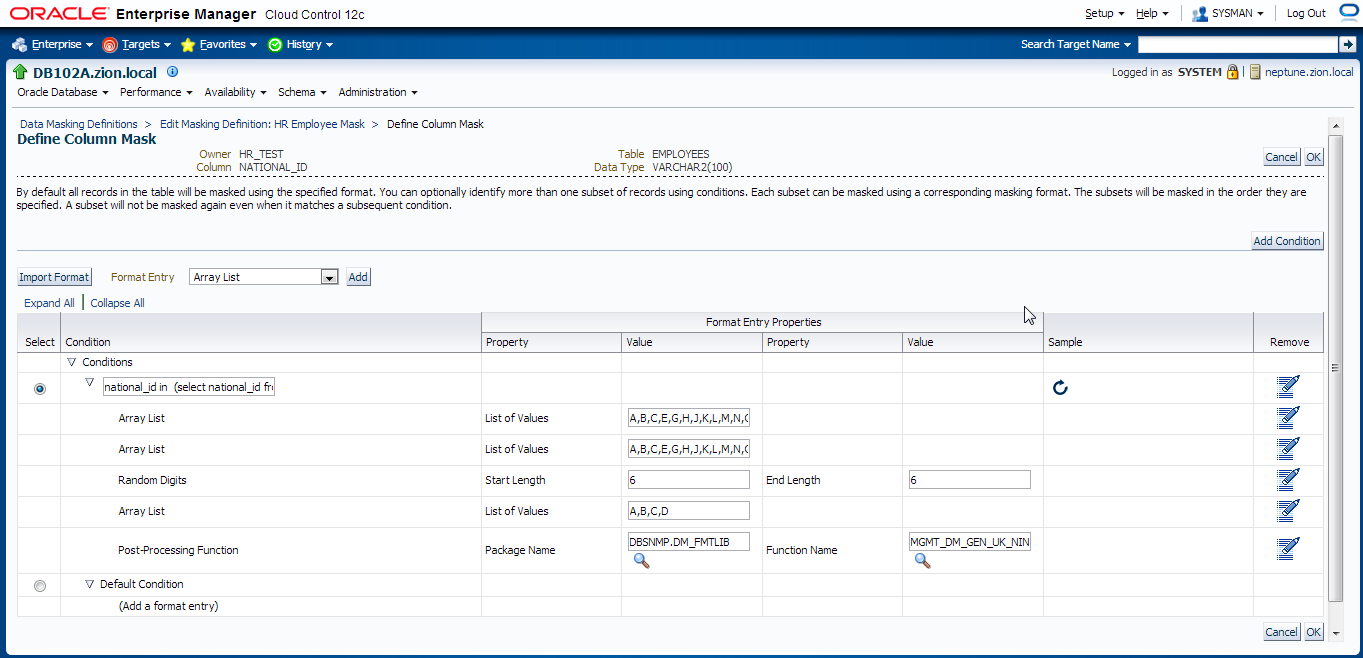
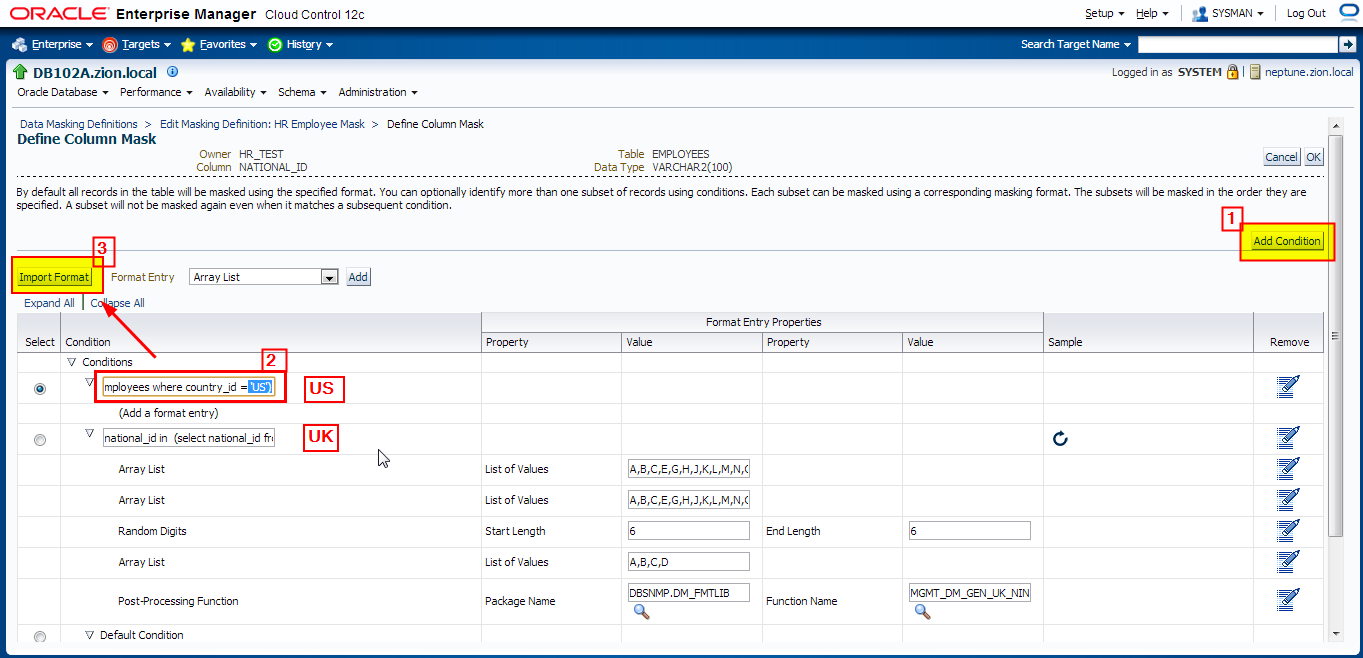
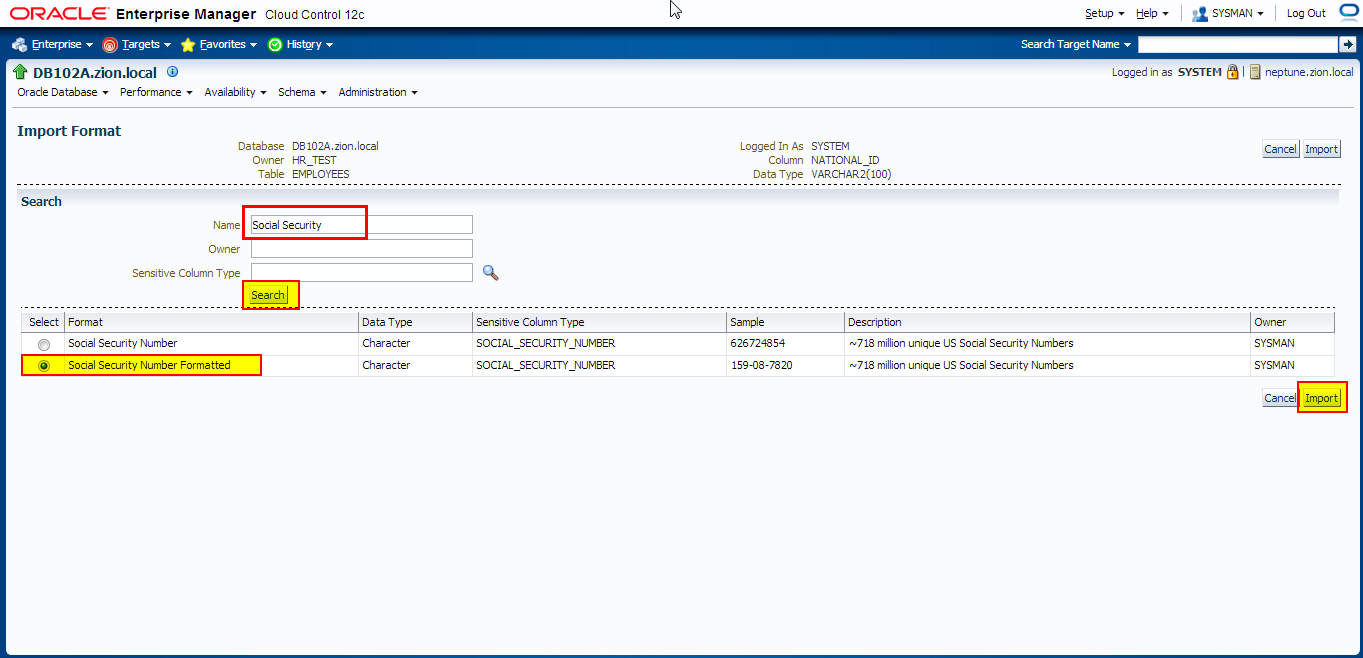
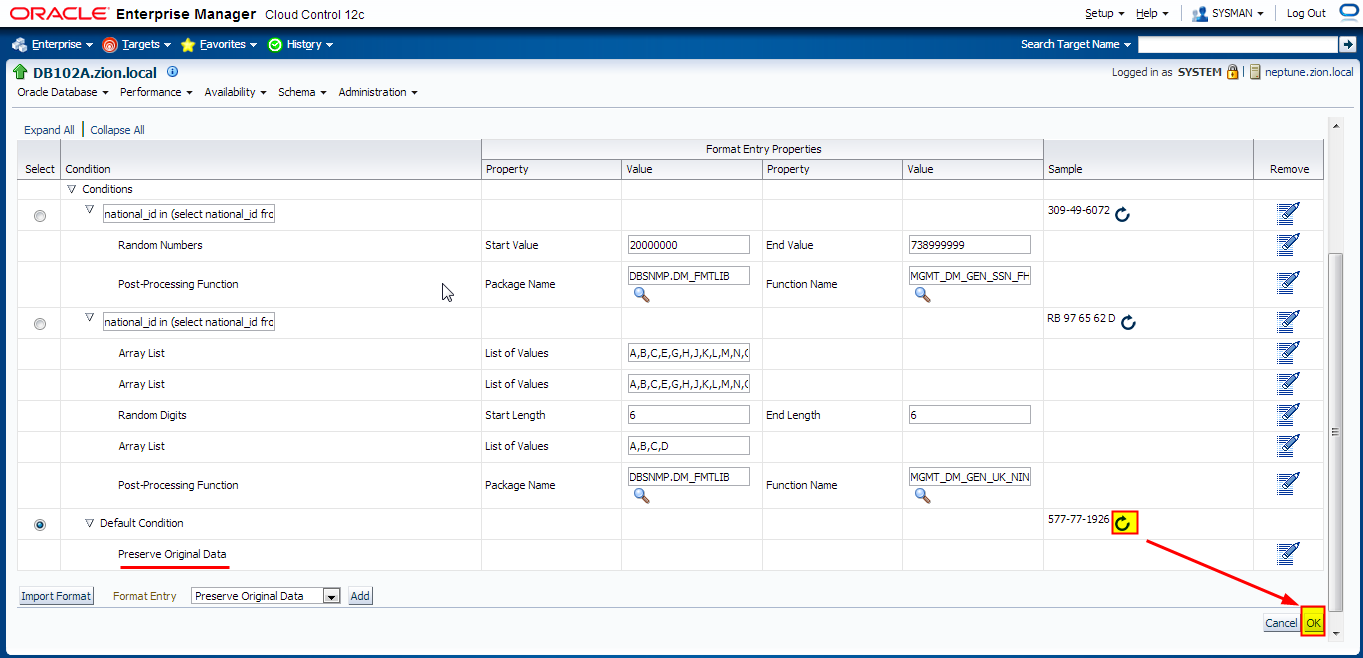
4. Creating Masking Definitions: NATIONAL_ID Column
Implement condition-based masking for the NATIONAL_ID column. Configure the masking so that the NATIONAL_ID column is masked with the National Insurance Number Formatted format for UK employees and Social Security Number Formatted for US employees. The NATIONAL_ID column for employees from other countries does not need to be masked.
Navigate to Enterprise -> Quality Management -> Data Masking Definitions
Edit masking definition HR Employee Mask.
Add NATIONAL_ID column to data masking definition with the following conditions defined:
- national_id in (select national_id from hr_test.employees where country_id = ‘UK’)
- national_id in (select national_id from hr_test.employees where country_id = ‘US’)
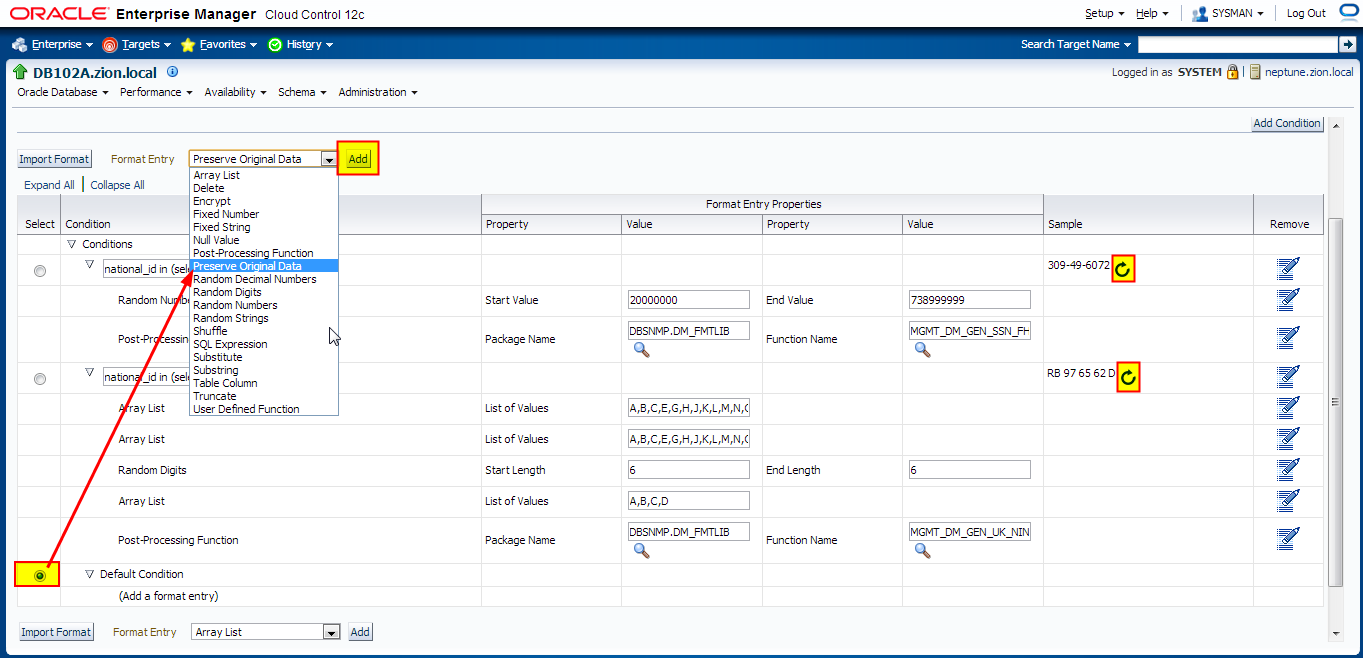
- default condition: Preserve Original Data


Row-Internal Synchronization (within the same table)
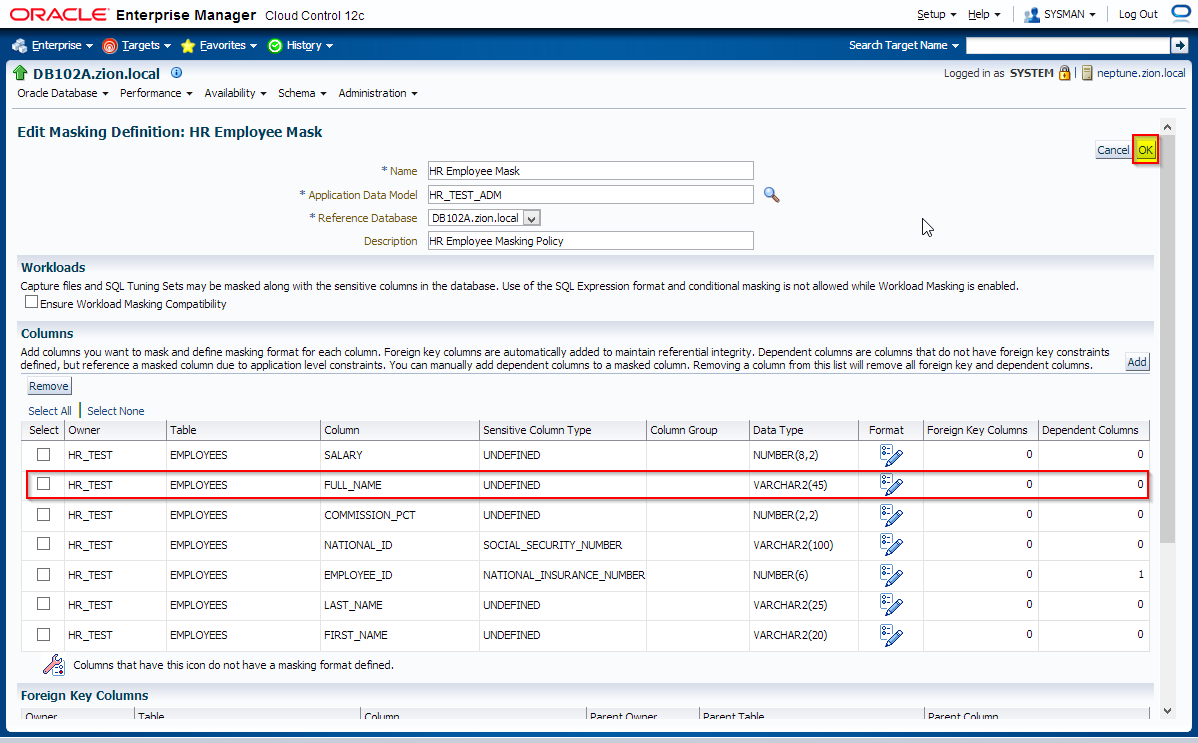
In this example the FULL_NAME field is composed of data from other columns in the same row.
FULL_NAME field is a concatenation of the FIRST_NAME and LAST_NAME with space between.
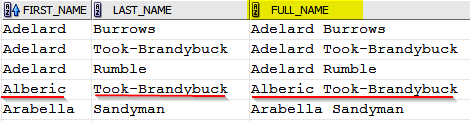
When masking data, the FIRST_NAME and LAST_NAME columns will change to other values. For the information to be secure, the FULL_NAME field must also change.
However, it must change to contain values synchronized with the rest of the data in the row so that the masked data reflects the denormalized structure of the row. It can be achieved by executing UPDATE/MERGE SQL query (for example: update HR_TEST.EMPLOYEES set FULL_NAME = FIRST_NAME || ‘ ‘ || LAST_NAME;) or by including SQL Expression into data masking definition. Note that “SQL Expression” function works only within the same and only one table.
Navigate to Enterprise -> Quality Management -> Data Masking Definitions
Edit masking definition HR Employee Mask and add FULL_NAME column with SQL Expression format.


Performing the Data Masking Operation
There are several ways to perform data masking operation;
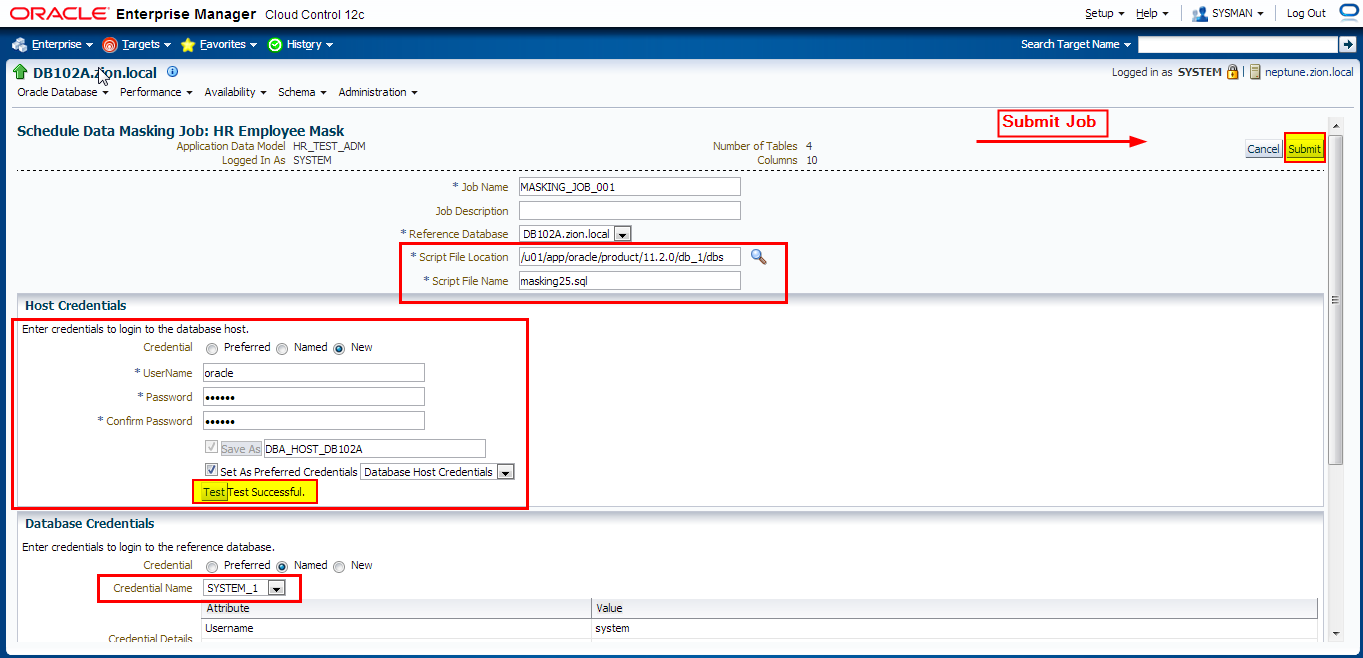
- Use Enterprise Manager Cloud Control 12c to generate the data-masking script and schedule the data masking job. This method requires database host dba credentials.
- Use Enterprise Manager Cloud Control 12c to generate the data-masking script, next save it and execute as SQL script using tool of your choice, Oracle SQL Developer, SQLPlus, TOAD name it.
In this tutorial we use OEM 12c.
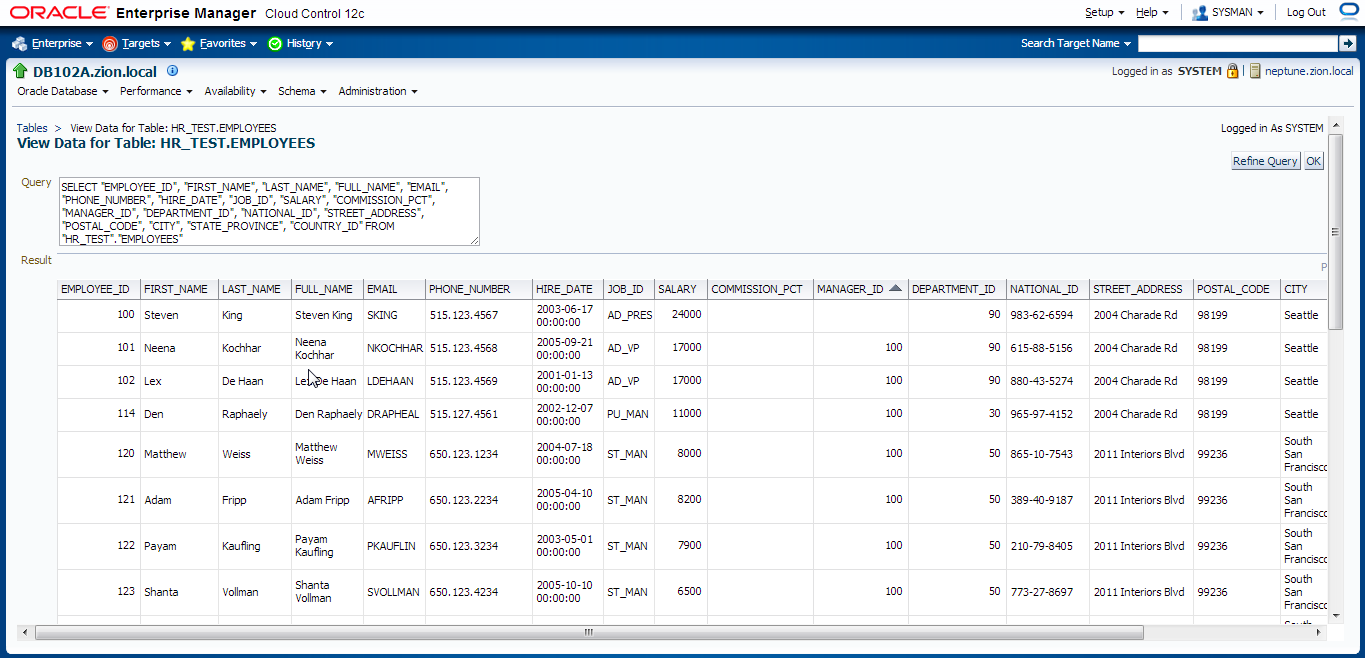
First, let’s take a look at the data in HR_TEST.EMPLOYEES table before masking:
- EMPLOYEES table before mask EMPLOYEES.htm
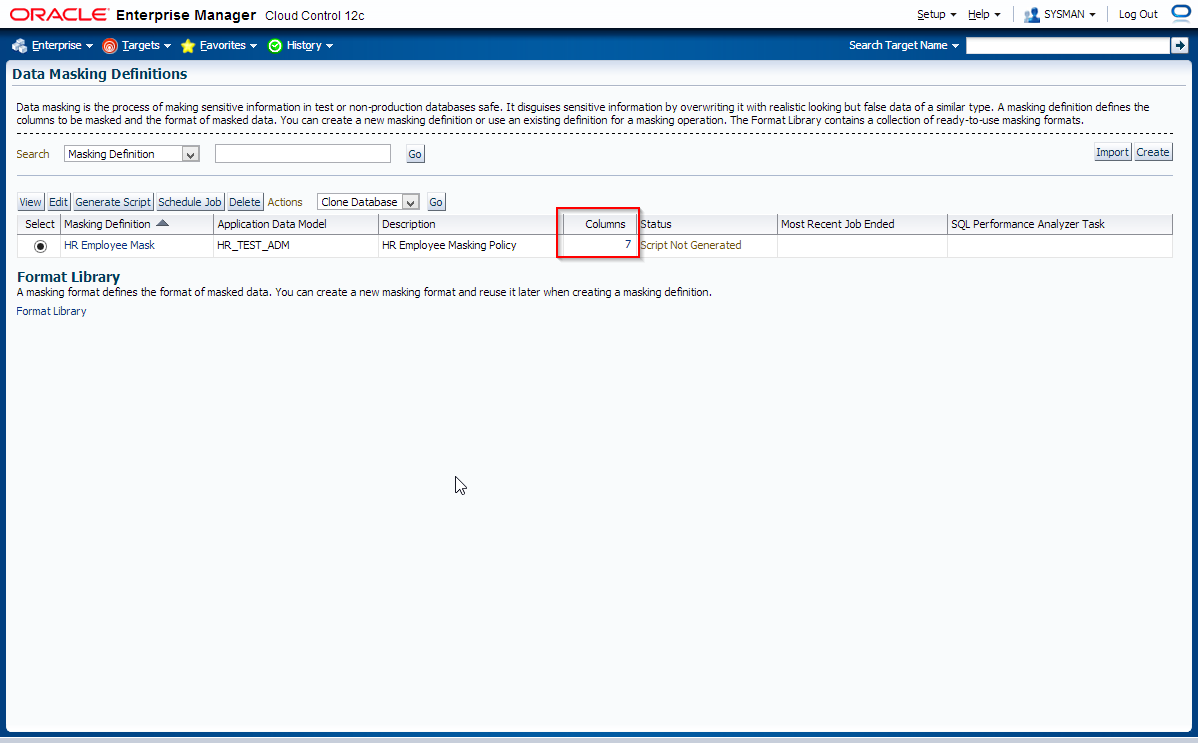
You could also check this in OEM 12c
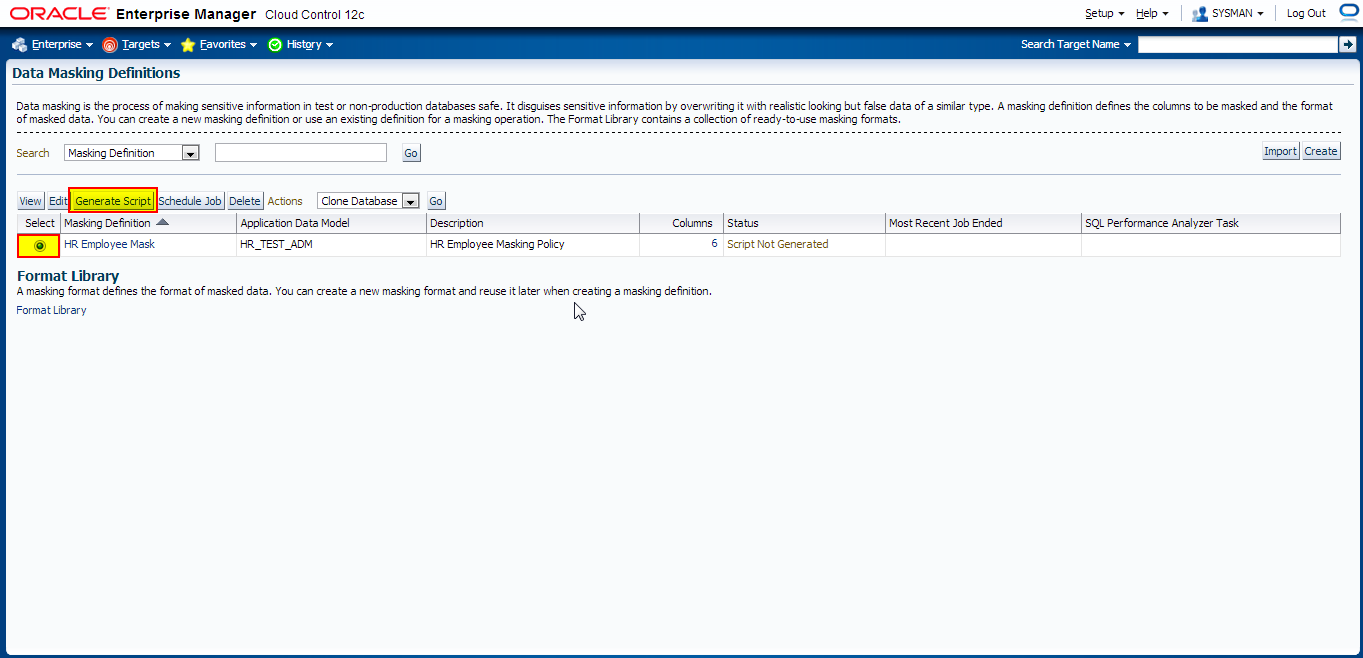
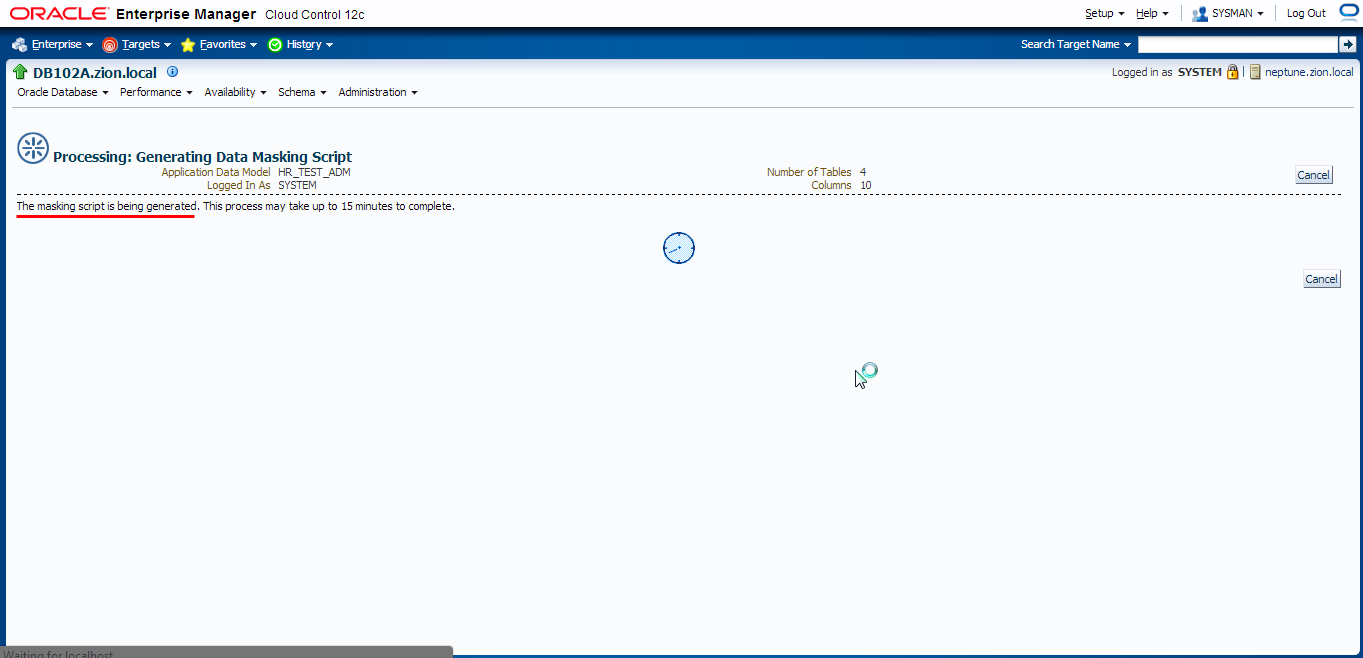
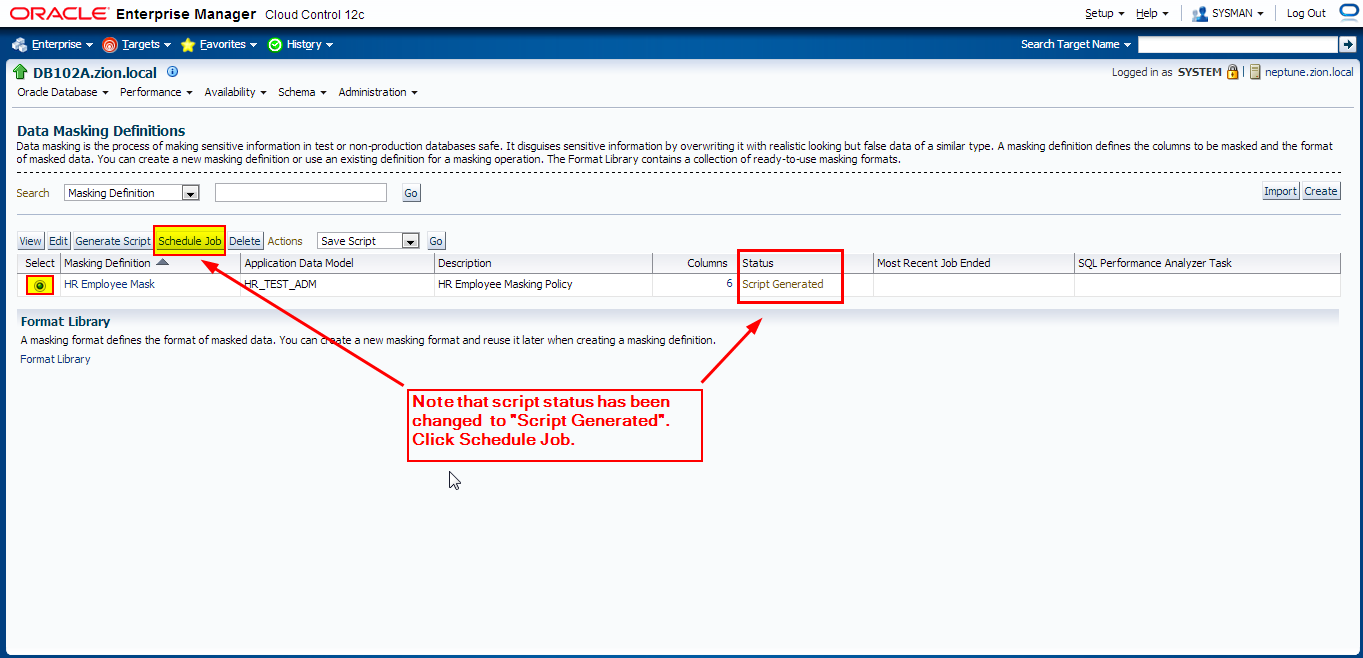
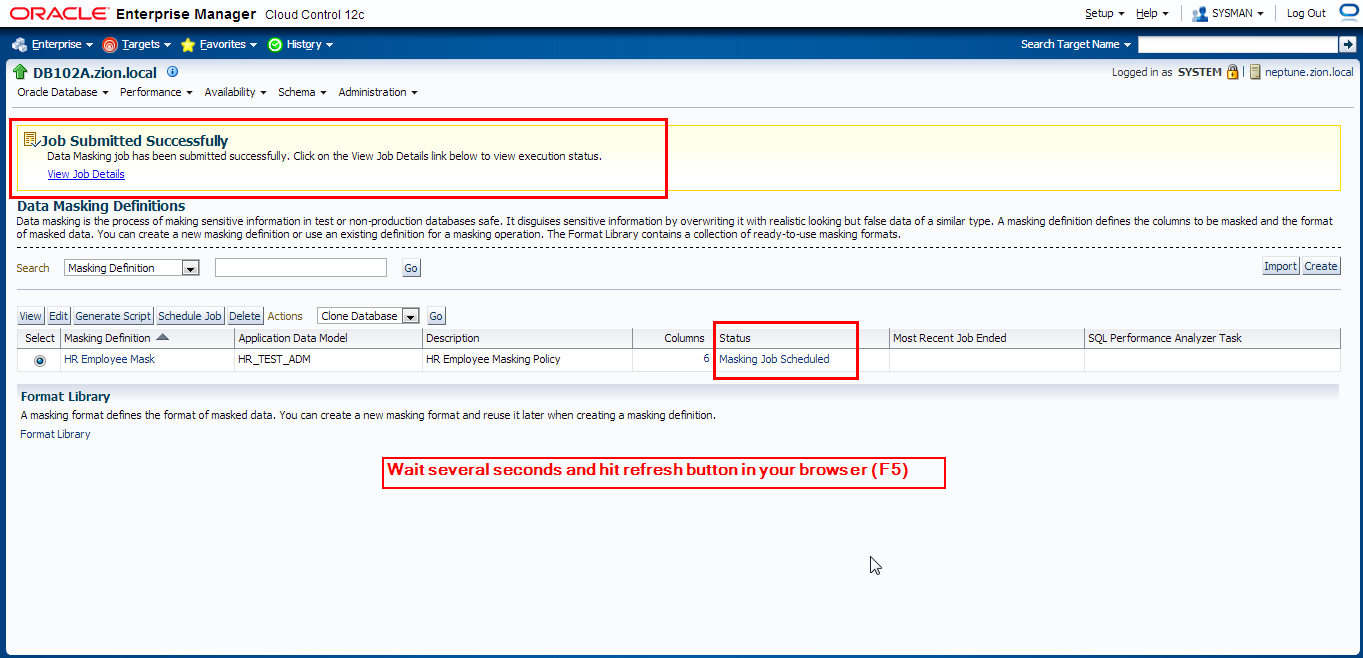
 Let’s generate masking script and schedule a job to perform data masking operation
Navigate to Enterprise -> Quality Management -> Data Masking Definitions


Querying Masked Data
Now view the data in the HR_TEST.EMPLOYEES table that was masked and compare the results with the unmasked data. Sort by EMAIL or MANAGER_ID (ASC) – user with manager_id = NULL supposed to be Mr King. Also note that FULL_NAME column has been updated according to child columns.
Data Masking examples: Post Mask Script
Masking fields which are concatenation of various columns from various tables:
Unfortunately “SQL Expression” function works only within one table area. In order to mask field that contains data from multiple columns from multiple tables across the schema we could include update/merge statements into “Post Mask Script” in data masking definition.
Test scenario
Field TABLE1.ADDRESS contains data from multiple sources and relation key is TABLE1.ADDR_ID and TABLE2.ROW_ID:
TABLE1.ADDRESS = TABLE2.STREET_NAME || TABLE2.HOUSE_NR || TABLE2.ZIPCODE || TABLE1.CITY
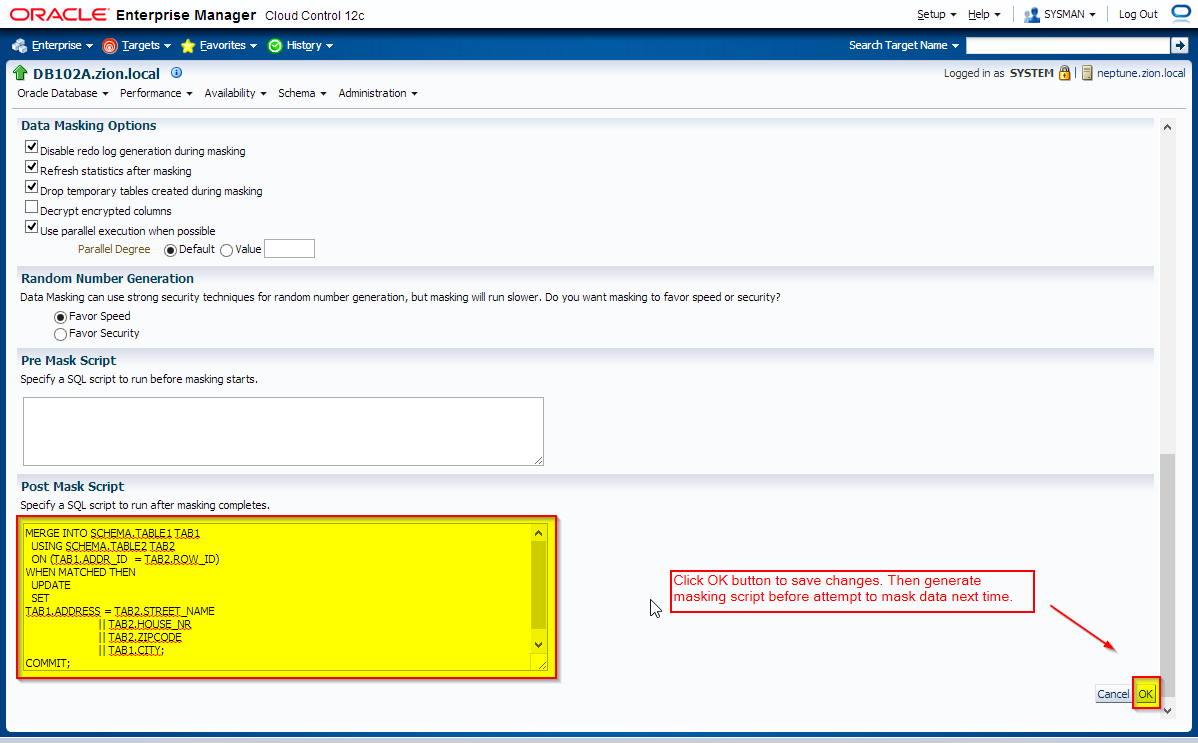
Create the following merge statement and add it to Post Mask Script section in advanced option screen of data masking definition.
MERGE INTO SCHEMA.TABLE1 TAB1
  USING SCHEMA.TABLE2 TAB2
  ON (TAB1.ADDR_ID  = TAB2.ROW_ID)
WHEN MATCHED THEN
  UPDATE
  SET
TAB1.ADDRESS = TAB2.STREET_NAME
            || TAB2.HOUSE_NR
            || TAB2.ZIPCODE
            || TAB1.CITY;
COMMIT;
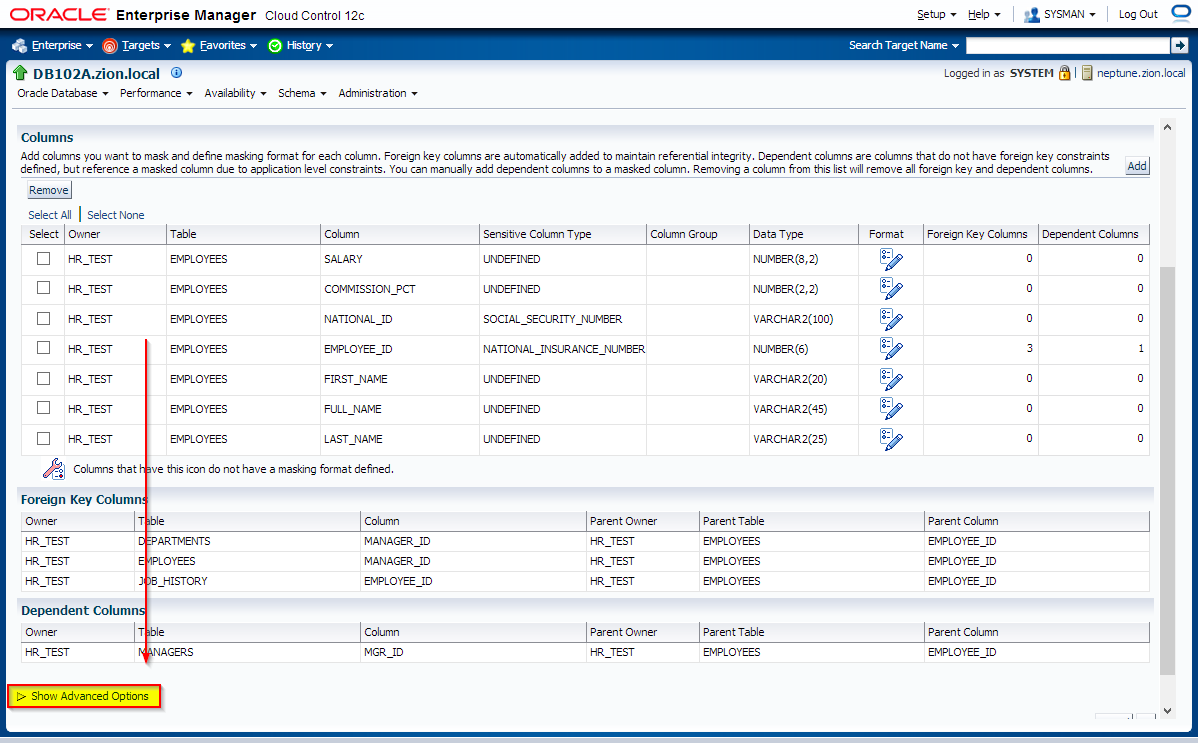
Navigate to Enterprise -> Quality Management -> Data Masking Definitions
Edit data masking definition HR Employee Mask, scroll down and click on “Show Advanced Options”, provide post mask script and save changes.
Removing Objects Created During this Tutorial
1. Return to your SQL*Plus window. Drop database schema (connect as SYSTEM or SYSDBA):
[oracle@/tmp/datamask]$ sqlplus / as sysdba
...
SQL> DROP USER HR_TEST CASCADE;
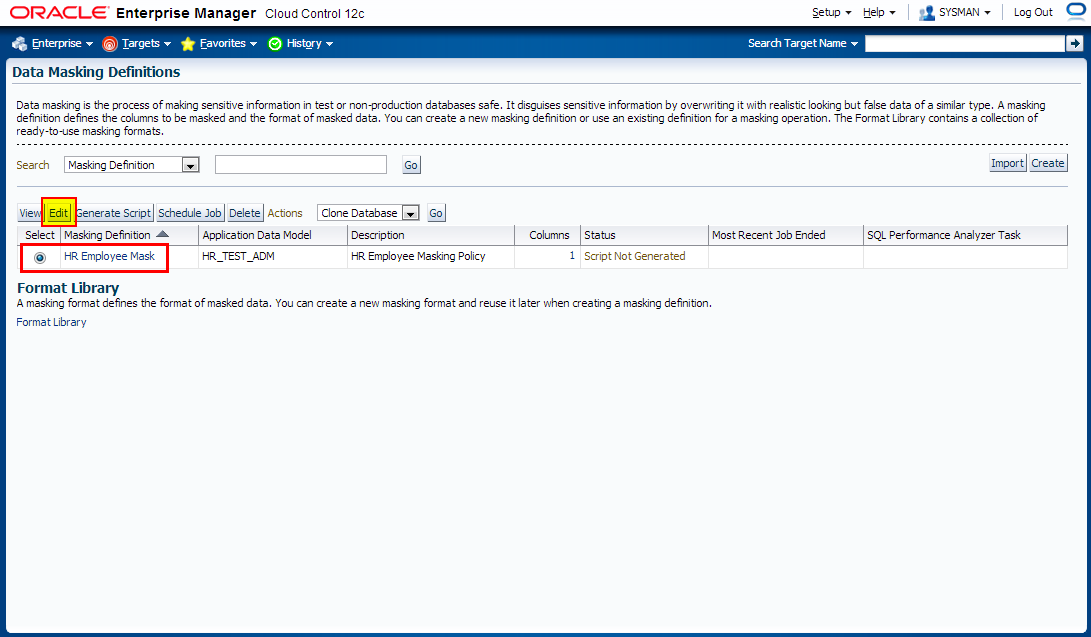
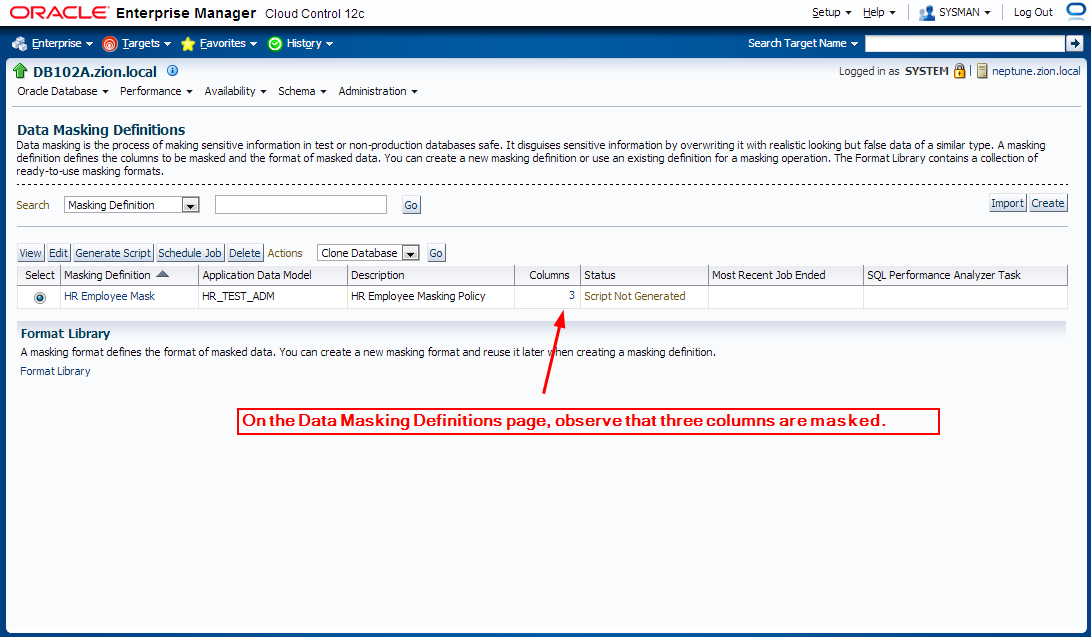
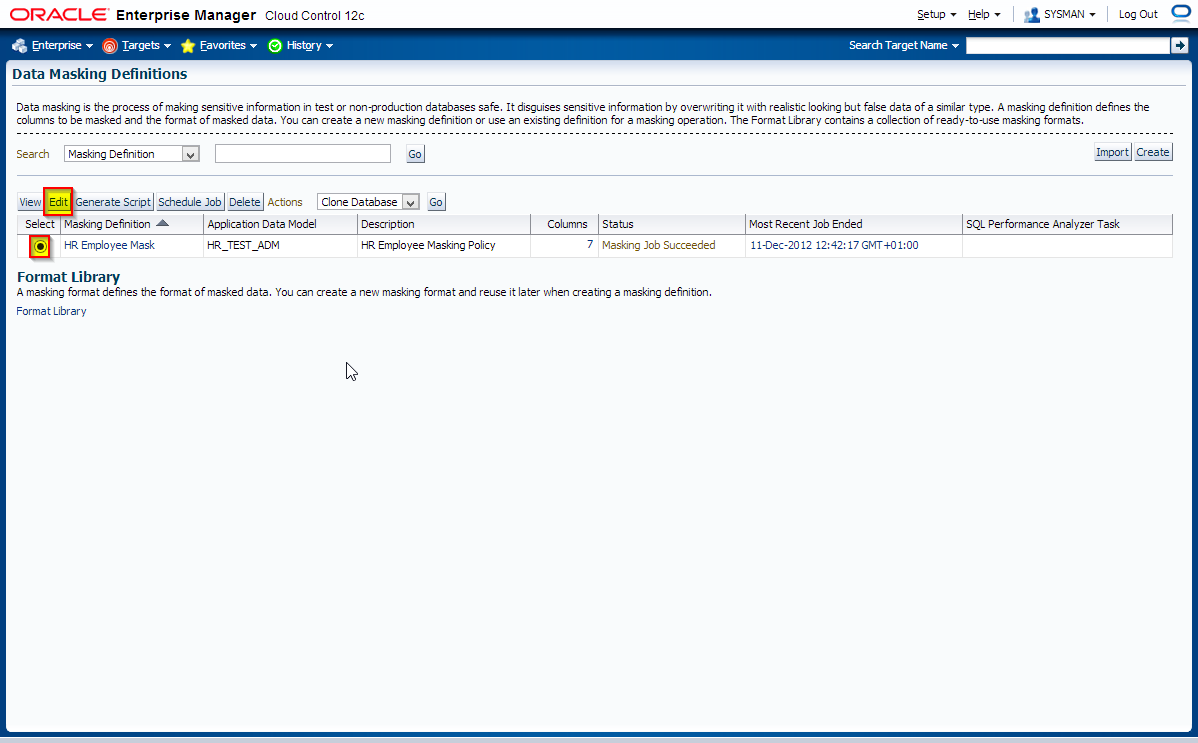
2. Login to Enterprise Manager 12c. Navigate to Enterprise -> Quality Management -> Data Masking Definitions
3. On the Data Masking Definitions page, select the HR Employee Mask and click Delete button.
4. Navigate to Enterprise -> Quality Management -> Data Discovery and Modelling
5. On the Application Data Models page, select the HR_TEST_ADM and click Delete button.
Note that you won’t be able to delete any of ADMs if they still contains dependent data masking definitions.
Delete the dependent objects first, then delete the application data model.
EDIT: You may be also interested with Oracle Data Redaction.
That’s all folks! Please leave your comments!
Oracle reference document can be found here (URL updated 17/02/2015)